Brane: The User Guide
This book is still in development. Everything is currently subject to change.
Welcome to the user guide for the Brane infrastructure!
In this book, we document and outline how to use Brane, a programmable application orchestration framework, from a user perspective.
If you want to know more about Brane before you begin, checkout the overview chapter. Otherwise, we recommend you to read the Before you read chapter. It explains how this book is structured, and also goes through some need-to-know terminology.
Attribution
The icons used in this book (![]() ,
, ![]() ,
, ![]() ) are provided by Flaticon.
) are provided by Flaticon.
Overview
In this chapter, we will provide a brief overview of what the framework is, how it is build and what kind of features it supports.
It is not, however, a complete, technical description of its implementation; for that, we recommend you read our other book.
Brane: Programmable Orchestration of Applications and Networking
Regardless of the context and rationale, running distributed applications on geographically dispersed IT resources often comes with various technical and organizational challenges. If not addressed appropriately, these challenges may impede development, and in turn, scientific and business innovation. We have designed and developed Brane to support implementers in addressing these challenges. Brane makes use of containerization to encapsulate functionalities as portable building blocks. Through programmability, application orchestration can be expressed using intuitive domain-specific languages. As a result, end-users with limited or no programming experience are empowered to compose applications by themselves, without having to deal with the underlying technical details.
In context of the EPI project, Brane is extended to orchestrate data distribution as well. Because the project concerns itself with health data, this orchestration does not just include distributing the data, but also policing access and making sure that applications adhere to both global and local data access policies. The same applies to the network orchestration of Brane; here, too, we have to make sure that secure and policy-appliant networking between different sites is possible and automated by Brane.
The framework in a nutshell
Concretely, the Brane framework is primarily designed to take an application in the form of a workflow and perform the work specified in it over multiple nodes spread over multiple domains, to which we refer as compute sites. This basic idea is shown in figure 1.
 Figure 1: Schematic showing the abstraction Brane provides over multiple domains / compute sites. The framework orchestrates over multiple sites, where each sites orchestrates over its own nodes. Together, this allows the user to utilize the work of all compute sites together as if they were one.
An important design feature of Brane is that it tries to be intuitive in use for different roles that users have when developing a workflow. We identify three: system engineers, who build and manage the compute sites; software engineers, who implement compute steps or algorithms; and scientists, who use the algorithms to write workflows that implement their research.
Since Brane's intergration into the EPI project, there is also a fourth role: that of policy makers, who define and write the policies that are related to data handling.
Finally, there is also a fifth, "hidden" role: the Brane administrators, who manage the framework itself.
This separation of concerns means that the framework provides different levels of abstraction to interact with it, where each of these levels are designed to be familiar to the users who will use it.
For system engineers, the framework hosts a number of tools and configuration files that allow them to setup and specify their infrastructures; software engineers can write software in any language they like, and then package that using a script-like domain-specific language (BraneScript); policy makers can define the policies in an already existing reasoner language called eFLINT; and for scientists, the framework provides a natural language-like domain-specific language to write the workflows (Bakery), so their work is easily shareable with scientists who do not have extensive Brane knowledge.
Before you read
As discussed in the overview chapter, the Brane framework is aimed at different kind of users, each of them with their own role within the framework. This split of the framework in terms of roles is referred to as the separation of concerns.
The four roles that this book focusses on are:
- system engineers, who are in charge of one of the compute sites that Brane abstracts over. They have to prepare their site for the framework and discuss its integration with the infrastructure managers.
- software engineers, who write the majority of the software used in the Brane framework. This software will be distributed in the form of packages.
- policy makers, who define and write the policies that are relevant to the framework. These are both data-level policies, which describe who can access what data and how; and network-level policies, which describe where the data can be send on the infrastructure and what kind of security measures are needed when that happens.
- scientists, who orchestrate different packages into a workflow, which eventually implements the computation needed for their research.
To this end, the book itself is split into four groups of chapters, one for each of the roles in the separation of concerns.
Terminology
Before you can begin, there is also some extra terminology that will be used throughout this book and that is useful to know here.
The Brane instance
Looked at from the highest level of abstraction, Brane has a client part (in the form of a command-line tool or a Jupyter notebook) and a server part. The first is referred to as a Brane client, while the latter is referred to as the Brane instance.
Where next
To continue reading, we suggest you start at the first chapter for your role. You can select it in the sidebar to the left.
If you are part of the fifth, "hidden" role (the Brane administrators), you have your own book; we recommend you continue there. It also details how to obtain, compile and run the framework for testing purposes.
Introduction
In this series of chapters, we will discuss the role of system administrators and how they may prepare their system for Brane. The chapters will talk about what the requirements are on their system and what kind of information they are expected to share with the Brane instance. Finally, we will also discuss defining datasets.
To know more about the inner workings of Brane, we recommend you checkout the Brane: A Specification book. That details the framework's inner workings.
Background & Terminology
The Brane instance defines a control node (or central node), which is where the orchestrator itself and associated services run. This node is run by the Brane administrators. Then, as a counterpart to this control node, there is the worker plane, which is composed of all the different compute sites that Brane orchestrates over. Each such compute site is referred to as a domain, a location or, since Brane treats them as a single entity, a worker node. Multiple worker nodes may exist per physical domain (e.g., a single hospital can have multiple domains for different tasks), but Brane will treat these as conceptually different places.
Within the framework, a system administrator is someone who acts as the 'technical owner' of a certain worker node. They are the ones who can make sure their system is prepared and meets the Brane requirements, and who defines the security requirements of any operation of the framework on their system. They are also the ones who make any data technically available that is published from their domain. And although policies are typically handled by policy writers, another role in the framework, in practise, this can be the same person as the system administrator.
The Central node
For every Brane instance, there is typically only one control node. Even if multiple VMs are used, the framework expects it to behave like a single node; this is due to the centralized nature of it.
The control node consists of the following few services:
- The driver service is, as the name suggests, the driving service behing a control node. It takes incoming workflows submitted by scientists, and starts executing them, emitting jobs that need to be executed on the worker nodes.
- The planner service takes incoming workflows submitted to the driver service and plans them. This is simply the act of defining which worker node will execute which task, and takes into account available resources on each of the domains, as well as policies that determine if a domain can actually transfer data or execute the job.
- The registry service (sometimes called central registry service or API service for disambiguation) is the centralized version of the local registry services (see below). It acts as a centralized database for the framework, which provides information about which dataset is located where, which domains are participating and where to find them1, and in addition hosts a central package repository.
- Finally, the proxy service acts as a gateway between the other services and the outside world to enable proxying (i.e., it does not accept proxied requests, but rather creates them). In addition, it is also the point that handles server certificates and parses client certificates for identifications.
For more details, check the specification.
Note that, if you need any compute to happen on the central node, this cannot be done through the central node itself; instead, setup a worker node alongside the central node to emulate the same behaviour.
The Worker node
As specified, a domain typically hosts a worker node. This worker node collectively describes both a local control part of the framework, referred to as the framework delegate, and some computing backend that actually executes the jobs. In this section, we provide a brief overview of both.
The delegate itself consists of a few services. Their exact working is detailled in the specification, but as a brief overview:
- The delegate service is the main service on the delegate, and takes incoming job requests and will attempt to schedule them. This is also the service that directly connects to the compute backend (see below). You can think of it as a local driver service.
- The registry service (sometimes called local registry service for disambiguation) keeps track of the locally available datasets and intermediate results (see the data tutorial for Software Engineers or the data tutorial for Scientists for more information) and acts as a point from where the rest of the framework downloads them.
- The checker service acts as the Policy Enforcement Point (PEP) for the framework. It hosts a reasoner, typically eFLINT, and is queried by both the delegate and registry services to see if operations are allowed.
- Finally, the local node also has proxy service, just like the central node.
As for the compute backend, Brane is designed to connect to different types. An overview:
- A local backend schedules new jobs on the same Docker engine where the control plane of Brane runs. This is the simplest infrastructure of them all, and requires no other preparation than required when installing the control plane. This is typically the choice of backend when the worker node is running on a single server or VM.
- A Kubernetes backend connects to a Kubernetes cluster on which incoming jobs are hosted. This is the recommended large-scale compute option if you need large amounts of compute power, since Kubernetes is designed to natively work with containers.
More information on each backend and how to set it up is discussed in the backends chapter(s).
Next
To start setting up your own worker node, we recommend checking out the installation chapters. These will walk you through everything you need to setup a node, both control nodes and worker nodes.
For information on setting up different backends, check the backend chapters.
Alternatively, if you are looking for extensive documentation on the Brane configuration files relevant to a worker node, checkout the documentation chapters.
Introduction
In these chapters, we will walk you through installing a node in the Brane instance.
There are three types of nodes: a central node (or control node), a worker node and a proxy node (see the generic introduction chapter for more information). These series of chapters will discuss how to install both of them.
First, for any kind of node, you should start by downloading the dependencies on the VM where your worker node will run. Then, install the branectl executable, which will help you in setting up and managing your node.
You can then go into the specifics for each kind of node. You can either setup a control node, worker node or a proxy node.
Dependencies
The first step to install any piece of software is to install its dependencies.
The next section will discuss the runtime dependencies. If you plan to compile the framework instead of downloading the prebuilt executables, you must install both the dependencies in the Runtime dependencies- and Compilation dependencies sections.
Runtime dependencies
In all Brane node types, the Brane services are implemented as containers, which means that the number of runtime dependencies is relatively few.
However, the following dependencies are required:
- You have to install Docker to run the container services. To install, follow one of the following links: Ubuntu, Debian, Arch Linux or macOS (note the difference between Ubuntu and Debian; they use different keys and repositories).
-
If you are running Docker on Linux, it is extremely convenient to set it up such that no root is required:
sudo usermod -aG docker "$USER" Don't forget to log in and -out again after running the above command to make the new changes effective. This effectively gives power to all non-root users that are part of the
 docker-group to modify any file as if they had root access. Be careful who you include in this group.
-
- Install the BuildKit plugin for Docker:
If these instructions don't work for you, you can also check the plugin's repository README for more installation methods.# Clone the repo, CD into it and install the plugin # NOTE: You will need to install 'make' # (check https://github.com/docker/buildx for alternative methods if that fails) git clone https://github.com/docker/buildx.git && cd buildx make install # Set the plugin as the default builder docker buildx install # Switch to the buildx driver docker buildx create --use Docker Buildx is included by default in most distributions of Docker noawadays. You can just run the
 docker buildx installanddocker buildx create --usefunctions first, and if they work, skip the top ones. - Install OpenSSL for the
branectlexecutable:- Ubuntu / Debian:
sudo apt-get install openssl - Arch Linux:
sudo pacman -Syu openssl - macOS:
# We assume you installed Homebrew (https://brew.sh/)
brew install openssl
- Ubuntu / Debian:
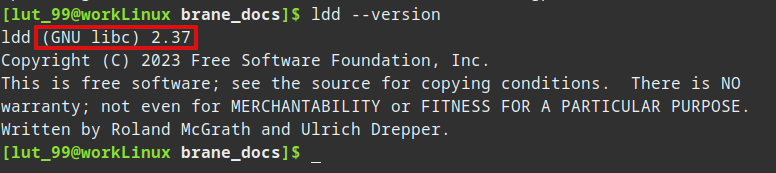
Aside from that, you have to make sure that your system can run executables compiled against GLIBC 2.27 or higher. You can verify this by running:
ldd --version
The top line of the rest will show you the GLIBC version installed on your machine:
If you do not meet this requirement, you will have to compile branectl (and any other non-containerized binaries) yourself on a machine with that version of GLIBC installed or lower. In that case, also install the compilation dependencies.
Next
Congratulations, you have prepared your machine for running (or compiling) a Brane instance! In the next chapter, we will discuss installing the invaluable node management tool branectl. After that, depending on which node you want to setup, you can follow the guide for installing control nodes or worker nodes.
branectl
Your best friend for managing a Brane node is the Brane server Command-Line Tool, or branectl (do not confuse with the user tool, brane or the Brane CLI).
This chapter concerns itself with installing branectl itself. Make sure that you have followed the previous chapter to install the necessary dependencies before you begin.
Precompiled binary
In most cases, it's the easiest to download the precompiled binary from the GitHub repository.
To download it, you can simply go to the repository (https://github.com/epi-project/brane) and navigate to 'tags'. From there, you can select your desired release and choose it from among the list. Alternatively, you can also go to the latest release by clicking this link: https://github.com/epi-project/brane/releases/latest.
branectlwas only introduced in version 1.0.0, so any version before that will not have a downloadablebranectlexecutable (or any compatible one, for that matter).
Once downloaded, it's highly recommended to move the executable to a location in your PATH (for example, /usr/local/bin). You can do so by running:
sudo mv ./branectl /usr/local/bin/branectl
if you are in the folder where you downloaded the tool.
Alternatively, you can also download the latest version using curl from the command-line:
# For Linux (x86-64)
sudo curl -Lo /usr/local/bin/branectl https://github.com/epi-project/brane/releases/latest/download/branectl-linux-x86_64

# For macOS (Intel)
sudo curl -Lo /usr/local/bin/branectl https://github.com/epi-project/brane/releases/latest/download/branectl-darwin-x86_64

# For macOS (M1/M2)
sudo curl -Lo /usr/local/bin/branectl https://github.com/epi-project/brane/releases/latest/download/branectl-darwin-aarch64
Don't forget to make the executable runnable:
sudo chmod +x /usr/local/bin/branectl
Compile it yourself
Sometimes, though, the executable provided on the repository doesn't suit your needs. This is typically the case if you need a cutting-edge version that isn't released, you have an uncommon OS or processor architecture or an incompatible GLIBC version.
To compile the binary, refer to the compilation instructions over at the Brane: A Specification-book for instructions.
Next
If you can now run branectl --help without errors, congratulations! You have successfully installed the management tool for the Brane instance.
You can now choose what kind of node to install. To install a central node, go to the next chapter; go to the chapter after that to install a worker node; or go the the final chapter to setup a proxy node.
Control node
Before you follow the steps in this chapter, we assume you have installed the required dependencies and installed branectl, as discussed in the previous two chapters.
If you did, then you are ready to install the control node. This chapter will explain you how to do that.
Obtaining images
Just as with branectl itself, there are two ways of obtaining the Docker images and related resources: downloading them from the repository or compiling them. Note, however, that multiple files should be downloaded; and to aid with this, the branectl executable can be used to automate the downloading process for you.
branectlto make the process easy for you.
Downloading prebuilt images
The recommended way to download the Brane images is to use branectl. These will download the images to .tar files, which can be send around at your leisure; and, if you will be deploying the framework on a device where internet is limited or restricted, you can also use it to download Brane's auxillary images (ScyllaDB).
Run the following command to download the Brane services themselves:
# Download the images
branectl download services central -f
And to download the auxillary images (run in addition to the previous command):
branectl download services auxillary -f
(the -f will automatically create missing directories for the target output path)
Once these complete successfully, you should have the images for the control node in the directory target/release. While this path may be changed, it is recommended to stick to the default to make the commands in subsequent sections easier.
branectlwill download the version for which it was compiled. However, you can change this with the--versionoption:# You should change this on all download commands branectl download services central --version 1.0.0Note, however, that not every Brane version may have the same services or the same method of downloading, and so this option may fail. Download the
branectlfor the desired version instead for a more reliable experience.
Compiling the images
The other way to obtain the images is to compile them yourself. If you want to do so, refer to the compilation instructions over at the Brane: A Specification-book for instructions.
Generating configuration
Once you have downloaded the images, it is time to setup the configuration files for the node. These files determine the type of node, as well as any of the node's properties and network specifications.
For a control node, this means generating the following files:
- An infrastructure file (
infra.yml), which will determine the worker nodes available in the instance; - A proxy file (
proxy.yml), which describes if any proxying should occur and how; and - A node file (
node.yml), which will contain the node-specific configuration like service names, ports, file locations, etc.
All of these can be generated with branectl for convenience.
First, we generate the infra.yml file. This can be done using the following command:
branectl generate infra <ID>:<ADDR> ...
Here, multiple <ID>:<ADDR> pairs can be given, one per worker node that is available to the instance. In such a pair, the <ID> is the location ID of that domain (which must be the same as indicated in that node; see the chapter for setting up worker nodes), and the <ADDR> is the address (IP or hostname) where that domain is available.
For example, suppose that we want to instantiate a central node for a Brane instance with two worker nodes: one called amy, at amy-worker-node.com, and one called bob, at 192.0.2.2. We would generate an infra.yml as follows:
branectl generate infra -f -p ./config/infra.yml amy:amy-worker-node.com bob:192.0.2.2
Running this command will generate the file ./config/infra.yml for you, with default settings for each domain. If you want to change these, you can simply use more options and flags in the tool itself (see the branectl documentation or the builtin branectl generate infra --help), or change the file manually (see the infra.yml documentation).
-fflag (fix missing directories) and the-poption (path of generated file) are not required, you will typically use these to make your life easier down the road. See thebranectl generate nodecommand below to find out why.
Next, we will generate the proxy.yml file. Typically, this configuration can be left to the default settings, and so the following command will do the trick in most situations:
branectl generate proxy -f -p ./config/proxy.yml
A proxy.yml file should be available in ./config/proxy.yml after running this command.
The contents of this file will typically only differ if you have advanced networking requirements. If so, consult the branectl documentation or the builtin branectl generate proxy --help, or the proxy.yml documentation.
Then we will generate the final file, the node.yml file. This file is done last, because it itself defines where the BRANE software may find any of the other configuration files.
When generating this file, it is possible to manually specify where to find each of those files. However, in practise, it is more convenient to make sure that the files are at the default locations that the tools expects. The following tree structure displays the default locations for the configuration of a central node:
<current dir>
├ config
│ ├ certs
│ │ └ <domain certs>
│ ├ infra.yml
│ └ proxy.yml
└ node.yml
The config/certs directory will be used to store the certificates for each of the domains; we will do that in the following section.
Assuming that you have the files stored as above, the following command can be used to create a node.yml for a central node:
branectl generate node -f central <HOSTNAME>
Here, <HOSTNAME> is the address where any worker node may reach the central node. Only the hostname will suffice (e.g., some-domain.com), but any scheme or path you supply will be automatically stripped away.
The -f flag will make sure that any of the missing directories (e.g., config/certs) will be generated automatically.
Once again, you can change many of the properties in the node.yml file by specifying additional command-line options (see the branectl documentation or the builtin branectl generate node --help) or by changing the file manually (see the node.yml documentation).
-Hoption is provided; it can be used to specify a certain hostname/IP mapping for this node only. Example:# We can address '192.0.2.2' with 'bob-domain' now branectl generate node -f -H bob-domain:192.0.2.2 central central-domain.comNote that this is local to this domain only; you have to specify this on other nodes as well. For more information, see the
node.ymldocumentation.
Adding certificates
Before the framework can be fully used, the central node will need the public certificates of the worker nodes to be able to verify their identity during connection. Since we assume Brane may be running in a decentralized and shielded environment, the easiest is to add the domain's certificates to the config/certs directory.
To do so, obtain the public certificate of each of the workers in your instance. Then, navigate to the config/certs directory (or wherever you pointed it to in node.yml), and do the following for each certificate:
- Create a directory with that domain's name (for the example above, you would create a directory named
amyfor that domain) - Move the certificate to that folder and call it
ca.pem.
At runtime, the Brane services will look for the peer domain's identity by looking up the folder with their name in it. Thus, make sure that every worker in your system has a name that you filesystem can represent.
Launching the instance
Finally, now that you have the images and the configuration files, it's time to start the instance.
We assume that you have installed your images to target/release. If you have built your images in development mode, however, they will be in target/debug; see the box below for the command then.
This can be done with one branectl command:
branectl start central
This will launch the services in the local Docker daemon, which completes the setup!
./target/release) and for thenode.ymlfile (./node.yml). If you use non-default locations, however, you can use the following flags:
- Use
-nor--nodeto specify another location for thenode.ymlfile:It will define the rest of the configuration locations.branectl -n <PATH TO NODE YML> start central- If you have installed all images to another folder than
./target/release(e.g.,./target/debug), you can use the quick option--image-dirto change the folders. Specifically:branectl start --image-dir "./target/debug" central- If you want to use pre-downloaded image for the auxillary services (
aux-scylla) that are in the same folder as the one indicated by--image-dir, you can specify--local-auxto use the folder version instead:branectl start central --local-aux- You can also specify the location of each image individually. To see how, refer to the
branectldocumentation or the builtinbranectl start --help.
docker psshows all Brane containers running (in particular thebrane-apiservice will crash until the Scylla service is done). You can usewatch docker psif you don't want to re-call the command yourself.
Next
Congratulations, you have configured and setup a Brane control node!
Depending on which domains you are in charge of, you may also have to setup one or more worker nodes or proxy nodes. Note, though, that these are written to be used on their own, so parts of it overlap with this chapter.
Otherwise, you can move on to other work! If you want to test your instance like a normal user, you can go to the documentation for Software Engineers or Scientists.
Worker node
Before you follow the steps in this chapter, we assume you have installed the required dependencies and installed branectl, as discussed in the previous two chapters.
If you did, then you are ready to install a worker node. This chapter will explain you how to do that.
Obtaining images
Just as with branectl itself, there are two ways of obtaining the Docker images: downloading them from the repository or compiling them. Note, however, that multiple files should be downloaded; and to aid with this, the branectl executable can be used to automate the downloading process for you.
branectlto make the process easy for you.
Downloading prebuilt images
The recommended way to download the Brane images is to use branectl. These will download the images to .tar files, which can be send around at your leisure.
Run the following command to download the Brane service images for a worker node:
# Download the images
branectl download services worker -f
(the -f will automatically create missing directories for the target output path)
Once these complete successfully, you should have the images for the worker node in the directory target/release. While this path may be changed, it is recommended to stick to the default to make the commands in subsequent sections easier.
branectlwill download the version for which it was compiled. However, you can change this with the--versionoption:branectl download services worker -f --version 1.0.0Note, however, that not every Brane version may have the same services or the same method of downloading, and so this option may fail. Download the
branectlfor the desired version instead for a more reliable experience.
Compiling the images
The other way to obtain the images is to compile them yourself. If you want to do so, refer to the compilation instructions over at the Brane: A Specification-book for instructions.
Generating configuration
Once you have downloaded the images, it is time to setup the configuration files for the node. These files determine the type of node, as well as any of the node's properties and network specifications.
For a worker node, this means generating the following files:
- A backend file (
backend.yml), which will define how the worker node connects to which backend that will actually execute the tasks; - A proxy file (
proxy.yml), which describes if any proxying should occur and how; - A policy secret for the deliberation API (
policy_deliberation_secret.json), which contains the private key for accessing the Brane-side ofbrane-chk; - A policy secret for the policy expert API (
policy_expert_secret.json), which contains the private key for accessing the management-side ofbrane-chk; - A policy database (
polocies.db), which is the persistent storage forbrane-chk's policies; and - A node file (
node.yml), which will contain the node-specific configuration like service names, ports, file locations, etc.
All of these can be generated with branectl for convenience.
We will first generate a backend.yml file. This will define how the worker node can connect to the infrastructure that will actually execute incoming containers. Multiple backend types are possible (see the series of chapters on it), but by default, the configuration assumes that work will be executed on the local machine's Docker daemon.
Thus, to generate such a backend.yml file, you can use the following command:
branectl generate backend -f -p ./config/backend.yml local
Running this command will generate the file ./config/backend.yml for you, with default settings for how to connect to the local daemon. If you want to change these, you can simply use more options and flags in the tool itself (see the branectl documentation or the builtin branectl generate backend --help), or change the file manually (see the backend.yml documentation).
-fflag (--fix-dirs, fix missing directories) and the-poption (--path, path of generated file) are not required, you will typically use these to make your life easier down the road. See thebranectl generate nodecommand below to find out why.
Next up is the proxy.yml file. Typically, these can be left to the default settings, and so the following command will do the trick in most situations:
branectl generate proxy -f -p ./config/proxy.yml
A proxy.yml file should be available in ./config/proxy.yml after running this command.
The contents of this file will typically only differ if you have advanced networking requirements. If so, consult the branectl documentation or the builtin branectl generate proxy --help, or the proxy.yml documentation.
Next, we will generate the policy keys. To do so, run the following two commands:
branectl generate policy_secret -f -p ./config/policy_deliberation_secret.json
branectl generate policy_secret -f -p ./config/policy_expert_secret.json
The default settings should suffice. If not, check branectl generate policy_secret --help for more information.
Then, we will generate the policy database. This is not a configuration file, but does need to be bootstrapped and explicitly passed to the node's brane-chk service. To generate it, run:
branectl generate policy_db -f -p ./policies.db
Finally, we will generate the node.yml file. This file is done last, because it itself defines where BRANE software may find any of the others.
When generating this file, it is possible to manually specify where to find each of those files. However, in practise, it is more convenient to make sure that the files are at the default locations that the tools expects. The following tree structure displays the default locations for the configuration of a worker node:
<current dir>
├ config
│ ├ certs
│ │ └ <domain certs>
│ ├ backend.yml
│ ├ policy_deliberation_secret.yml
│ ├ policy_expert_secret.yml
│ └ proxy.yml
├ policies.db
└ node.yml
The config/certs directory will be used to store the certificates for this worker node and any node it wants to download data from. We will do that in the following section.
Assuming that you have the other configuration files stored at their default locations, the following command can be used to create a node.yml for a worker node:
branectl generate node -f worker <HOSTNAME> <LOCATION_ID>
Here, the <HOSTNAME> is the address where any worker node may reach the central node. Only the hostname will suffice (e.g., some-domain.com), but any scheme or path you supply will be automatically stripped away. Then, the <LOCATION_ID> is the identifier that the system will use for your location. Accordingly, it must be unique in the instance, and you must choose the same one as defined in the central node of the instance.
The -f flag will make sure that any of the missing directories (e.g., config/certs) will be generated automatically.
For example, we can generate a node.yml file for a worker with the identifier bob:
branectl generate node -f worker 192.0.2.2 bob
Once again, you can change many of the properties in the node.yml file by specifying additional command-line options (see the branectl documentation or the builtin branectl generate node --help) or by changing the file manually (see the node.yml documentation).
-Hoption is provided; it can be used to specify a certain hostname/IP mapping for this node only. Example:# We can address '192.0.2.2' with 'some-domain' now branectl generate node -f -H some-domain:192.0.2.2 worker bob-domain.com bobNote that this is local to this domain only; you have to specify this on other nodes as well. For more information, see the
node.ymldocumentation.
Generating certificates
In contrast to setting up a control node, a worker node will have to strongly identify itself to prove to other worker nodes who it is. This is relevant, because worker nodes may want to download data from one another; and if this dataset is private, then the other domains likely won't share it unless they know who they are talking to.
In Brane, the identity of domains is proven by the use of X.509 certificates. Thus, before you can start your worker node, we will have to generate some certificates.
Server-side certificates
Every worker node is required to have at least a certificate authority (CA) certificate and a server certificate. The first is used as the "authority" of the domain, which is used to sign other certificates such that the worker can see that it has been signed by itself in the past. The latter, in contrast, is used to provide the identity of the worker in case it plays the role of a server (some other domain connects to us and requests a dataset).
Once again, we can use the power of branectl to generate both of these certificates for us. Use the following command to generate both a certificate autority and server certificate:
branectl generate certs -f -p ./config/certs server <LOCATION_ID> -H <HOSTNAME>
where <LOCATION_ID> is the identifier of the worker node (the one configured in the node.yml file), and <HOSTNAME> is the hostname that other domains can connect to this domain to.
You can omit the -H <HOSTNAME> flag to default the hostname to be the same as the <LOCATION_ID>. This is useful where you've given manual host mappings when generating the node.yml file (i.e., the -H option there).
For example, to generate certificates for the domain amy that lives at amy-worker-node.com:
branectl generate certs -f -p ./config/certs server amy -H amy-worker-node.com
This should generate multiple files in the ./config/certs directory, chief of which are ca.pem and server.pem.
branectl. The checksum of the downloaded file is asserted, and if you ever see a checksum-related error, then you might be dealing with a fake binary that is being downloaded under a real address. In that case, tread with care.
When the certificates are generated, be sure to share ca.pem with the central node. If you are also adminstrating that node, see here for instructions on what to do with it.
Client-side certificates
The previous certificates only authenticate a server to a client; not the other way around. That is where the client certificates come into play.
The power of client certificates come from the fact that they are signed using the certificate authority of the domain to which they want to authenticate. In other words, the domain has to "approve" that a certain user exists by creating a certificate for them, and then sending it over.
Note, however, that currently, Brane does not use any hostnames or IPs embedded in the client certificate. This means that anyone with the client certificate can obtain access to the domain as if they were the user for which it was issued. Treat the certificates with care, and be sure that the client is also careful with the certificate.
To generate a client certificate, its easiest to navigate to the ./config/certs directory where you generate the server certificates. Then, you can run:
branectl generate certs client <LOCATION_ID> -H <HOSTNAME> -f -p ./client-certs
Note, that the <LOCATION_ID> is now the ID of the worker for which you are generating the certificate, and <HOSTNAME> is their address. Similarly to server certificates, you can omit -H <HOSTNAME> to default to the <LOCATION_ID>.
-fand-poptions. These are optional, and work together to redirect the output of the commands to a nested folder calledclient-certs. This is however very recommendable, since running this command without that flag in the server certificates folder will accidentally clear theca.pemfile, rendering the rest of the certificates useless.
For example, contuining the example in the previous subsection, we now generate a client certificate for bob at bobs-emporium.com:
branectl generate certs client bob -H 192.0.2.2
Once the client certificates are generated, you can share the ca.pem and client-id.pem files with the client who intends to connect to this node.
Adding client certificates of other domains
If your worker node needs to download data from other worker nodes, you will have to add the client certificates they generated to your configuration.
The procedure to do so is identical as for central nodes. For every pair of a ca.pem and client-id.pem certificates you want to:
- Create a directory with that domain's name in the
certsdirectory (for the example, you would create a directory namedcerts/amyfor a domain namedamy) - Move the certificates to that folder.
At runtime, whenever your worker node will need to download a dataset from another worker, it will read the certificates in that worker's folder if they exist to authenticate itself.
Writing policies
Before you launch the instance, you may want to change the node's policy. If not, then the default policy kicks in; which is deny all.
To change which policies are active, the policy experts needs access tokens to authorize themselves. You can generate these by running:
branectl generate policy_token <INITIATOR> <SYSTEM> <DURATION> -s <PATH_TO_SECRET>
where:
<INITIATOR>is the name of the policy expert (or some other identifier);<SYSTEM>is some identifier for the system that acts on their behalf. Typically, this would be the identifier of the domain they are working for.<DURATION>is the duration for which the token is valid. You should give it as numbers, withsfor seconds,mfor minutes,dfor days oryfor years (e.g.,31d).<PATH_TO_SECRET>is the path to the relevant policy secret you generated earlier.
Note that the command writes the token to ./policy_token.json, unless you change the path with -p. You can then share this token with the policy expert.
More information to manage policies can be found in the policy expert's documentation.
Launching the instance
Finally, now that you have the images and the configuration files, it's time to start the instance.
We assume that you have installed your images to target/release. If you have built your images in development mode, however, they will be in target/debug; see the box below for the command then.
This can be done with one branectl command:
branectl start worker
This will launch the services in the local Docker daemon, which completes the setup!
./target/release) and for thenode.ymlfile (./node.yml). If you use non-default locations, however, you can use the following flags:
- Use
-nor--nodeto specify another location for thenode.ymlfile:It will define the rest of the configuration locations.branectl -n <PATH TO NODE YML> start worker- If you have installed all images to another folder than
./target/release(e.g.,./target/debug), you can use the quick option--image-dirto change the folders. Specifically:branectl start --image-dir "./target/debug" worker- You can also specify the location of each image individually. To see how, refer to the
branectldocumentation or the builtinbranectl start --help.
Next
Congratulations, you have configured and setup a Brane worker node!
If you are in charge of more worker nodes, you can repeat the steps in this chapter to add more. If you are also charged with setting up a control node, you can check the previous chapter for control-node specific instructions.
Alternatively, you can also see if a proxy node is something for your use-case in the next chapter.
Otherwise, you can move on to other work! If you want to test your node like a normal user, you can go to the documentation for Software Engineers or Scientists.
Proxy node
Before you follow the steps in this chapter, we assume you have installed the required dependencies and installed branectl, as discussed in the previous two chapters.
If you did, then you are ready to install a proxy node. This chapter will explain you how to do that.
Obtaining images
Just as with branectl itself, there are two ways of obtaining the Docker images: downloading them from the repository or compiling them. Note, however, that multiple files should be downloaded; and to aid with this, the branectl executable can be used to automate the downloading process for you.
branectlto make the process easy for you.
Downloading prebuilt images
The recommended way to download the Brane images is to use branectl. These will download the images to .tar files, which can be send around at your leisure.
Run the following command to download the Brane service images for a worker node:
# Download the images
branectl download services proxy -f
(the -f will automatically create missing directories for the target output path)
Once these complete successfully, you should have the images for the worker node in the directory target/release. While this path may be changed, it is recommended to stick to the default to make the commands in subsequent sections easier.
branectlwill download the version for which it was compiled. However, you can change this with the--versionoption:branectl download services proxy -f --version 1.0.0Note, however, that not every Brane version may have the same services or the same method of downloading, and so this option may fail. Download the
branectlfor the desired version instead for a more reliable experience.
Compiling the images
The other way to obtain the images is to compile them yourself. If you want to do so, refer to the compilation instructions over at the Brane: A Specification-book for instructions.
Generating configuration
Once you have downloaded the images, it is time to setup the configuration files for the node. These files determine the type of node, as well as any of the node's properties and network specifications.
For a worker node, this means generating the following files:
- A proxy file (
proxy.yml), which describes if any proxying should occur and how; and - A node file (
node.yml), which will contain the node-specific configuration like service names, ports, file locations, etc.
All of these can be generated with branectl for convenience.
We first generate the proxy.yml file. Typically, these can be left to the default settings, and so the following command will do the trick in most situations:
branectl generate proxy -f -p ./config/proxy.yml
A proxy.yml file should be available in ./config/proxy.yml after running this command.
The contents of this file will typically only differ if you have advanced networking requirements. If so, consult the branectl documentation or the builtin branectl generate proxy --help, or the proxy.yml documentation.
-fflag (--fix-dirs, fix missing directories) and the-poption (--path, path of generated file) are not required, you will typically use these to make your life easier down the road. See thebranectl generate nodecommand below to find out why.
Then we will generate the node.yml file. This file is done last, because it itself defines where Brane software may find any of the others.
When generating this file, it is possible to manually specify where to find each of those files. However, in practise, it is more convenient to make sure that the files are at the default locations that the tools expects. The following tree structure displays the default locations for the configuration of a proxy node:
<current dir>
├ config
│ ├ certs
│ │ └ <domain certs>
│ └ proxy.yml
└ node.yml
The config/certs directory will be used to store the certificates for this proxy node and any node it wants to download data from. We will do that in the following section.
Assuming that you have the other configuration files stored at their default locations, the following command can be used to create a node.yml for a proxy node:
branectl generate node -f proxy <HOSTNAME>
Here, the <HOSTNAME> is the address where any other node may reach the proxy node. Only the hostname will suffice (e.g., some-domain.com), but any scheme or path you supply will be automatically stripped away.
The -f flag will make sure that any of the missing directories (e.g., config/certs) will be generated automatically.
For example, we can generate a node.yml file for a proxy found at 192.0.2.2:
branectl generate node -f proxy 192.0.2.2
Once again, you can change many of the properties in the node.yml file by specifying additional command-line options (see the branectl documentation or the builtin branectl generate node --help) or by changing the file manually (see the node.yml documentation).
-Hoption is provided; it can be used to specify a certain hostname/IP mapping for this node only. Example:# We can address '192.0.2.2' with 'some-domain' now branectl generate node -f -H some-domain:192.0.2.2 proxy bob-domain.comNote that this is local to this domain only; you have to specify this on other nodes as well. For more information, see the
node.ymldocumentation.
Generating certificates
In contrast to setting up a control node, a proxy node will have to strongly identify itself to prove to other nodes who it is. This is relevant, because worker nodes may want to download data from one another through their proxy nodes; and if this dataset is private, then the other domains likely won't share it unless they know who they are talking to.
In Brane, the identity of domains is proven by the use of X.509 certificates. Thus, before you can start your proxy node, we will have to generate some certificates.
Server-side certificates
Every proxy node is required to have at least a certificate authority (CA) certificate and a server certificate. The first is used as the "authority" of the domain, which is used to sign other certificates such that the proxy can see that it has been signed by itself in the past. The latter, in contrast, is used to provide the identity of the proxy in case it plays the role of a server (some other domain connects to us and requests a dataset).
Once again, we can use the power of branectl to generate both of these certificates for us. Use the following command to generate both a certificate autority and server certificate:
branectl generate certs -f -p ./config/certs server <LOCATION_ID> -H <HOSTNAME>
where <LOCATION_ID> is the identifier of the proxy node (the one configured in the node.yml file), and <HOSTNAME> is the hostname that other domains can connect to this domain to.
You can omit the -H <HOSTNAME> flag to default the hostname to be the same as the <LOCATION_ID>. This is useful where you've given manual host mappings when generating the node.yml file (i.e., the -H option there).
For example, to generate certificates for the domain amy that lives at amy-proxy-node.com:
branectl generate certs -f -p ./config/certs server amy -H amy-proxy-node.com
This should generate multiple files in the ./config/certs directory, chief of which are ca.pem and server.pem.
branectl. The checksum of the downloaded file is asserted, and if you ever see a checksum-related error, then you might be dealing with a fake binary that is being downloaded under a real address. In that case, tread with care.
When the certificates are generated, be sure to share ca.pem with the central node. If you are also adminstrating that node, see here for instructions on what to do with it.
Client-side certificates
The previous certificates only authenticate a server to a client; not the other way around. That is where the client certificates come into play.
The power of client certificates come from the fact that they are signed using the certificate authority of the domain to which they want to authenticate. In other words, the domain has to "approve" that a certain user exists by creating a certificate for them, and then sending it over.
Note, however, that currently, Brane does not use any hostnames or IPs embedded in the client certificate. This means that anyone with the client certificate can obtain access to the domain as if they were the user for which it was issued. Treat the certificates with care, and be sure that the client is also careful with the certificate.
To generate a client certificate, its easiest to navigate to the ./config/certs directory where you generate the server certificates. Then, you can run:
branectl generate certs client <LOCATION_ID> -H <HOSTNAME> -f -p ./client-certs
Note, that the <LOCATION_ID> is now the ID of the proxy for which you are generating the certificate, and <HOSTNAME> is their address. Similarly to server certificates, you can omit -H <HOSTNAME> to default to the <LOCATION_ID>.
-fand-poptions. These are optional, and work together to redirect the output of the commands to a nested folder calledclient-certs. This is however very recommendable, since running this command without that flag in the server certificates folder will accidentally clear theca.pemfile, rendering the rest of the certificates useless.
For example, contuining the example in the previous subsection, we now generate a client certificate for bob at bobs-emporium.com:
branectl generate certs client bob -H 192.0.2.2
Once the client certificates are generated, you can share the ca.pem and client-id.pem files with the client who intends to connect to this node.
Adding client certificates of other domains
If your proxy node needs to download data from other nodes, you will have to add the client certificates they generated to your configuration.
The procedure to do so is identical as for central nodes. For every pair of a ca.pem and client-id.pem certificates you want to:
- Create a directory with that domain's name in the
certsdirectory (for the example, you would create a directory namedcerts/amyfor a domain namedamy) - Move the certificates to that folder.
At runtime, whenever your proxy node will need to download a dataset from another node, it will read the certificates in that node's folder if they exist to authenticate itself.
Launching the instance
Finally, now that you have the images and the configuration files, it's time to start the instance.
We assume that you have installed your images to target/release. If you have built your images in development mode, however, they will be in target/debug; see the box below for the command then.
This can be done with one branectl command:
branectl start proxy
This will launch the services in the local Docker daemon, which completes the setup!
./target/release) and for thenode.ymlfile (./node.yml). If you use non-default locations, however, you can use the following flags:
- Use
-nor--nodeto specify another location for thenode.ymlfile:It will define the rest of the configuration locations.branectl -n <PATH TO NODE YML> start proxy- If you have installed all images to another folder than
./target/release(e.g.,./target/debug), you can use the quick option--image-dirto change the folders. Specifically:branectl start --image-dir "./target/debug" proxy- You can also specify the location of each image individually. To see how, refer to the
branectldocumentation or the builtinbranectl start --help.
Next
Congratulations, you have configured and setup a Brane proxy node!
If you are in charge of more proxy nodes, you can repeat the steps in this chapter to add more. If you are also charged with setting up a control node or worker node, you can check the control node chapter or the worker node chapter, respectively, for node specific instructions.
Otherwise, you can move on to other work! If you want to test your node like a normal user, you can go to the documentation for Software Engineers or Scientists.
Introduction
Welcome to the series of chapters detailing the policy expert role!
These chapters will discuss everything needed to successfully play this role, including technical knowledge, setup, and considerations when writing policy for Brane.
This chapter will first briefly outline the role as a whole. Then, the next-section gives pointers on where to start.
Policy experts
The role of a policy expert within Brane is to understand the restrictions and regulations that apply to compute infrastructure and datasets managed by a domain, and then to translate those into computable policy. By this we mean some kind of representation -e.g., declarative rules- that represent these regulations and that can be used by the system to automatically give access to users or not.
Policy experts walk the line between management and technology. They both need to understand the legal- and business side of sharing data and the technology in order to map from the first to the second successfully. Moreover, they need to be careful in how they design their reasoner in what information it divulges, as any policy information may be sensitive one way or another (e.g., private domain internal regulations, patient consent, etc).
In order to make this process as easy as possible, Brane allows domains to choose their own policy language, as long as this translates to either an allow/deny at the end of evaluation1. Currently, Brane uses eFLINT as the default language, but see the custom reasoning backend chapters for more information on how to implement custom languages.
Eventually, Brane will support a system where (parts of) policy are shared with other domains to drastically increase efficiency. For now, though, this is future work.
Next
To start learning about how to be a policy expert for Brane, start by installing the required tooling. Then, depending on whether your administrator asks you to use eFLINT or another language, either check the eFLINT introduction chapters, or documentation for the language implemented by your administrator. Additionally, you can check the docs for implementing a custom reasoning backend if more customization is needed.
Installation
As a policy expert, you will write policies and then manage them in the node's brane-chk-service.
To do the former, you need a development environment for the reasoner backend you will be using. See the Installing the eFLINT Interpreter-section to find out how to setup a local environment for eFLINT.
For the latter, you can choose between the Policy Reasoner GUI, a visual interface, or branectl, a command-line interface. Installing either of these is explained in Installing management tools-section.
Installing the eFLINT Interpreter
To develop and test your policies, it is recommended to have an offline environment available where you can iteratively test your policies as you construct them.
The most mature eFLINT interpreter is the Haskell implementation. This version is up-to-date with the most recent eFLINT edition, and supports a human-friendly REPL to examine and change a knowledge base for testing purposes.
To install it, download and install Haskell as described in the README of the project. In short, open a terminal and run:
# On Ubuntu
apt-get install cabal-install ghc
cabal update
Once installed, clone the repository with the interpreter and build it with cabal:
git clone https://gitlab.com/eflint/haskell-implementation ./eflint
cd eflint
cabal configure
cabal build
cabal install
After completion, you should be able to run the interactive eFLINT prompt by running:
eflint-repl
Use eflint-repl --help to see more options, or type :help when you are in the REPL.
Also consider adding syntax highlighting for your favourite code editor. There are syntax highlighters for Visual Studio Code and Sublime.
Installing management tools
To manage the local Brane node, you need to use a tool that can interface with the reasoner and push/pull policies, change the active policy and test drive your changes. Currently, there are two tools available that can do this:
- The official Policy Reasoner GUI, which provides a visual interface; and
- The Brane CTL management tool, which provides a terminal interface.
Installing the first is recommended in most cases, except when you're in need of a quick way to manage them (e.g., in scenarios where the system administrator also takes the role of the policy expert) or are more comfortable with terminals in general.
The Policy Reasoner GUI
The most up-to-date instructions for installing the policy reasoner GUI are described here. Below follows a summary for convenience.
First, clone the repository to your machine using Git:
git clone https://github.com/epi-project/policy-reasoner-gui && cd ./policy-reasoner-gui
Then, you can either install the GUI natively or in a Docker container.
For the former, install Rust (rustup is usually the easiest) and NPM. Then, open two terminals in the repository directory, and run
cd client
npx parcel
in one to launch the HTML client, and
cargo run
in the other to launch the client's backend.
For the latter, install Docker (macOS, Ubuntu, Debian or Arch Linux) (don't forget to enable sudoless access if you're on Linux). Then, run:
docker compose up -d
to build & run both the client and the client's backend.
The branectl management tool
To install the management tool, you can download the binary from the repository or compile it from scratch.
To download, you simply go to the release and download the branectl binary of your choice. There are options to download it for Linux (branectl-linux-x86_64), Intel Macs (branectl-darwin-x86_64) or M1/M2/M3 Macs (branectl-darwin-aarch64).
To compile the binary yourself, install GCC's gcc and g++, CMake and Rust (rustup is usually the easiest) first if you haven't already. Then, clone the repository and run the make.py script:
git clone https://github.com/epi-project/brane && cd ./brane
./make.py ctl
The resulting binary can be found under target/release/branectl.
Either way, it's nice if you add the binary to your PATH to make executing it easier. To do so, you can copy it to /usr/local/bin on Linux or macOS:
sudo cp <BINARY_PATH> /usr/local/bin/branectl
If you can execute branectl --help without problems, you know the installation succeeded.
Next
Now that you have the management client of your choice installed, move to the next chapter to learn how to use it.
You can also consult chapters on how to write eFLINT policies, if that's the language of your node, or else how to write new backends.
Managing policies
This chapter discusses how you can manage the policies in a running policy reasoner.
The first section focusses on obtaining access keys from your adminsitrator. Then, we discuss either managing the checker using the visual interface or using the terminal interface.
Acquiring keys
Before you begin, you need to have access to the reasoner in question. This is currently implemented as two JSON Web Tokens (JWTs): one is used to access the deliberation API of the checker, which is where Brane connects to check workflows; and the other is used to access the policy expert API of the checker, which is used to manage which policies are active. For full convenience, you should try to acquire both so you can test the checker yourself.
If your adminstrator is unsure how to do this (or you are the administrator), consult the relevant section of their part of the wiki.
Visual management (Policy Reasoner GUI)
Terminal management (branectl)
Next
Introduction
This chapter will be written soon.
Introduction
This chapter will be written soon.
The Policy File
This page is for the deprecated method of entering policies into the system using a
policies.ymlfile. A better method (involving eFLINT) is implemented through thepolicy-reasonerproject.
Brane used to read its policies from a so-called policy file (also known as policies.yml) which defines a very simplistic set of access-control policies.
Typically, there is one such policy file per domain, which instructs the "reasoner" for that domain what is should allow and what not.
In this chapter, we discuss how one might write such a policy file. In particular, we will discuss the general layout of the file, and then the two kinds of policies currently supported: user policies and container policies.
Overview
The policies.yml file is written in YAML for the time being.
It has two sections, each of them corresponding to a kind of policy (users and containers, respectively). Each section is then a simple list of rules. At runtime, the framework will consider the rules top-to-bottom, in order, to find the first rule that says something about the user/dataset pair or the container in question. A full list of available policies can be found below.
Before that, we will first describe the kinds of policies in some more detail in the following sections.
User policies
User policies concern themselves what a user may access, and then specifically, which dataset they may access. These policies thus always describe some kind of rule on a pair of a user (known by their ID) and a dataset (also known by its ID).
As a policy expert, you may assume that by the time your policy file is consulted, the framework has already verified the user's ID. As for datasets, your policies are only consulted when data is accessed on your own domain, and so you can also assume that dataset IDs used correspond to the desired dataset.
Note that which user IDs and dataset IDs to use should be done in cooperation with the system administrator of your domain. Currently, the framework doesn't provide a safe way of communicating which IDs are available to the policy file, so you will have to retrieve the up-to-date list of IDs the old-fashioned way.
Container policies
Container policies concern themselves with which container is allowed to be run at a certain domain. Right now, it would have seemed obvious that they are triplets of users, datasets and containers - but due to time constraints, they currently only feature a container hash (e.g., its ID) that says if they are allowed to be implemented or not.
Because the ID of a container is a SHA256-hash, you can safely assume that whatever container your referencing will actually reference that container with the properties you know of it. However, similarly to user policies, there is no list available in the framework itself of known container hashes; thus, this list must be obtained by asking the system's administrator or, maybe more relevant, a scientist who wants to run their container.
Policies
In this section, we describe the concrete policies and their syntax. Remember that policies are checked in-order for a matching rule, and that the framework will throw an error if no matching rule is found.
In general, there are two possible actions to be taken for a given request: allow it, in which case the framework proceeds, or deny it, in which case the framework aborts the request. For each of those action, though, there are multiple ways of matching a user/dataset pair or a container hash, which results in the different policies described below.
Syntax-wise, the policies are given as a vector of dictionaries, where each dictionary is a policy. Then, every such dictionary must always have the policy key, which denotes its type (see the two sections below). Any other key is policy-dependent.
User policies
The following policies are available for user/dataset pairs:
allow: Matches a specific user/dataset pair and allows it.user: The identifier of the user to match.data: The identifier of the dataset to match.
deny: Matches a specific user/dataset pair and denies it.user: The identifier of the user to match.data: The identifier of the dataset to match.
allow_user_all: Matches all datasets for the given user and allows them.user: The identifier of the user to match.
deny_user_all: Matches all datasets for the given user and denies them.user: The identifier of the user to match.
allow_all: Matches all user/dataset pairs and allows them.deny_all: Matches all user/dataset pairs and denies them.
Container policies
The following policies are available for containers:
allow: Matches a specific container hash and allows it.hash: The hash of the container to match.name(optional): A human-friendly name for the container (no effect on policy, but for debugging purposes).
deny: Matches a specific container hash and denies it.hash: The hash of the container to match.name(optional): A human-friendly name for the container (no effect on policy, but for debugging purposes).
allow_all: Matches all container hashes and allows them.deny_all: Matches all container hashes and denies them.
Example
The following snippet is an example policy file:
# The user policies
users:
# Allow the user 'Amy' to access the datasets 'A', 'B', but not 'C'
- policy: allow
  user: Amy
  data: A
- policy: allow
  user: Amy
  data: B
- policy: deny
  user: Amy
  data: C

# Specifically deny access to `Dan` to do anything
- policy: deny_user_all
  user: Dan

# For any other case, we deny access
- policy: deny_all


# The container policies
containers:
# We allow the `hello_world` container to be run
- policy: allow
  hash: "GViifYnz2586qk4n7fdyaJB7ykASVuptvZyOpRW3E7o="
  name: hello_world

# But not the `cat` container
- policy: deny
  hash: "W5WS23jAAtjatN6C5PQRb0JY3yktDpFHnzZBykx7fKg="
  name: cat

# Any container not matched is allowed (bad practice, but to illustrate)
- policy: allow_all
Introduction
In these series of chapters, we will discuss how you can develop and then upload packages to the Brane instance for use by scientists and other software engineers.
First, in the next section, we will give a bit of background that will help you understand what you're doing. Then, in the next chapter, we will help you preparing your local machine for Brane package development.
Background & Terminology
In Brane, every kind of job that is executed is done so by submitting a workflow. This is simply a high-level specification of which external functions will be called in what order, and how data is passed between them.
You may think of them as a program, except that it's meant to be more high-level and abstracted over the actual algorithms that are run part of the execution.
That means that the bulk of the work will be done in these external function calls. Because of this modularity present in these workflows, Brane collects these functions in packages, which may be used in zero or more workflows as independent compute steps.
Technically, these packages are implemented as containers, which means that they might be written in any language (as long as they adhere to the protocol Brane uses to communicate with packages) and will ship together with all required dependencies.
As a consequence, this means that Brane package calls are, in principle, always completely self-contained. After execution, the container is destroyed, removing any work that the package has done. The only way to retrieve results is by either sending them back to the workflow-space directly as a return value (which can contain limited data), or by returning so-called datasets or intermediate results (see the scientist chapters for more background information, or the software engineer's data chapter for practical usage).
Next
Before we will go more in-depth on the functionality and process of developing Brane packages, we will first walk you through setting up your machine for development in the next chapter.
Then, in the chapter after that, we will discuss the different types of packages supported by Brane and how to create them.
Installation
To develop Brane packages, you will need three components:
- The Brane Command-Line Interface (Brane CLI), which you use to package your code and publish it to an instance
- A Docker engine, which is used to build the package containers by the Brane CLI
- Support for your language of choice
The third component, the language support, is hard to generalize as it will depend on the language you choose. However, there is an import difference in setup between interpreted languages and compiled languages.
For interpreted languages, (such as Python), you should setup your machine in such a way that it is able to run the scripts locally (for development purposes). Additionally, you should make sure that you have some way of installing the interpreter (and any dependencies) on Ubuntu (since the Brane containers are based on that OS).
For compiled languages (such as Rust), you should prepare your machine to not only develop but also compile the language for use in an Ubuntu container. Then, you should only package the resulting binaries so that the package container remains as lightweight as possible.
The other two prerequisites will be discussed below.
The Docker engine
First, you should install Docker on the machine that you will use for development. Brane will use this to build the containers, since Docker features an excellent build system. However, Brane also requires you to have the BuildKit plugin installed on top of the normal Docker build system.
To install Docker, refer to their official documentation (macOS, Ubuntu, Debian or Arch Linux). Note that, if you install Docker on Linux, you should make sure that you can execute Docker commands without sudo (see here, first section) Then, you should install the Buildkit plugin by running the following commands:
# Clone the repo, CD into it and install the plugin (check https://github.com/docker/buildx for alternative methods if that fails)
git clone https://github.com/docker/buildx.git && cd buildx
make install

# Switch to the buildx driver
docker buildx create --use
The Brane CLI
With Docker installed, you may then install the Brane Command-Line Interface.
You can either download the binary directly from the repository, or build the tool from scratch. The first method should be preferred in most cases, which the latter is only required if you require a non-released version or run Brane on non-x86_64 hardware.
Note that you probably already installed the Brane Command-Line Interface if you've installed a node on your local machine (follow this guide, for example).
Downloading the binary
To download the Brane CLI binary, use the following commands:
# For Linux
sudo wget -O /usr/local/bin/brane https://github.com/epi-project/brane/releases/latest/download/brane-linux-x86_64

# For macOS (Intel)
sudo wget -O /usr/local/bin/brane https://github.com/epi-project/brane/releases/latest/download/brane-darwin-x86_64

# For macOS (M1/M2)
sudo wget -O /usr/local/bin/brane https://github.com/epi-project/brane/releases/latest/download/brane-darwin-aarch64
These commands download the latest Brane CLI binary for your OS, and store them in /usr/local/bin (which is why the command requires sudo). You may install the binary anywhere you like, but don't forget to add the binary to your PATH if you choose a location that is not part of it already.
Compiling the binary
You may also compile the binary from source if you need the cutting-edge latest version or are running a system that doesn't have any default binary available.
To compile the binary, refer to the compilation instructions over at the Brane: A Specification-book for instructions.
Next
Now that you have the Brane CLI installed, we will give a brief tutorial on how to start writing packages in the next chapter.
If you would like to know more about the different packages types that Brane supports, check the Packages series of chapters.
Your first package
In this chapter, we will guide you through creating the simplest and most basic package available: the hello world package.
This tutorial assumes that you have experience with programming. In particular, it's useful to known about standard streams and environment variables.
examples/doc/hello-worldof the repository.
1. Writing the code
Because Brane will package your code as an Ubuntu container, you may choose virtually any language you like to write your code in.
For the purpose of this tutorial (because the code is very simple), we will write in GNU Bash, which is a very commonly used Unix shell.
To begin, create a new directory (which we will call hello-world), and create a file hello_world.sh. All it does it printing: "Hello, world!", and so we only have to use an echo-statement:
#!/bin/bash
echo 'Hello, world!'
Don't forget the shebang at the top of the file; this special comment,
#!/bin/bash, tells the terminal how it should run this script (using the Bash interpreter, in this case). If you omit it, it will try to run your script as a normal Linux executable - which will not work, as this is not binary code.
However, if we were to build this as a package and launch it in Brane as it is, we wouldn't see anything. That's because Brane doesn't pass the stdout directly to the user; instead, it reads it and parses it as YAML.
Specifically, Brane will expect a YAML file as output that has a certain key/value mapping, where it will only return the result of a specific key. The name of this key is arbitrary; for this tutorial, we will call it output.
Thus, change your script to:
#!/bin/bash
echo 'output: "Hello, world!"'
which just writes the YAML equivalent of a key output with a value Hello, world!.
For now, this is all the code that we will package in a container, and so you can save the script and move to the next section.
2. Creating a container.yml
Every Brane (code) package exists of two components: the code to run and a file describing how to interface with the code. For us, the first part is the hello_world.sh script, and the second is a file conventionally called container.yml.
For this tutorial, we will only focus on the general file structure of the container.yml and how to read package output. The next tutorial will focus on how to partition a package into multiple functions and provide them with input.
The container.yml file describes a couple of things about your package:
- Metadata (name, version, kind, etc).
- Files and dependencies that should be added to the container
- The functions that your package implements and how they can be called.
We will go through these step-by-step.
Create a file container.yml in the hello-world directory, and populate it with the following to start:
# The package metadata
name: hello_world
version: 1.0.0
kind: ecu
The first line (name) specifies the package name, and the second line (version) specifies the package version. Together, the provide a unique identifier for each package. This means that we can have multiple versions of the same packages around, which the framework will treat as different packages.
The third line (kind) is the most important one, because this specifies that this package contains arbitrary code (Executable Code Unit; see the packages series of chapters).
Next, we will specify the dependencies of this package. Because Bash is installed in the Ubuntu image by default, we only have to provide the files that should be copied over to the container, and then which file the container should run. Do this by adding the following to your file:
...

# Specify the files to copy over (relative to the container.yml file)
files:
- hello_world.sh

# Specify which file to run
entrypoint:
  # 'task' means the script should be run synchronously (i.e., blocking)
  kind: task
  exec: hello_world.sh
As you can see, Brane supports only one entry point, even though a package may contain multiple functions. As you will see in the next tutorial, Brane will tell your entrypoint which function to run by specifying certain command-line arguments or environment variables. However, because our script contains only one function, we do not worry about this; every time it is called, it will only ever have to return the Hello, world! message.
However, we still have to define this function. To do so, add the following lines to your container.yml:
...

actions:
  "hello_world":
    command:
    input:
    output:
    - type: string
      name: output
This defines a function with the identifier hello_world, that requires no input (input: is empty) and also doesn't need to pass any command-line arguments to the script (command: is empty). What is does define, however, is that it should return the value of the output-key in the function's output. We define that value to be of type string, and the name of the key corresponds to the one we set in the hello_world.sh Bash script.
With that defined, your container.yml file should now look like this:
# Container.yml for the hello_world package
name: hello_world
version: 1.0.0
kind: ecu

files:
  - hello_world.sh

entrypoint:
  kind: task
  exec: hello_world.sh

actions:
  'hello_world':
    command:
    input:
    output:
    - name: output
      type: string
We are now ready to build the package.
3. Building the package
To build a package, we will finally use the Brane CLI. We will assume that you have named it brane, and that it is reachable under the PATH of your machine.
To build the package, simply run the following from within the hello-world directory:
brane build ./container.yml
While the command above seems simple, there are a couple of semantics to think about:
- All relative paths in the file are relative to the
container.ymlfile; use the--workdiroption to change the working directory. - Brane will automatically try to deduce the kind of the package based on the name of the file you specify it.
container.ymlwill default to anecupackage (see the packages series of chapters). To change this, or if Brane could not deduce the package kind, use the--kindoption to manually specify it. - The CLI will automatically download the
braneletexecutable that will live in the container from the repository. However, if you have a non-released version of the CLI in any way, you should probably build your own (download the repository as described here) and pass it to the build command with the--initoption.
If everything succeeds, you should see something along the lines of:

Your package is now available in the local repository that only exists on your laptop. To verify it, you can run:
brane list
which should show you:

4. Testing your package
Because publishing your package to a Brane instance immediately exposes it for others to use, it is often better to first test your package locally to catch any errors or bugs.
To do so, the Brane CLI provides a build-in test capability, which can run any function you defined in the package container with some (properly-typed) input and test its computation.
To run it for the hello_world package, run the following command:
brane test hello_world
You will then be greeted by something along the lines of:

This TUI (Terminal UI) will help you to select a function, give input to it (though now not relevant) and show its output.
If everything went alright, you should see the Hello, world! message if you hit 'enter':

This confirms that your package is working and Brane can interact with it! If it doesn't, you'll see an error that hopefully allows you to debug your package. You can check the troubleshooting chapter with some general tips on how to debug any such errors.
If everything checks out, you are now ready to push your package to a Brane instance.
5. Publishing your package
For this step, you will need to have a running Brane instance. If you do not have one where you can test this tutorial, you can download and install one yourself by following the steps listed in the chapters for system administrators.
We will assume that you have a Brane instance available at 127.0.0.1 (localhost). If you will be using a remote instance, replace all of the occurrences of the localhost IP address with the address of your instance.
The first step, before you can publish to a cluster, is to login to one. Run the following command for that:
brane login http://127.0.0.1 --username <user>
where you should replace <user> with a name of your choosing. This is the name that will be used to 'sign' all your packages (i.e., list you as owner).
Next, you may try to publish your package by pushing it to the instance you just logged-in to:
bash push hello_world
This command will automatically push the latest version of your package to the remote instance. If you want to be explicit about which version to push, you may add it to the end of the command. For this tutorial, this command will give the same result as the one above:
brane push hello_world 1.0.0
Your package is now available in the remote instance. You can verify this by running:
brane search
This commands does exactly the same as the brane list command, except that it doesn't inspect your local repository but instead the remote one you are logged-in to. Thus, it should show you something along the lines of:

6. Running your package
Finally, we can properly run the function that you have just created!
To do so, we will connect to the remote instance using the REPL (Read, Eval, Print-Loop) of the Brane CLI tool. This loop will take BraneScript statements line-by-line, and run them on the remote instance. Effectively, this will be like "interactively" running a workflow on the remote instance.
To start the REPL, run:
brane repl --remote http://127.0.0.1:50053
--remoteoption from the command, you will run a local REPL instead. This can be used to test workflows and run package locally more thoroughly, and should work the same (except that you don't actually push anything to a Brane instance).
If the REPL launched and connected successfully, you will see:

Any command you write will be executed as BraneScript. For a more in-depth documentation of how BraneScript works, you can refer to its documentation chapters.
For now, we will restrict ourselves to testing our package.
First, we will bring the function that we have defined in our package into scope, by importing the package:
import hello_world;
(Note the delimiter, ;. BraneScript requires all stataments to be terminated by it.)
If the instance was able to find the package, then the command will return without printing anything. Otherwise, it might give you an error saying the package is unknown. If so, try re-pushing your package and making sure you are logged-in to the correct instance.
Next, you can call the function to run your package on the instance:
hello_world();
After running that command, you should see:

Wait, we're not seeing anything?! Did something go wrong?!
No, it didn't! Remember, Brane never simply shows the user the stdout of the package. Instead, it uses the value of the parsed YAML field (in our case, output) as the return value of the function that we defined. Thus, if we wrap the hello_world()-call in a println-statement (a builtin in BraneScript), you will finally see:
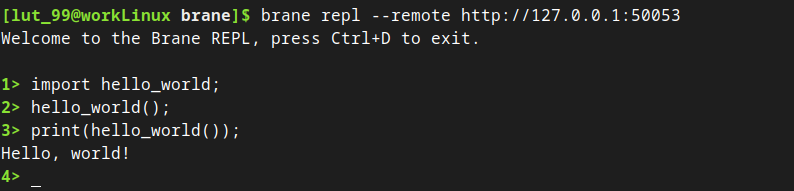
Congratulations! You have now written, built, tested, published and then executed your first Brane package.
// TODO: Replace pic above here with one that uses println
Next
In the next chapter, we will consider a slightly more complicated case, where we will talk about passing inputs to functions and separating a package to have multiple functions. To do so, you will implement a simple Base64 encoding/decoding package.
Alternatively, you can also look at the Package documentation to find out the details of the different package types, or dive into BraneScript by reading its documentation.
Package inputs & multiple functions
In the previous chapter, you created your first package, and learned how to build and run a function that take no inputs.
However, this makes for very boring workflows. Thus, in this chapter, we will extend upon this by creating a container with multiple functions, and where we can pass inputs to those functions. Concretely, we will describe how to implement a base64 package, which will contain a function to encode a string and decode a string to and from Base64, respectively.
examples/doc/base64of the repository.
1. Writing code
To implement the package, we will write a simple Python script that contains the two functions.
First, create the directory for this package. We will call it base64. Then, create a Python file code.py with the skeletons for the two functions:
#!/usr/bin/env python3


# Imports
# TODO


# The functions
def encode(s: str) -> str:
    """
        Encodes a given string as Base64, and returns the result as a string
        again.
    """

    # TODO


def decode(b: str) -> str:
    """
        Decodes the given Base64 string back to plain text.
    """

    # TODO


# The entrypoint of the script
if __name__ == "__main__":
    # TODO
(Don't forget the shebang at the top of the file!)
strs in the function headers. If you're unfamiliar with it, this annotes the types of the arguments. If you're interested, you can read more about it here.
The functions themselves are pretty straightforward to implement if we employ the help of the base64 module, which is part of the Python standard library. Thus, import it first:
# Imports
import base64

...
The implementation of encode():
...

def encode(s: str) -> str:
    """
        Encodes a given string as Base64, and returns the result as a string
        again.
    """

    # First, get the raw bytes of the string (to have correct padding and such)
    b = s.encode("utf-8")

    # We simply encode using the b64encode function
    b = base64.b64encode(s)

    # We return the value, but not after interpreting the raw bytes returned by the function as a string
    return b.decode("utf-8")

...
The implementation of decode() is very similar:
...

def decode(b: str) -> str:
    """
        Decodes the given Base64 string back to plain text.
    """

    # Remove any newlines that may be present from line splitting first, as these are not part of the Base64 character set
    b = b.replace("\n", "")

    # Decode using the base64 module again
    s = base64.b64decode(b)

    # Finally, we return the value, once again casting it
    return s.decode("utf-8")

...
Up to this point, we are just writing a Python package; Brane is not yet involved.
But that will change now. In the entrypoint of our package, we have to do two things: we have to let Brane select which of the functions to call, and we have to be able to process the input that Brane presents us with.
The first is done by Brane specifying a command-line argument (see below) that specifies the function to call. Thus, we will write a piece of code that reads the first argument passed to the script, and then uses that to select the function.
...

# The entrypoint of the script
if __name__ == "__main__":
    # Make sure that at least one argument is given, that is either 'encode' or 'decode'
    if len(sys.argv) != 2 or (sys.argv[1] != "encode" and sys.argv[1] != "decode"):
        print(f"Usage: {sys.argv[0]} encode|decode")
        exit(1)

    # If it checks out, call the appropriate function
    command = sys.argv[0]
    if command == "encode":
        result = encode(<TODO>)
    else:
        result = decode(<TODO>)

    # TODO
Don't forget to import the sys module:
# Imports
import base64
import sys

...
However, to call our functions, we will first have to know the input that the caller of the function wants to be encoded or decoded.
Brane does this by passing the arguments of the function call to the package as environment variables. Specifically, it takes the value in BraneScript, serializes it to JSON and then sets the resulting string in the matching environment variable. The names of these variables are derived from the container.yml file (see below), but let's for now just assume that it's called: INPUT.
Thus, to give our functions their input, we can just pass the value of the INPUT environment variable to the json package, and pass the resulting string to our functions:
...

if __name__ == "__main__":
    ...

    # If it checks out, call the appropriate function
    command = sys.argv[0]
    if command == "encode":
        # Parse the input as JSON, then pass that to the `encode` function
        arg = json.loads(os.environ["INPUT"])
        result = encode(arg)
    else:
        # Parse the input as JSON, then pass that to the `decode` function
        arg = json.loads(os.environ["INPUT"])
        result = decode(arg)

    # TODO
Again, don't forget to add our new dependencies as imports:
# Imports
import base64
import json    # new
import os      # new
import sys

...
Now, finally, we have to give the result back to Brane like we did before.
We will do so in a slightly complicated manner, using the yaml package of Python. This is both to show that Brane just expects YAML, which might make it easier to return arbitrary output, and it gives us an opportunity to talk about package dependencies in a later section.
To return the values, we will return the value as a YAML key/value pair with the key name called output:
...
if __name__ == "__main__":
    ...

    # Print the result with the YAML package
    print(yaml.dump({ "output": result }))

    # Done!
Finally, add the yaml-module dependency:
# Imports
import base64
import json
import os
import sys
import yaml

...
And that gives us the final base64/code.py Python file that implements the base64-package:
#!/usr/bin/env python3


# Imports
import base64
import json
import os
import sys
import yaml


# The functions
def encode(s: str) -> str:
    """
        Encodes a given string as Base64, and returns the result as a string
        again.
    """

    # First, get the raw bytes of the string (to have correct padding and such)
    b = s.encode("utf-8")

    # We simply encode using the b64encode function
    b = base64.b64encode(b)

    # We return the value, but not after interpreting the raw bytes returned by the function as a string
    return b.decode("utf-8")


def decode(b: str) -> str:
    """
        Decodes the given Base64 string back to plain text.
    """

    # Remove any newlines that may be present from line splitting first, as these are not part of the Base64 character set
    b = b.replace("\n", "")

    # Decode using the base64 module again
    s = base64.b64decode(b)

    # Finally, we return the value, once again casting it
    return s.decode("utf-8")


# The entrypoint of the script
if __name__ == "__main__":
    # Make sure that at least one argument is given, that is either 'encode' or 'decode'
    if len(sys.argv) != 2 or (sys.argv[1] != "encode" and sys.argv[1] != "decode"):
        print(f"Usage: {sys.argv[0]} encode|decode")
        exit(1)

    # If it checks out, call the appropriate function
    command = sys.argv[1]
    if command == "encode":
        # Parse the input as JSON, then pass that to the `encode` function
        arg = json.loads(os.environ["INPUT"])
        result = encode(arg)
    else:
        # Parse the input as JSON, then pass that to the `encode` function
        arg = json.loads(os.environ["INPUT"])
        result = decode(arg)

    # Print the result with the YAML package
    print(yaml.dump({ "output": result }))

    # Done!
2. Creating a container.yml
With the code complete, we will once again create a container.yml.
Again, write the package metadata first, together with the files that contain the code and the entrypoint:
name: base64
version: 1.0.0
kind: ecu

files:
  - code.py

entrypoint:
  kind: task
  exec: code.py
(see the previous chapter for a more in-depth explanation on these)
Next, we can specify additional dependencies for the package. Not only do we require Python to run our script, we also require the yaml package in Python. To do so, we will add an extra section, which will tell Brane to install both of these in the package container:
...

dependencies:
  - python3
  - python3-yaml
The dependencies are just apt packages for Ubuntu 20.04. If you require another OS or system, you should check the in-depth container.yml documentation.
Next, we once again write the section that describes the functions. However, this time, we have two functions (encode and decode), and so we will create two entries:
...

actions:
  encode:
    command:
      # TODO
    input:
      # TODO
    output:
      # TODO

  decode:
    command:
      # TODO
    input:
      # TODO
    output:
      # TODO
First, we will fill in the command-field.
If you think back to the previous section, we said that Brane would tell us which function to run based on the argument given to the script. We can fullfill this assumption by using the command-field of each function:
...

actions:
  encode:
    command:
      # This is just a list of arguments we pass to the function
      args:
      - encode
    input:
      # TODO
    output:
      # TODO

  decode:
    command:
      # Note that we give another argument here, selecting the other function
      args:
      - decode
    input:
      # TODO
    output:++
      # TODO
This (correctly) implies that there are other ways of selecting functions in a package. See the container.yml documentation for more information.
With the function selected, we will next specify the input arguments to each function. For both functions, this is a simple string that we would like to encode.
Now, remember that Brane will pass the input arguments as environment variables. Because environment variables are (by convention) spelled with CAPS, Brane will translate the name you give to an input argument to an appropriate environment variable name - which is the same but all alphabetical characters converted to UPPERCASE.
Thus, for each function, we define an input argument input (which translates to the INPUT in the code.py file) that is of type string:
...

actions:
  encode:
    command:
      args:
      - encode
    input:
    # This specifies one input of type string, in similar syntax to how we specified outputs.
    - name: input
      type: string
    output:
      # TODO

  decode:
    command:
      args:
      - decode
    input:
    # This specifies one input of type string, in similar syntax to how we specified outputs.
    - name: input
      type: string
    output:
      # TODO
Finally, we will define an output (called output again) in much the same way as in the Your first package tutorial:
...

actions:
  encode:
    command:
      args:
      - encode
    input:
    - name: input
      type: string
    output:
    # See the previous section
    - name: output
      type: string

  decode:
    command:
      args:
      - decode
    input:
    - name: input
      type: string
    output:
    # See the previous section
    - name: output
      type: string
The complete container.yml may be found in the project repository (examples/doc/base64/container.yml).
3. Building & Publishing the package
If you've done everything right, this will be exactly the same as with the previous tutorial.
First, we will build the package:
brane build ./container.yml
Once that's ready, test your package by running brane test:
brane test base64
If you test your encode function and then your decode function, you should get something along the lines of:
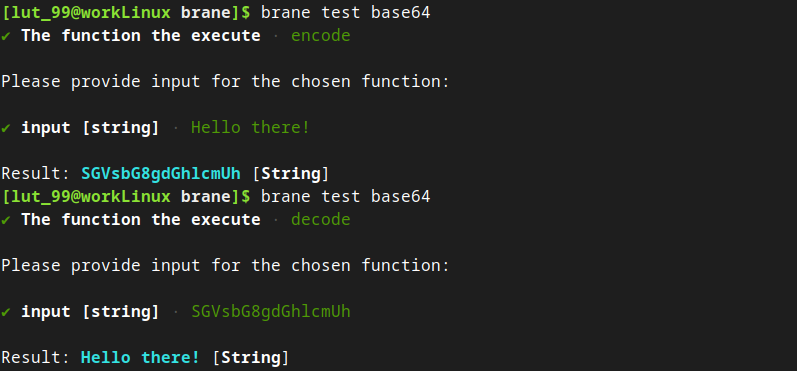
Once you've verified everything works, we will push it to the remote repository:
brane push base64
brane login. Refer to the previous tutorial for more details.
And then, like before, we can use the REPL to interact with our package:
brane repl --remote http://<IP>:50053
For example, you can now do the following:
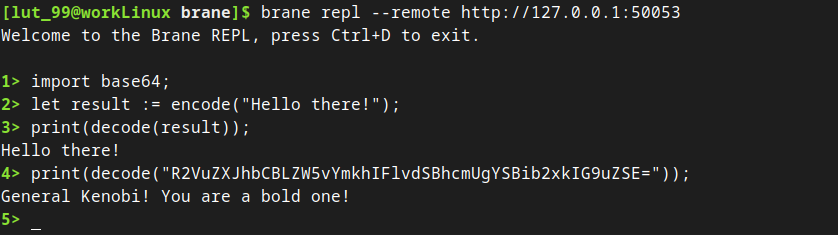
// TODO: Replace pic above here with one that uses println
You can refer to the chapters on writing workflows or the documentation of BraneScript for more explanation on the syntax used here.
Next
You should now be able to build most functions, congratulations!
In the next chapter, we will consider a last-but-not-least aspect of building packages: datasets and intermediate results. If you plan to do any serious data processing with Brane, we highly recommend you to check that chapter out.
Otherwise, check the in-depth documentation on the package system. It will talk about the different types of packages, how they are implemented and the complete overview of the interface with code and the container.yml file.
You can also continue with the chapters for [scientists] to know more about how to write workflows, or check the documentation of BraneScript and Bakery.
Datasets & Intermediate results
The you have followed the previous two tutorials (here and here), you should be a little familiar with how to package your code as one or more Brane functions, that can accept input and return output.
However, so far, your code will not be very usable to data scientists. That's because a key ingredient is missing: datasets, and especially large ones.
In this tutorial, we will cover exactly that: how you can define a (local) dataset and use it in your package. This is illustrated by creating a package that can compute the minimum or maximum of a given file. First, however, we will provide a little background on how datasets are represented, and what's the difference between Brane's concept of data and Brane's concept of intermediate results. If you're eager and already know this stuff, you can skip ahead to the section after the next one.
examples/doc/minmaxof the repository.
0. Background: Variables & Data
In Brane, there is an explicit distinction between variables and data.
Variables are probably familiar to you from other programming languages. There, they can be though of as (simple) values or data structures that live in memory only, and is something that typically the processor is able to directly1 manipulate. This is almost exactly the same in Brane, except that they are emphesised to be simple, and mostly used for configuration or control flow decisions only.
Data, on the other hand, represents the complex, large data structures that typically live on disk or on remote servers. In Brane, this is typically the information that a package wants to work on, and is also the information that may be sensitive. It is thus subject to policies.
Another useful advantage of being able to separate variables and data this way is that we can now leave the transfer of large datasets up to the framework to handle. This significantly reduces complexity when attempting to use data from different sources.
As a rule of thumb, something is a variable if it can be created, accessed and manipulated in BraneScript (or Bakery). In contrast, data can only be accessed by the code in packages, and only exist in BraneScript itself as a reference. It isn't possible to inspect any of the data in a dataset in BraneScript, unless a package is used.
From a programmer's perspective, anyway.
Datasets & Intermediate Results
Data itself, however, knows a smaller but important distinction. Brane will call a certain piece of data either datasets or intermediate results. Conceptually, they are both data (i.e., referencing some file on a disk or some other source), but the first one can outlive a workflow whereas the other can't. This distinction is used for policies, where it's important that intermediate results can only be referenced by users in the framework participating within the same workflow and not by others.
For you, a software engineer, the important thing to know is that functions can take both as input, but return only intermediate results as output. To get a dataset from a workflow, a scientist has to use builtin functions to commit and intermediate result to a full dataset.
1. Creating a dataset
This time, before we will write code, we first have to create the dataset that we will be using.
Note, though, that creating datasets is typically the role of the system administrator of a given domain that offers the dataset. In other words, you will typically only use datasets already available on the domains in a Brane instance.
However, it can still be useful to create a dataset that is locally available only - typically for testing purposes. That's what we will do here.
For the purpose of the tutorial, we will use a very simple dataset that is a single list of numbers where our code may find the min/max of. To do so, create a folder for the package (which we will call minmax) and a folder for the dataset (we will use minmax/data). Then, you can either download the dataset from the repository or generate it yourself by running:
echo "numbers" > numbers.csv && for i in $(awk 'BEGIN{srand(); for(i = 0; i < 100; i++) print int(rand()*100)}'); do echo "$i" >> numbers.csv; done
We will assume that after this step, you have a file called minmax/data/numbers.csv.
Next, similar to how we use a container.yml file to define a package, we will create a data.yml file to define a dataset. Create the file (minmax/data/data.yml) and write in it:
# This determines the name, or more accurately, identifier, of the dataset.
name: numbers

# This determine how we access the data. In this example, we use a file, but check the wiki to find all possible kinds.
access:
  kind: file
  # Note that relative paths, per default, are relative to this file.
  path: ./numbers.csv
This will tell Brane out of which file(s) this dataset consists, and by which identifier it is known. The identifier is arbitrary, but should be unique across your local machine. We will assume numbers.
data.ymlfile. Be aware, though, that this adds additional uniqueness to your dataset; see below.
Then you can build the dataset by running:
brane data build ./data.yml
in the data folder.
You can confirm that this has worked by executing:
brane data list
which lists all locally available datasets. You should see something like this:
// TODO
2. Creating a container.yml
In this tutorial, we will break the format you've come to expect so far some more by first looking at a container.yml that we will use for our package.
This is almost exactly the same as in previous tutorials, so you should be able to write it yourself (use any of the previous tutorials as example, or check the repository). The only thing that differs is the input and output to the functions we define in our package:
...

actions:
  # The max command, which should be mostly familiar by now
  max:
    command:
      args:
      - max
    input:
    - name: column
      type: string
    - name: file
      # This is new!
      type: Data
    output:
    - name: output
      # This is also new!
      type: IntermediateResult

  # Same here
  min:
    command:
      args:
      - min
    input:
    - name: column
      type: string
    - name: file
      type: Data
    output:
    - name: output
      type: IntermediateResult
We will focus on the two new parts in max only, since they are identical for min.
The first is that, instead of requiring an atomic variable such as a string or an int as input, we now require a class named Dataset. Classes are a whole different story altogher (see the BraneScript documentation or the container.yml documentation), but because Data is a special builtin we can safely ignore it for now.
All that you have to know is that Data represents a dataset reference; it is not the data itself, but merely some way for the framework to known which dataset you are talking about. You can find more information about this in the chapters for scientists, but as a teaser, this is how such a reference is created:
let data_reference := new Data { name := "numbers" };
This creates a reference for a dataset called numbers (what a coincidence!). Thus, by specifying that our package takes a Data as input, Brane will know that it's actually some larger dataset that we're referencing.
In the output, we are using something extremely similar: a class named IntermediateResult. This is Brane's builtin class for intermediate results, and this is once again a reference to a dataset. The only concrete differences between these two (other than those specified in the background section) is that Data cannot be the output of your function, only IntermediateResult. This should be obvious from the semantic difference between them.
This is all that is necessary for Brane to arrange that data is appropriate made available to our package. The rest is done in the package code itself.
IntermediateResultas an input instead of aData. This is becauseData-objects are trivially convertible toIntermediateResultobjects, but the reverse isn't true. Thus, usingIntermediateResultis more general and typically better practise.
3. Writing code
We can now finally start writing the code that runs in our package. Because we have already written the container.yml file, we can safely assume that we will have two inputs, COLUMN and FILE, and that our function should return an intermediate result called output somehow.
The code itself will be based on Python, like in the previous tutorial, and then specifically the Pandas library, since that is able to compute the minumum/maximum of a CSV file in just a few lines.
Like before, create a file code.yml that will contain our Python code in the package directory (remember, we use minmax as that directory):
#!/usr/bin/env python3


# Imports
import json
import os
import pandas as pd
import sys


# The functions
def max(column: str, df: pd.DataFrame) -> int:
    """
        Finds the maximum number in the given column in the given pandas
        DataFrame.
    """

    # We use the magic of pandas
    return df.max(axis=column)


def min(column: str, data: pd.DataFrame) -> int:
    """
        Finds the minimum number in the given column in the given pandas
        DataFrame.
    """

    # We use the magic of pandas again
    return df.min(axis=column)


# The entrypoint of the script
if __name__ == "__main__":
    # This bit is identical to that in the previous tutorial, but with different keywords
    if len(sys.argv) != 2 or (sys.argv[1] != "max" and sys.argv[1] != "min"):
        print(f"Usage: {sys.argv[0]} max|min")
        exit(1)

    # Read the column from the Brane-specified arguments
    column = json.loads(os.environ["COLUMN"])

    # TODO 1

    # Use the loaded file to call the functions
    command = sys.argv[0]
    if command == "max":
        result = max(column, <TODO>)
    else:
        result = min(column, <TODO>)

    # TODO 2
(Don't forget the shebang!)
More than in the previous tutorial, we will leave understanding the Python code up to you. If you have trouble understanding what it does, we refer you to the Pandas documentation. The two # TODOs are the places where we will interact with the given dataset or result and return the resulting result, respectively.
First, we will examine how to access given datasets. We assume that two arguments are given to the package: COLUMN (which defines the name of the column to read) and FILE (which will somehow be our dataset). COLUMN will be a simple string, and FILE will be some reference to the dataset that the scientist wants our package to work on (see the container.yml section).
But what is passed exactly? This is a very case-specific answer, since Brane assumes that every dataset is completely unique - even up to the point of its representation (i.e., a file, a remote API, ...). This means that, as a package writer, it is very hard to write general packages, and instead you will have to make assumptions about a specific format of a dataset. Thus, if you want to support multiple types of datasets, it's instead recommended to create multiple functions, one per data type, and verbosely document the types of data required.
For the tutorial, however, we can commit ourselves to the numbers dataset only. This is of kind file (see above), which means that Brane will do two things when it passes it to your package:
-
Before the container with your package is launched, the dataset's referenced file (or folder) will be available under some path (in practise, this is typically a folder nested in the
/datadirectory in the container). -
It will pass the path of the dataset's file (or folder) to you as a string. This is the value passed in the
FILEargument. You should always use the given path instead of using a hardcoded one. Not only is the generated path undefined (it may differ per implementation or even domain you're running on), it's also a different path each time a result is passed to your function. Relying on hardcoded values is very bad practise.
Concretely, the following Python snippet will use Pandas to load the dataset at the path given by the FILE argument:
...

# TODO 1

# Load the path given in FILE (you can assume it's always absolute)
file = json.loads(os.environ["FILE"])
df = pd.read_csv(file)

...

if command == "max":
    # Note that we replaced '<TODO>' with the loaded dataset here
    result = max(column, df)
else:
    result = min(column, df)

...
Despite all the theoretical background, accessing the dataset is typically relatively easy; the only thing to keep in mind is that it is highly specific to the dataset you are committing yourself to.
numbersdataset packaged a folder with the filenumbers.csvin it, the following should be done instead:file = json.loads(os.environ["FILE"]) df = pd.read_csv(f"{file}/numbers.csv")However, in this tutorial things are kept simple, and a single file is packaged directly.
With the dataset loaded, we will now consider the second part, which is writing the result.
For educational purposes, we assume that we do not want to use the minimum / maximum number directly, but instead package it as a new dataset. This is actually very common, since this way the result is also subject to policies and cannot be send everywhere.
Recall from the container.yml section that we have defined that our package returns an IntermediateResult with name output. By using that return type, Brane will do the following:
- A folder
/resultbecomes available that is writable (in contrast to the input files/folders). Everything that is written to that folder is, after your package call completes, automatically packages as a new piece of data (anIntermediateResult, to be precise).
This means that for our package, all that it has to do to write the result is simply write it to a file in the /result directory. This is exactly what we'll be doing:
...

# TODO 2

# We will write the `result` variable to `/result/result.txt`
with open("/result/result.txt", "w") as h:
    h.write(f"{result}")
Perhaps a bit counter-intuitively, note that our statement that we will have to return the result as output somehow isn't actually true; because functions can have only a single output, and this output is now solely on disk under a defined folder, Brane packages shouldn't actually return anything on stdout when they return an intermediate result. Thus, the output name defined in the container.yml is actually unused in this case.
And with that, our package code is complete! The full code can be inspected in the repository.
/resultdirectory looks like once your package call is done with it. Other packages will get the same directory as-is, so will have to know which files to load and in what format they are written.
4. Building & Publishing the package
This will mostly be the same as in the previous tutorial(s), and because this tutorial is already getting pretty long already, we assume you are getting familiar to this now.
One key difference with before is that when testing your package, you should now be prompted to use a dataset as input:
// TODO
It will only show you the locally available datasets, which should include the numbers dataset. If not, go back to the first section and redo those steps.
Similarly, calling your package from the terminal will require you to explicitly reference the numbers dataset:
// TODO
You should also see that executing your package call will not be very exciting, since all it does is produce a new dataset. This is alright, since subsequent package calls in a workflows are still able to use it; however, for demonstration purposes, you can try to download the cat package to inspect it:
// TODO
(Refer to the pull chapter for scientists to learn how to install it).
Next
Congratulations! You have now mastered Brane's packaging system. This should allow you to create useful data science packages for the Brane ecosystem, that scientists may rely upon in their workflows.
As a follow-up to these chapters, you can continue with the chapters for scientists to learn about the workflows for which you write packages. Alternatively, you can also check the documentation of container.yml or data.yml to see everything you can do with those files. Finally, you can also go to the BraneScript documentation to find a complete overview of the language if you're interested.
Alternative packages: OpenAPI Standard
Introduction
In these few chapters, we will explain the role of scientists within the framework. Specifically, we will talk about BraneScript and Bakery, two domain-specific languages (DSLs) for Brane that are used to write workflows. Concretely, this chapters will thus focus on writing the high-level workflows that may implement a specific use-case.
To start, we recommend that you first read the next section to get a little background and read about some terminology that we will be using. After that, you can go the next chapter, where we will discuss preparing your machine for interacting with Brane.
Background
Typically, workflows revolve around packages that contain external functions (also known as package functions). These are treated extensively in the chapters for software engineers, but all a scientist needs to know is that each function is an algorithm that maybe be executed on a remote backend, managed by Brane.
Another important concept is that of datasets, which are (typically large) files or other sources that contain the data that package functions may operate on. For example, a dataset may be a CSV file with tabular data; or in another instance, it's a compressed archive of CT-scan images.
Workflows are typically in the business of using a combination of package functions acting on certain datasets to achieve certain goals. In short, they are high-level descriptions and implementation of a use-case. And that's exactly the role that a Scientist has in the Brane framework: writing these high-level workflows using low-level packages provided by software engineers as implementation.
Next
In the next chapter, we will walk you through setting up your machine to start writing workflows. If you have already done so previously, you can also skip ahead and learn how to manage packages for your workflows.
Installation
In this chapter, we will discuss how to install the Brane Command-Line Tool, or the brane-executable, on your machine.
If you already have this executable available, you can skip ahead to the next chapter instead. If you do not, you should begin with the next chapter.
Aside from the
braneexecutable, you may make your life easier by installing the Brane JupyterLab environment; check out its repository.
Prerequisites
Before you can write and test workflows on your machine, make sure that you install the following:
- Install Docker on your machine. You can refer to the official documentation to find how to install it for Debian, Ubuntu, Arch Linux, macOS or other operating systems.
- Install the Docker Buildkit plugin. Their repository contains information on how to install it, but typically, the following works:
# Clone the repo, CD into it and install the plugin (check https://github.com/docker/buildx#building for alternative methods if that fails)
git clone https://github.com/docker/buildx.git && cd buildx
make install

# Set the plugin as the default builder
docker buildx install

# Switch to the buildx driver
docker buildx create --use
Downloading the binaries
The easiest way to install the brane-executable is by downloading it from the project's repository.
Head to https://github.com/epi-project/brane/releases/latest/ to find the latest release. From there, you can download the appropriate brane executable by clicking on the desired entry in the Assets-list:
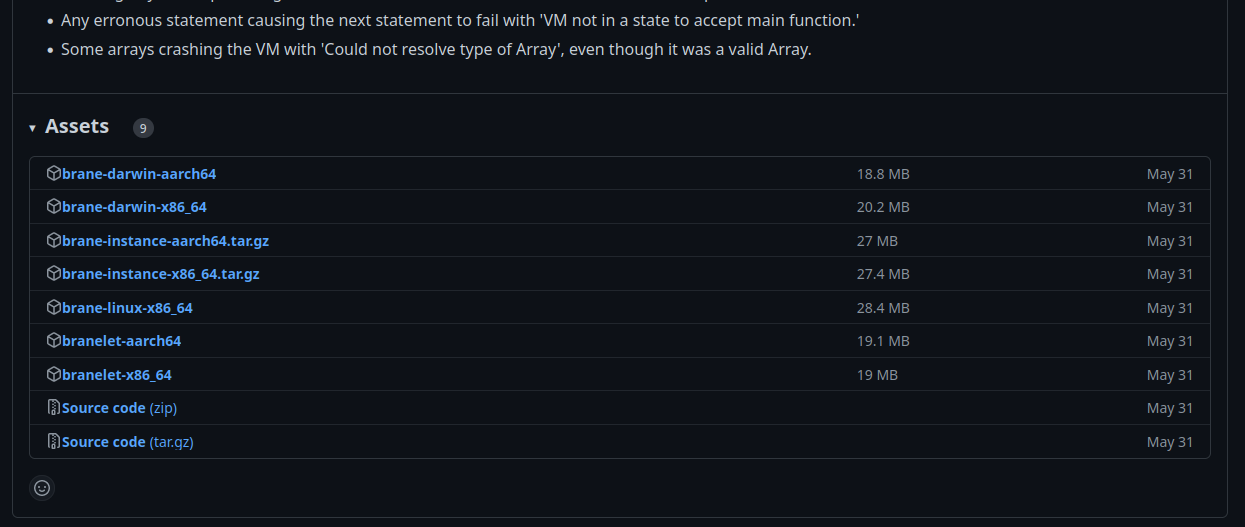
Example list of assets in a specific Brane release; you can click the one you want to download.
To know which of the executables you need, it helps to know the naming scheme behind the assets:
- Every asset starts with some name identifying the kind of asset. We are looking for the
braneexecutable, so find one that starts with onlybrane. - Next, the OS is listed. Linux users can select a binary with
linux, whereas macOS users should selectdarwininstead. - Finally, the processor architecture is listed. Typically, this will be
x86_64, unless you are on a mac device running an M-series processor; then you should selectaarch64.
So, for example, if you want to write workflows on a Linux machine, choose brane-linux-x86_64; for Intel-based Macs choose brane-darwin-x86_64, and for M1/M2-based Macs, choose brane-darwin-aarch64.
Once you have downloaded the executable, it is very useful to put it somewhere in your $PATH so that your terminal can find it for your. To do so, open up a terminal (Ctrl+Alt+T on Ubuntu) and type:
sudo mv <download_location> /usr/local/bin/brane
where you should replace <download_location> with the path of the downloaded executable.
For example, if you are running on an Intel-based Mac, you can typically use:
sudo mv ~/Downloads/brane-darwin-x86_64 /usr/local/bin/brane
To verify that the installation was succesfull, you can run:
brane version
If you see a version number, the installation was successful; but if you see an error (likely something along the lines of No such file or directory), you should try to re-do the above steps and try again.
braneexecutable to somewhere in your PATH is not necessary. However, if you don't, remember that you will have to replace all calls tobranewith the path of where your downloaded the executable. For example, to verify whether it works, use this command instead:~/Downloads/brane-darwin-x86_64 version
Permission denied, you can try to give execution rights to the binary:sudo chmod +x /usr/local/bin/braneand try again.
Compiling the binary
Instead of downloading the binary and running it, you can also choose to compile the binary yourself. This is usually only necessary if you need a cutting-edge latest, unreleased version, you have an OS or processor architecture for which there is no brane-executable readily available or you are actively developing the framework.
To compile the binary, refer to the compilation instructions over at the Brane: A Specification-book for instructions.
Next
If you are able to run the brane version command, you have installed your brane executable successfully! You can now move to the next chapter, which contains information on how to connect to remote instances and manage your credentials. After that, continue with the chapter on package management, or start by writing your first workflow in either BraneScript or Bakery.
Managing instances
The Brane framework has as main goal to act as an interface to one or more High-Performance Compute systems, such as cluster computers or grid computers.
To this end, it is often the case that you want to connect to such a system. In Brane terminology, this is called a Brane instance1, and in this chapter we will discuss how you can connect to it.
In the first section, we will discuss how to define an instance in the CLI and manage it. Then, in the second section we will show how to add credentials (certificates) to the CLI as to easily use them when connecting to an instance.
It's a little bit more complex than presented here. A single Brane instance may actually abstract over multiple HPC systems at once, effectively acting as a "HPC orchestrator". However, from your point of view, the scientist, Brane will act as if it is a single HPC divided into separate domains.
The instance-command
All of the commands for managing the basic information about instances is grouped under the brane instance subcommand in the brane CLI. We will assume in this chapter that you have already installed this tool, so consult the installation chapter if you did not.
In the CLI, instances are defined as separate entities that can be created and destroyed. Think of them as keys in a keychain, where each of them has a unique name to identify them, and furthermore carries information such as where to reach the instance or credentials to connect with.
If you have just installed the CLI, you won't have any instances yet. You can check this by running:
brane instance list
This should show you an empty table:

Let's change that by defining our own instance!
Defining instances
For the purpose of this tutorial, we assume that there is a Brane instance running at some-domain.com, which is what we want to connect to.
The most basic form of the command to generate a new instance is as follows:
brane instance add <HOSTNAME>
where we want to replace <HOSTNAME> with the address where we can reach the instance.
For our example, you can run:
brane instance add some-domain.com
which then adds a new instance with default settings. You can see this by running brane instance list again:

This shows you the name by which you can refer to this instance and the addresses that the CLI uses to connect to this instance. In addition, you can also add the --show-status flag to ping the remote backend and see if it's online:

By default, the CLI will also ping the remote instance when you define it to help you to see if you entered the hostname correctly. If you want to disable this behaviour, or if you are not connected to the internet when you define a new instance, add the
--uncheckedflag:brane instance add <HOSTNAME> --unchecked
Defining non-default instances
While the command used above is nice and concise, it is often desireable to change some properties about the instance upon creation.
One of such properties is the name of the instance. By default, this equals the hostname, but you can easily specify this to be something else using the --name option:
brane instance add <HOSTNAME> --name <SOME_OTHER_NAME>
For example:
brane instance add some-domain.com --name instance1
Inspecting the instance using brane instance list now shows:

--nameflag to define multiple instances that point to the same hostname. This might be useful if you have two sets of credentials you want to login with (see below).
There are other properties that can be set, too. You can inspect them using brane instance add --help, or consult this list:
--api-port <NUMBER>changes the port number with which the CLI connects to the instance's registry. Leaving this to the default value is probably fine, unless the system administrator of the instance told you to use something else.--drv-port <NUMBER>changes the port number with which the CLI connects to the instance's execution engine. Leaving this to the default value is probably fine, unless the system administrator of the instance told you to use something else.
Selecting instances
After you have created an instance, however, you must select it before you can use it. This effectively tells the CLI that all subsequent commands should be executed on the selected instance, if relevant, until the selection is changed.
To do so, use the following command:
brane instance select <NAME>
For example:
brane instance select instance1
You can verify that you have selected an instance by running brane instance list again. The selected instance should be printed in bold:

--useflag to instantly select it:brane instance add <HOSTNAME> --useavoiding the need to manually call
brane instance select ...afterwards.
Editing instances
If you ever need to change some property of the instance, then you can use the brane instance edit subcommand to do so.
You can change the same properties from an instance as given during creation, except for the name of an instance. To "change" the name of an instance, you have to re-define it with the same properties as the old one.
The properties that can be changed can be found when running brane instance edit --help, or else in this list:
--hostname: Change the hostname where this instance lives. For example:brane instance edit instance1 --hostname some-other-domain.com.--api-port: Change the port number with which the CLI connects to the instance's registry.--drv-port: Change the port number with which the CLI connects to the instance's execution engine.
Note that you can specify multiple options at once, e.g.:
brane instance edit instance1 --hostname some-other-domain.com --api-port 42
changes both the hostname and the API port for the instance instance1.
Removing instances
Finally, if you no longer have the need to connect to an instance, you can remove it using the following command:
brane instance remove <NAME>
When you attempt to remove it, brane will not do so before you have given confirmation. Simply hit y if you want to remove it (no need to press enter), or n if you changed your mind.
For example, if you run:
brane instance remove some-domain.com
and then hit y, you should no longer see it in the list generated by brane instance list:

If you remove a selected instance, then no instance will be selected afterwards, and you have to re-run brane instance select with a different one.
--forceflag to skip the confirmation check:brane instance remove <HOSTNAME> --forceUse at your own risk!
brane instance remove some-domain.com instance1would remove both of those instances.
Note that you will only be asked for confirmation once.
And that's it for the basic instance mangement!
Credentials
Aside from the basic properties of an instance, there is also the matter of credential management. After all, an instance may handle sensitive data, in which case it's paramount that a user is able to identify themselves.
A complicating factor in this story is that a Brane instance may consist of multiple domains (for example, it may feature two hospitals who want to collaboratively run some workflow). The problem, however, if that they are both in charge of their own authentication scheme; while this is very nice for the hospitals, it gets a little complicated for you, the scientist, because you will have to have credentials for each domain with an instance. Typically, this will be a certificate, and every domain will provide you with one that proves you are who you say you are - but only on their domain.
For this section, we once again assume that there is some instance over at some-domain.com and that you have already defined an instance called instance1 to refer to it (see the previous section). Additionally, we assume that you have been provided with the certificates for a domain called domain1: two files, ca.pem and client-id.pem.
Adding certificates
Brane always assumes that a certificate pair for the purpose of connecting to a domain consists of two files:
- A root certificate, canonically called
ca.pem, which allows the Brane CLI to detect if the remote domain is who they say they are. It is a public certificate, so it is not very sensitive. - A client identity file, canonically called
client-id.pem, which contains both the public and private parts of your key to that domain. Because of this private key, however, this file is sensitive, so never share this with anyone!
Note, however, that it may be the case that the system administrator of the target domain provides you with a single file that contains both, or three files to separate the client certificate and key. Regardless, to add them to an instance, you can run the following command:
brane certs add <FILES>
By default, the CLI will add the certificates to the instance you have currently selected, but you can also use the --instance option to target some other instance.
So, for our certificates:
brane certs add ca.pem client-id.pem
Similarly to how you can use brane instance list to check your instances, you can use brane certs list to check your certificates:

CAandCLIENTmentioned in the table refer to the files generated by the command, not by your input. That means that regardless of how many certificate/key files you specify, it will always separate them into one CA file and one client file internally.
Note that the domain name is automatically deduced based on the issuer of the certificates. Typically, this is what you want, since the domain name is used automatically based on the name of the domain to which the CLI will connect. However, if necessary, you can manually specify it using the --domain flag.
Removing certificates
Just as with instances, removing certificates is also useful at times. To do so, use the following command:
brane certs remove <DOMAIN>
This will remove the certificates for the given domain in the currently selected instance. Just as with brane certs add, you can remove them in another instance using the --instance flag, and just like brane instance remove, you can specify multiple domains at once to mass-delete them.
After running the command, the certificates will disappear again if you run brane certs list:
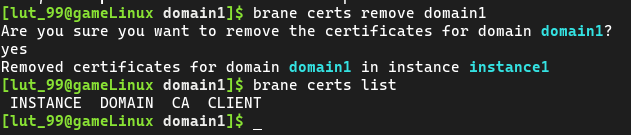
brane certs list --allto see all of the certificates in all of the instances.
Next
Now that you can manage instances and their credentials, you are ready to start managing the packages available locally and in your Brane instance of choice. If that's already setup, you can start writing your own workflow! See the chapter on BraneScript for how to do this.
Playing with packages
In this chapter, we will explain how to manage packages on your local system and push them to a remote instance for running your workflows.
Currently, Brane has three ways of obtaining packages that contain functions: package code yourself, download a package from GitHub or pull them from a Brane instance. The first option is typically the role of a software engineer, and so we focus on the latter two in this chapter.
We will first discuss where you can move packages to/from in the first section. Then, in the two following sections, we will explain how to get packages from GitHub and from a Brane instance, respectively. Then, in the section after that, we will also explain how to push the obtained packages to (another) Brane instance to use them, and we close by discussing how to remove packages in the final section.
Note that we assume that you are able to login to some remote instance, as described in the previous chapter.
Package locations
Brane packages can have two possible kinds of locations: they can be local, in which case they are only usable on your machine; or they can be remote, in which case they are usable in some Brane instance.
Typically, you first download a package to your local machine from whatever source (see the next section and the section after that) to play around with it and to test your workflows; and then, when you are ready to schedule the workflow "for real", you push them to a remote instance and submit your workflow there.
// TODO package diagram
Another thing to note is that every Brane instance will also host its own package repository. So another instance of where you have to manage packages is to pull a package from one instance to your local machine, and then push it to another instance for use there.
Downloading packages from GitHub
The first method to download a package is by downloading it from GitHub using the brane-executable. You can find how to install this tool in the installation chapter.
brane.
As an example repository, we will use the brane-std repository. It provides a set of packages that are useful in general scenarios, and so can be thought of as a kind of standard library for Brane.
Before we can install a package from a repository, first we have to find the identifier of the repository. This identifier is written as the GitHub user or organisation name, a slash, and then the name of the repository. Or, more precisely, the identifier is the part of the URL of a repository that comes after https://github.com/. For example, for the standard library, which can be found at https://github.com/epi-project/brane-std, the ID would be:
epi-project/brane-std
To download a package and install it locally, you can use the following command:
brane import <REPO> <FILE>
where <REPO> is the identifier of the repository, and <FILE> is the path to the package to download in that repository. Note that you have to refer to the container.yml file (or similar) for that package; consult the documentation of the package to find which file to refer to specifically.
container.ymlfile in the root of the repository, you can also omit the<FILE>argument.
So, for example, to download the hello_world package from the standard library:
brane import epi-project/brane-std hello_world/container.yml
Brane will then download the package and install it, making it available for local use.
Pulling packages from an instance
Another method is to pull a package from a remote instance to your local machine so you can distribute it later.
To use it, you first have to define and then select an instance to work on. We won't go into detail here; consult the previous chapter for that. Instead, you can use this command to quickly log into an instance if you haven't already:
brane instance add <ADDRESS> --use
where <ADDRESS> is the URL where the instance may be reached.
--uncheckedflag behind it:brane instance add <ADDRESS> --use --uncheckedHowever, note that if it works with this flag, it means the remote instance isn't available - so any of the subsequent commands won't work either.
Once logged-in, you can fetch a list of available packages by using:
brane search
Which should display something like:

Then you can use the brane pull command to pull one of the available packages:
brane pull <ID>
where <ID> is typically the name of the package. However, if you want to download a specific package version instead of just the latest version, you can also use <NAME>:<VERSION>.
For example, to download the hello_world package from an instance that is reachable at some-domain.com:
# Needs only doing once
brane instance add some-domain.com --use

# Pull the package
brane pull hello_world
# Or, to pull version 1.0.0 specifically:
brane pull hello_world:1.0.0
Pushing packages
Aside from making packages available on your local machine, you also need the ability to publish packages to a remote instance.
To publish a package, you first have to make sure you are logged-in to an instance. If you have not already in the previous section, do so by running:
brane instance add <ADDRESS> --use
where <ADDRESS> is the URL where the instance may be reached. Consult the previous chapter for more information on this and related commands.
Then, you can find a list of the packages installed locally by running:
brane list
which should return something like:

Next, you can push the latest version of a package to the remote instance by using:
brane push <ID>
where <ID> is the name of the package. However, if you want to download a specific package version, you can also use <NAME>:<VERSION>.
For example, to push the package hello_world to an instance that is reachable at some-domain.com:
# Needs only doing once
brane instance add some-domain.com --use

# Push the package
brane push hello_world
# Or, to push version 1.0.0 specifically:
brane push hello_world:1.0.0
Removing packages
Finally, Brane conveniently offers you functions for removing existing packages without diving into filesystems.
Local packages
For local packages, you can use the following command:
brane remove <ID>
where <ID> is the name of the package. If you want to delete a specific version instead of all its versions, you can use <NAME>:<VERSION> instead.
For example, to remove the hello_world package from the local repository:
brane remove hello_world
# Or, a specific version:
brane remove hello_world:1.0.0
--forceflag to skip the check:brane remove hello_world --forceUse at your own risk.
The same can be done for remote packages, except that you should use brane unpublish instead:
brane unpublish <ID>
# Don't forget to login first if you haven't already - you are interacting with an instance again
brane instance add some-domain.com --use

# For hello_world:
brane unpublish hello_world
# Or a specific version:
brane unpublish hello_world:1.0.0
Next
Now that you can manage packages, it is finally time to move on to that which you are here to do: write workflows. You can go to the next chapter for tutorials on doing so with Brane's own language, BraneScript.
However, if you already have a basic idea, you can also skip ahead to further chapters in each language to discuss increasingly advanced concepts. Alternatively, you can also just check the more extensive tutorials on BraneScript in its own series of chapters.
BraneScript Workflows
In these chapters, we will discuss what it means to write a workflow, and how BraneScript can help you to do this.
In the first chapter, we will discuss what it is that we exactly try to model with BraneScript. To this end, we will go in a bit more depth on workflows, and discuss the example that we will spend untangling for the rest of this series.
In the second chapter, we will discuss calling the external functions in BraneScript, which is arguably the most elementary yet useful operation that can be done. Then, in the third chapter, we will discuss variables, after which we will treat control flows statements in the fourth chapter. Finally, we will discuss the notion of Data in Brane, after which you will have completed you brief BraneScript bootcamp.
Note that this tutorial is not meant to give you a complete overview of BraneScript. Instead, it will teach you the most important concepts for writing most workflows. If you are eager to learn about all of its features, consider checking the extended tutorial in the chapters on BraneScript itself, or even consult the language specification in the Brane: A Specification book.
The language in high-level
Calling functions
Variables
Control flow
Datasets in a workflow
Writing a full workflow: Jupyter-style
Introduction
In these series of chapters, you can find reference materials for the various configuration files used in BRANE. These are mostly relevant for system administrators, but also include user-facing configuration files such as the container or data files.
The configuration files are ordered by user. In the admin chapters, you can find configuration files for system administrators, and in the user chapters you can find configuration files for system engineers or scientists.
Alternatively, you can use the sidebar to the left to find an overview of all configuration files.
Conventions
Throughout these chapters, we use the following convention to represents configuration files.
In most cases, configuration files are defined as either YAML or JSON. In either such case, we typically define the toplevel fields in the struct as the JSON type their are - or as a
Configuration files for users
In this chapter, you can find an overview of the configuration files for software engineers and scientists.
There are other configuration files in BRANE, but these are for use of administrators of nodes and instances. You can find those here, or check the sidebar to the left.
In addition, there are a few configuration files that are present on the user's machine, but only relevant for the framework itself. These are discussed in the specification.
The following configuration files are relevant for users of the framework:
container.yml: A YAML file that defines the metadata of a BRANE package.data.yml: A YAML file that defines the metadata of a BRANE dataset.
The container file
![]()
ContainerInfo in specifications/data.rs.
The container file, or more commonly referenced as the container.yml file, is a user-facing configuration file that describes the metadata of a BRANE package. Most notably, it defines how the package's container may be built by stating which files to include, how to run the code, and which BRANE functions are contained within. Additionally, it can also carry data such as the owner of the package or any hardware requirements the package has.
Examples where simple container.ymls are written can be found in the chapters for software engineers.
Toplevel layout
The container.yml file is written in YAML. It has quite a lot toplevel fields, so they are discussed separately in the following subsections.
First, we discuss all required fields in the first subsection. Then, in the subsequent sections, all optional fields are discussed.
Required fields
name: A string defining the package's identifier. Must be unique within a BRANE instance.version: A string defining the package's version number. Given as three non-negative numbers, separated by a dot (e.g.,0.1.0), representing the major, minor and patch versions, respectively. Conventionally adheres to semantic versioning. Forms a unique identifier for this specific package together with thename.kind: A string defining the kind of the package. For acontainer.yml, this must always beecu(which stands forExeCutable Unit).entrypoint: A map that describes which file to run when any function in the package is executed. The following fields are supported:kind: The kind of entrypoint. Currently, onlytaskis supported.exec: The path to the file to execute. Note that all paths are relative to the rootmost file or directory defined in thefiles-field.
An example of the required toplevel fields:
# Shows an absolute bare minimum header for a `hello_world` package that contributes nothing

name: hello_world
version: 1.0.0
kind: ecu

entrypoint:
  kind: task
  # This won't do anything
  exec: ":"
Extra metadata
owners[optional]: A sequence of strings which defines the owners/writers of the package. Omitting this field will default to no owners.description[optional]: A string description the package in more detail. This is only used for thebrane inspect-subcommand (see the chapters for software engineers). If omitted, will default to an empty string / no description.
An example of using these fields:
...

owners:
- Amy
- Bob

description: |
  An example package with a lengthy description!

  We even have two lines, using YAML's bar-syntax.
Functions & Classes
actions[optional]: A map of strings to nested maps that specifies which functions are available to call in this package. Every key defines the name of the function, and every nested map defines what BRANE needs to know about it. The definition of this nested map is given below. Omitting the field will default to no functions defined.types[optional]: A map of strings to nested maps that specifies any custom classes contributed by this package. Omitting this field will default to no such types defined. Every key defines the name of the class, and the map accepts the following possible fields:properties[optional]: A map of string property names to string data types. The data types are listed in the appropriate section below. Omitting the field will default to no properties defined.methods[optional]: A map of string method names to nested maps that define what BRANE needs to know about a function body. The definition of this nested map is given below, with the additional requirement imposed on it that there must be at least one input argument calledselfthat has the same type as the class of which is it part. Omitting the field will default to no methods defined.
An example of either of the two fields:
# Shows an example function that returns a "Hello, world!"-string as discussed in the chapters for software engineers

...

entrypoint:
  kind: task
  exec: hello_world.sh

actions:
  hello_world:
    output:
    - name: output
      type: string
# Shows an example function that return a "Hello, world!"-string using commands only

...

entrypoint:
  kind: task
  exec: /bin/bash

actions:
  hello_world:
    command:
      args:
      - "-c"
      - "echo 'output: Hello, world!'"
    output:
    - name: output
      type: string
# Example that shows the definition of a HelloWorld-class that would say hello to a replacement of 'world'

...

types:
  HelloWorld:
    properties:
      world: string
    methods:
      hello_world:
        # Mandatory argument
        input:
        - name: self
          type: HelloWorld
        output:
        - name: output
          type: string
Older BRANE versions (<= 3.0.0) have more limited support for custom classes. First, the key is effectively ignored, and instead an additional
name-field defines the string name. Second, the properties are not defined by map but instead more like arguments (i.e., as a sequence with a separate name field). Finally, themethods-field is not supported altogether. The closest alternative to the above example would thus be:actions: # Replaces the method, instead requiring a manual function call hello_world_method: input: - name: self type: HelloWorld output: - name: output type: string types: HelloWorld: name: HelloWorld properties: - name: world type: string
Container creation fields
base[optional]: A string describing the name of the base image for the container. Note that currently, only Debian-based images are supported (due to dependencies being installed with apt-get). If omitted, will default toubuntu:20.04.environment[optional]: A map of string environment variable names to their values to set in the container using theENV-command. These occur first in the Dockerfile. Omitting this field means no custom environment variables will be set.dependencies[optional]: A sequence of strings describing additional packages to install in the image. They should be given as package names in the repository of the base image, since they will be installed using apt-get. The installation of these occurs before any of the subsequent fields in the Dockerfile. If omitted, no custom dependencies will be installed.install[optional]: A sequence of strings that defines additional commands to run in the container. Every string will be oneRUN-command. Since these are placed after thedependencies-step, but before thefiles-step in the Dockerfile, they are conventionally used to install non-apt dependencies. If omitted, none of suchRUN-steps will be added.files[optional]: A sequence of strings that refer to files to copy into the container. Every entry is one file, which can either be an absolute path or a relative path. The latter will be interpreted as relative to thecontainer.ymlfile itself, unless thebrane build --contextflag is used (seebrane build --helpfor more information). The copy of the files will occur after theinstall-steps, but before thepostinstall-steps. If omitted, no files will be copied.postinstall(orunpack) [optional]: A sequence of strings that defines additional commands to run in the container after the files have been copied. Every string will be oneRUN-command. Since these are placed after thefiles-step in the Dockerfile, they are conventionally used to post-process the source files, such as unpacking archives, downloading additional files or executing Pipfiles. If omitted, none of suchRUN-steps will be added.
A few examples of the above fields:
# Shows a typical installation for a Hello-World python script

...

dependencies:
- python3
- python3-pip

install:
- pip3 install yaml

files:
- hello_world.py

...
# Shows a more complex example where we use a new Ubuntu version and postinstall from a requirements.txt

...

base: ubuntu:22.04

dependencies:
- python3
- python3-pip

files:
- hello_world.py
- requirements.txt

postinstall:
- pip3 install -f requirements.txt

...
Function layout
The following fields define a function layout:
requirements[optional]: A sequence of strings that defines hardware capabilities that are required for this package. An overview of the possible capabilities can be found here.command[optional]: A map that can modify the command to call the file defined in theentrypointtoplevel field. Omitting it implies that no additional arguments should be passed. It has the following two possible fields:args: A sequence of strings that defines the arguments to pass to the file. Conventionally, this is used to distinguish between the various functions in the file (since there is only one entrypoint).capture[optional]: A string that defines the possible modes of capturing theentrypoint's output. The output should be a YAML file, but only that defined by the capture is identified as such. Possible options are:completeto capture the entire stdout;markedto capture everything in between a--> START CAPTURE-line and an--> END CAPTURE-line (not including those markers, and only once); orprefixedto capture every line that starts with~~>(which is stripped away). Omitting thecapture-field, or omitting thecommand-field altogether, will default to thecompletecapture mode.
input[optional]: A sequence of maps that defines the input arguments to the function. The order of the sequence determines the order of the arguments in the workflow language. Omitting the sequence defaults to an empty sequence, i.e., no input arguments taken. The following fields can be used in each nested map:name: A string name of the argument. This will define the name of the environment variable that theentrypointexecutable can read to obtain the given value for this argument. It is not a one-to-one mapping; instead, the environment variable has the same name but in UPPERCASE. In addition, this name will also be used in BraneScript error messages when relevant.type: A string describing the BRANE data type of the input argument. The possible types are defined in the relevant section below.
output[optional]: A sequence of maps that defines the possible output values to a function. The nested maps are of the same as for theinput-field (see above), except that the names of the values are used as fieldnames in the YAML outputted by the package code. The order or the sequence determines the order of the returned values in the workflow language. Omitting the sequence defaults to an empty sequence, i.e., returning a void-value. Older BRANE versions (<= 3.0.0) do not support more than one output value, even though they do require a YAML map to be passed. In other words, the sequence cannot be longer than one entry.description[optional]: An additional description for this specific function. This is only used for thebrane inspect-subcommand (see the chapters for software engineers). If omitted, will default to an empty string / no description.
For examples, see the Functions & Classes section.
Data types
![]()
DataType in brane_ast/data_type.rs.
BRANE abstracts the various workflow languages it accepts as input to a common representation. This representation is what is referred to in the container.yml file when we are talking about data types, and so these data types are language-agnostic.
The following identifiers can be used to refer to certain data types:
boolorbooleanrefers to a boolean value.intorintegerrefers to a whole number (64-bit integer).floatorrealrefers to a floating-point number (64-bit float).stringrefers to a string value.- Any other alphanumerical identifier is interpreted to be a custom class name (see the toplevel
types-field). - Any of the above can be wrapped in square brackets (e.g.,
[int]) or suffixed by square brackets (e.g.,int[]) to define an array of the wrapped/suffixed type.- Nested arrays are possible (e.g.,
[[float]]orfloat[][]).
- Nested arrays are possible (e.g.,
For examples, see the Functions & Classes section.
Full example
A full example of a container.yml file, taken from the Hello, world!-tutorial:
# Define the file metadata
# Note the 'kind', which defines that it is an Executable Code Unit (i.e., runs arbitrary code)
name: hello_world
version: 1.0.0
kind: ecu

# Specify the files that are part of the package. All entries will be resolved to relative to the container.yml file (by default)
files:
- hello_world.sh

# Define the entrypoint: i.e., which file to call when the package function(s) are run
entrypoint:
  kind: task
  exec: hello_world.sh

# Define the functions in this package
actions:
  # We only have one: the 'hello_world()' function
  'hello_world':
    # We define the output: a string string, which will be read from the return YAML under the 'output' key.
    output:
    - type: string
      name: output
The data file
![]()
AssetInfo in specifications/data.rs.
The data file, or more commonly referenced as the data.yml file, is a user-facing configuration file that describes the metadata of a BRANE dataset. Most notably, it defines how the dataset can be referenced in BraneScript (i.e., its identifier) and describes which files or other resources actually make up the dataset.
Examples where simple data.ymls are written can be found in the chapters for scientists.
Toplevel layout
The container.yml file is written in YAML. It has the following toplevel fields:
name: The name/identifier of the dataset. This will be used in the workflow language to refer to it, and must thus be unique within an instance.access: A map that describes how the package may be accessed. The map has multiple variants in principle, although currently only the!file-variant is supported:path: A string that refers to a file or folder that has the actual dataset. Can be absolute or relative, where the latter case is interpreted as relative to thedata.ymlfile itself (unlessbrane data build --contextchanges it; seebrane data build --helpfor more information). The pointed file or folder will be attached to containers as-is.
owners[optional]: A sequence of strings which defines the owners/writers of the dataset. Omitting this field will default to no owners.description[optional]: A string description the dataset in more detail. This is only used for thebrane data inspect-subcommand. If omitted, will default to an empty string / no description.
For example, the following defines a data.yml file for a simple CSV file called jedis.csv:
name: jedis
description: A simple CSV file listing Jedis that survived Order 66.
owners:
- Sheev Palpatine
access: !file
  path: ./jedis.csv
Configuration files for administrators
In this chapter, you can find an overview of the configuration files for administrators.
There are also a few configuration files not mentioned here, which are user-facing. You can find them in these chapters instead. Or check the sidebar on the left.
The configuration files for administrators are sorted by node type. The files are referenced by their canonical name.
Control node
infra.yml: A YAML file that defines the worker nodes in the instance represented by the control node.proxy.yml: A YAML file that defines the proxy settings for outgoing node traffic. Can also be found on the worker and proxy nodes.node.yml: A YAML file that defines the environment settings for this node, such as paths of the directories and the other configuration files, ports, hostnames, etc. Can also be found on the worker and proxy nodes.
Worker node
backend.yml: A YAML file that defines how the worker node connects to the container execution backend. Currently, only a local Docker backend is supported, with a Kubernetes backend in development.policies.yml: A YAML file that defines any access control rules for which containers may be executed, and which datasets may be downloaded by whom. For more information, see the chapters for policy experts.data.yml: A YAML file that defines the layout of a dataset that is published on a worker node. Is the same file as used by users.proxy.yml: A YAML file that defines the proxy settings for outgoing node traffic. Can also be found on the central and proxy nodes.node.yml: A YAML file that defines the environment settings for this node, such as paths of the directories and the other configuration files, ports, hostnames, etc. Can also be found on the central and proxy nodes.
Proxy node
proxy.yml: A YAML file that defines the proxy settings for outgoing node traffic. Can also be found on the central and worker nodes.node.yml: A YAML file that defines the environment settings for this node, such as paths of the directories and the other configuration files, ports, hostnames, etc. Can also be found on the central and worker nodes.
The infrastructure file
![]()
InfraFile in brane_cfg/infra.rs.
The infrastructure file, or more commonly referenced as the infra.yml file, is a control node configuration file that is used to define the worker nodes part of a particular BRANE instance. Its location is defined by the node.yml file.
The branectl tool can generate this file for you, using the branectl generate infra subcommand. See the chapter on installing a control node for a realistic example.
Toplevel layout
The infra.yml file is written in YAML. It features only the following toplevel field:
locations: A map that details the nodes present in the instance. It maps from strings, representing the node identifiers, to another map with three fields:name: Defines a human-friendly name for the node. This is only used on the control node, and only to make some logging messages nicer; there are therefor no constraints on this name.delegate: The address of the delegate service (i.e.,brane-job) on the target worker node. Must be given using a scheme (eitherhttporgrpc), an IP address or hostname and a port.registry: The address of the local registry service (i.e.,brane-reg) on the target worker node. Must be given using a scheme (https), an IP address or hostname and a port.
For example, the following defines an infra.yml file for two workers, amy at amy-worker-node.com and bob at 192.0.2.2:
locations:
  # Amy's node
  amy:
    name: Amy's Worker Node
    delegate: grpc://amy-worker-node.com:50052
    registry: https://amy-worker-node.com:50051

  # Bob's node
  bob:
    name: Bob's Worker Node
    delegate: http://192.0.2.2:1234
    registry: https://192.0.2.2:1235
The backend file
![]()
BackendFile in brane_cfg/backend.rs.
The backend file, or more commonly referenced as the backend.yml file, is a worker node configuration file that describes how to connect to the container execution backend. Its location is defined by the node.yml file.
The branectl tool can generate this file for you, using the branectl generate backend subcommand. See the chapter on installing a worker node for a realistic example.
Toplevel layout
The backend.yml file is written in YAML. It features only the following three toplevel fields:
method: A map that defines the method of accessing the container execution backend. Can be one of the following options:!Local: Connects to the Docker engine local to the node on which the worker node runs. This variant has the following two fields:path[optional]: A string with the path to the Docker socket to connect to. If omitted, will default to/var/docker/run.sock.version[optional]: A sequence of two numbers detailling the Docker client version to connect to. If omitted, will negotiate a client version on the fly.
capabilities[optional]: A sequence of strings, each of which defines a capability of the computing backend. Currently supported capabilities are defined below. If omitted, no capabilities are enabled.hash_containers[optional]: A boolean that defines whether to hash containers, enabling container policies in thepolicies.ymlfile. It may give a massive performance boost when using many different larger containers (100MB+), although the hashes are cached as long as the containers are cached. If omitted, will default to 'true'.
A few example backend.yml files:
# Defines the simplest possible file, which is a local file with default options
method: !Local
# Defines a local file that has a different Docker socket path
method: !Local
  path: /home/amy/my-own-docker.sock
# Defines a default local backend that supports CUDA containers and explicitly hashes all containers
capabilities:
- cuda_gpu
method: !Local
hash_containers: true
In older versions of BRANE (<= 2.0.0), the tagged enum representation (e.g.,
!Local) was not yet supported. Instead, use the additionalkind-field to distinguish. For example:# This is the same as the first example method: kind: local# This is the same as the second example method: kind: local path: /home/amy/my-own-docker.sock...
Capabilities
The following capabilities can be used in the backend.yml file:
cuda_gpu: States that the compute backend can provide a CUDA accelerator to containers who ask for that. See therequirements-field in the user'scontainer.ymlfile.
The data file
![]()
AssetInfo in specifications/data.rs.
The data file, or more commonly referenced as the data.yml file, is a user-facing configuration file that describes the metadata of a BRANE dataset. Most notably, it defines how the dataset can be referenced in BraneScript (i.e., its identifier) and describes which files or other resources actually make up the dataset.
Examples where simple data.ymls are written can be found in the chapters for scientists.
Toplevel layout
The container.yml file is written in YAML. It has the following toplevel fields:
name: The name/identifier of the dataset. This will be used in the workflow language to refer to it, and must thus be unique within an instance.access: A map that describes how the package may be accessed. The map has multiple variants in principle, although currently only the!file-variant is supported:path: A string that refers to a file or folder that has the actual dataset. Can be absolute or relative, where the latter case is interpreted as relative to thedata.ymlfile itself (unlessbrane data build --contextchanges it; seebrane data build --helpfor more information). The pointed file or folder will be attached to containers as-is.
owners[optional]: A sequence of strings which defines the owners/writers of the dataset. Omitting this field will default to no owners.description[optional]: A string description the dataset in more detail. This is only used for thebrane data inspect-subcommand. If omitted, will default to an empty string / no description.
For example, the following defines a data.yml file for a simple CSV file called jedis.csv:
name: jedis
description: A simple CSV file listing Jedis that survived Order 66.
owners:
- Sheev Palpatine
access: !file
  path: ./jedis.csv
The proxy file
![]()
ProxyConfig in brane_cfg/proxy.rs.
The proxy file, or more commonly referenced as the proxy.yml file, is a central-, worker- and proxy node configuration file that describes how to deal with outgoing connections out of the node. For more information, see the documentation for the brane-prx service. Its location is defined by the node.yml file.
The branectl tool can generate this file for you, using the branectl generate proxy subcommand. See the chapter on installing a control node for a realistic example.
Toplevel layout
The proxy.yml file is written in YAML. It features only the following three toplevel fields:
outgoing_range: A map that defines the range of ports that can be allocated when other BRANE services request new outgoing connections. This port should be sufficiently large to support at least two connections to every worker node that this node will talk to (which, in the case of a central node('s proxy node), is all worker nodes). The map has the following two fields:start: A positive number indicating the start port (inclusive).end: A positive number indicating the end port (inclusive).
incoming: A map that maps incoming ports to BRANE service addresses for incoming connections. Specifically, every key is a number indicating the port that can be connected to, where the connection will then be forwarded to the address specified in the value. Must be given using a scheme, an IP address or hostname and a port.forward[optional]: A map that carries any configuration for forwarding traffic through a sockx proxy. Specifically, it is a map with the following fields:address: The address to forward the traffic to. Must be given using a scheme (eithersocks5orsocks6), an IP address or hostname and a port.protocol: The protocol to use for forwarding traffic. Can be eithersocks5orsocks6to use the SOCKS protocol version 5 or 6, respectively.
The following examples are examples of valid proxy.yml files:
# This is a minimal example, supporting up to ~50 worker nodes
outgoing_range:
  start: 4200
  end: 4299
incoming: {}
# A more elaborate example mapping a few incoming ports as well
outgoing_range:
  start: 4200
  end: 4299
incoming:
  5200: http://brane-api:50051
  5201: grpc://brane-drv:50053
# An example where we route some network traffic
outgoing_range:
  start: 4200
  end: 4299
incoming: {}
forward:
  address: socks5://socks-proxy.net:1234
  protocol: socks5
The
protocol-field in theforward-map may become obsolete in future versions of BRANE if we apply stricter code restrictions on the protocol used in theaddress-field. You can ease the transition already by being careful which protocol to use.
The node file
![]()
NodeConfig in brane_cfg/node.rs.
The node file, or more commonly referenced as the node.yml file, is a central-, worker- and proxy node configuration file that describes the environment in which the node should run. Most notably, it defines the type of node, where any BRANE software (branectl, services) may find other configuration files and which ports to use for all of the services.
The branectl tool can generate this file for you, using the branectl generate node subcommand. See the chapter on installing a control node for a realistic example.
Toplevel layout
The node.yml file is written in YAML. It defines only two toplevel fields:
hostnames: A map of strings to other strings, which maps hostnames to IP addresses. This is used to work around the issue that certificates cannot be issued for raw IP addresses alone, and need a hostname instead. The hostnames can be defined in this map to make them available to all the services running in this node. For more information, see the chapter on installing a control node (at the end).node: A map that has multiple variants based on the specific node configuration. These are all treated below in their own sections.
An example of just the toplevel fields would be:
# We don't define any hostnames
hostnames: {}
node: ...
  ...
# This example allows us to use `amy-worker-node.com` on any of the services to refer to `192.0.2.3`
hostnames:
  amy-worker-node.com: 192.0.2.3
node: ...
  ...
Because there are quite a lot of nested fields, we will discuss the various variants of the node-map in subsequent sections.
Central nodes
![]()
CentralConfig in brane_cfg/node.rs.
The first variant of the node-map is the !central variant, which defines a central node. There are two fields in this map:
-
paths: A map that defines all paths relevant to the central node. Specifically, it maps a string identifier to a string path. The following identifiers are defined:certs: The path to the directory with certificate authority files for the worker nodes in the instance. See the chapter on installing a control node for more information.packages: The path to the directory where uploaded packages will be stored. This should be a persistent directory, or at the very least exactly as persistent as the storage of the instance's Scylla database.infra: The path to theinfra.ymlconfiguration file.proxy: The path to theproxy.ymlconfiguration file.
Note that all paths defined in the node.ymlfile must be absolute paths, since they are mounted as Docker volumes. -
services: A map that defines the service containers in the central node and how they are reachable. It is a map of a service identifier to one of three possible maps: a private service, a public service or a variable service. Each of these are explained at the end of the chapter.
The following identifiers are available:api(orregistry): Defines thebrane-apicontainer as a public service.drv(ordriver): Defines thebrane-drvcontainer as a public service.plr(orplanner): Defines thebrane-plrcontainer as a private service.prx(orproxy): Defines thebrane-prxcontainer as a variable service.aux_scylla(orscylla): Defines theaux-scyllacontainer as a private service.
An example illustrating just the central node:
...

node: !central
  paths:
    # Note all paths are full, absolute paths
    certs: /home/amy/config/certs
    packages: /home/amy/packages
    infra: /home/amy/config/infra.yml
    proxy: /home/amy/config/proxy.yml

  services:
    api:
      ...
    drv:
      ...
    # (We can also use the aliases, if we like)
    planner:
      ...
    proxy: ...
      ...

    aux_scylla:
      ...
    aux_kafka:
      ...
    zookeeper:
      ...
Worker nodes
![]()
WorkerConfig in brane_cfg/node.rs.
The second variant of the node-map is the !worker variant, which defines a worker node. There are three fields in this map:
-
name(orlocation_id): A string that contains the identifier used to recognize this worker node throughout the system. -
usecases(oruse_cases): A map of string identifiers to worker usecases. This essentially defines several central instances that the work trusts and is aware of, and acts as a map of the identifier to where to find the instance's registry. -
paths: A map that defines all paths relevant to the central node. Specifically, it maps a string identifier to a string path. The following identifiers are defined:certs: The path to the directory with certificate authority files for the worker nodes in the instance. See the chapter on installing a control node for more information.packages: The path to the directory where uploaded packages will be stored. This should be a persistent directory, or at the very least exactly as persistent as the storage of the instance's Scylla database.backend: The path to thebackend.ymlconfiguration file.policy_database(orpolicy_db): The path to the [policies.db] file that is the persistent storage for the policy's of the worker'sbrane-chkservice.policy_deliberation_secret: The path to a JWK that defines the secret used forbrane-chk's deliberation API.policy_expert_secret: The path to a JWK that defines the secret used forbrane-chk's policy expert (management) API.policy_audit_log: An optional path to a file to which thebrane-chkservice writes it audit log. If omitted, the audit log only exists within thebrane-chkcontainer.proxy: The path to theproxy.ymlconfiguration file.data: The path to the directory where datasets may be defined that are available on this node. Seedata.ymlfor more information.results: The path to a directory where intermediate results are stored that are created on this node. It does not have to be persistent per sé, although the services will assume they are persistent for the duration of a workflow execution.temp_data: The path to a directory where datasets are stored that are downloaded from other nodes. It does not have to be a persistent folder.temp_results: The path to a directory where intermediate results are stored that are downloaded from other nodes. It does not have to be a persistent folder.
Note that all paths defined in the node.ymlfile must be absolute paths, since they are mounted as Docker volumes. -
services: A map that defines the service containers in the central node and how they are reachable. It is a map of a service identifier to one of three possible maps: a private service, a public service or a variable service. Each of these are explained at the end of the chapter.
The following identifiers are available:reg(orregistry): Defines thebrane-regcontainer as a public service.job(ordelegate): Defines thebrane-jobcontainer as a public service.chk(orchecker): Defines thebrane-chkcontainer as a private service.prx(orproxy): Defines thebrane-prxcontainer as a variable service.
An example illustrating just the worker node:
...

node: !worker
  paths:
    # Note all paths are full, absolute paths
    certs: /home/amy/config/certs
    packages: /home/amy/packages
    backend: /home/amy/config/backend.yml
    policy_database: /home/amy/policies.db
    policy_deliberation_secret: /home/amy/config/policy_delib_secret.json
    policy_expert_secret: /home/amy/config/policy_expert_secret.json
    policy_audit_log: /home/amy/checker-audit.log     # May be omitted!
    proxy: /home/amy/config/proxy.yml
    data: /home/amy/data
    results: /home/amy/results
    temp_data: /tmp/data
    temp_results: /tmp/results

  services:
    reg:
      ...
    job:
      ...
    # (We can also use the aliases, if we like)
    checker:
      ...
    proxy: ...
      ...
Proxy nodes
![]()
ProxyConfig in brane_cfg/node.rs.
The third variant of the node-map is the !proxy variant, which defines a proxy node. There are two fields in this map:
-
paths: A map that defines all paths relevant to the proxy node. Specifically, it maps a string identifier to a string path. The following identifiers are defined:certs: The path to the directory with certificate authority files for the worker nodes in the instance. See the chapter on installing a control node for more information.proxy: The path to theproxy.ymlconfiguration file.
Note that all paths defined in the node.ymlfile must be absolute paths, since they are mounted as Docker volumes. -
services: A map that defines the service containers in the proxy node and how they are reachable. It is a map of a service identifier to a variable service. This is explained at the end of the chapter.
The following identifiers are available:prx(orproxy): Defines thebrane-prxcontainer as a public service (note: this is different from the other node types).
An example illustrating just the worker node:
...

node: !worker
  paths:
    # Note all paths are full, absolute paths
    certs: /home/amy/config/certs
    proxy: /home/amy/config/proxy.yml

  services:
    prx:
      ...
Service maps
Through the various node variants, a few types of service maps appear. In this section, we will define their layouts.
Private services
![]()
PrivateService in brane_cfg/node.rs.
A private service represents a service that is only accessible for other BRANE services, but not from outside of the Docker network. A few examples of such services are aux-scylla or aux-kafka.
Private services have three fields:
name: A string with the name of the Docker container. This can be anything, but by convention, this isbrane-followed by the ID of the service (e.g.,brane-prxorbrane-api). On worker nodes, this may optionally be suffixed by the name of the worker (e.g.,brane-reg-bob), and on proxy nodes, this may be suffixed byproxy(e.g.,brane-prx-proxy). Finally, third-party services are often namedaux-and then the service ID instead orbrane-(e.g.,aux-scylla).address: A string with the address that other services running on this node can use to reach this service. Because this only applies to services in the same Docker network, you can use Docker DNS names (e.g., you can useaux-scyllaas a hostname to refer a container with the same name).bind: A string with the socket address (and port) that the service should launch as. The port should match the one given inaddress.
An example showing a private service:
...

node: !central
  # The type of service is hardcoded for every node, so no need for the tags (e.g., `!kafka`)
  aux_scylla:
    name: aux-scylla
    # The Scylla images launches of 9042 by default, so might as well use that
    address: aux-scylla:9042
    # Accepts any connection
    bind: 0.0.0.0:9042

  ...
127.0.0.1as a bind address will not work, since the127.0.0.1refers to the container and not the host. Thus, using that address will make the service inaccessible for everyone.
Public services
![]()
PublicService in brane_cfg/node.rs.
A public service represents a service that is accessible for other BRANE services and from outside of the Docker network. A few examples of such services are brane-drv or brane-reg.
Private services have three fields:
name: A string with the name of the Docker container. This can be anything, but by convention, this isbrane-followed by the ID of the service (e.g.,brane-prxorbrane-api). On worker nodes, this may optionally be suffixed by the name of the worker (e.g.,brane-reg-bob), and on proxy nodes, this may be suffixed byproxy(e.g.,brane-prx-proxy). Finally, third-party services are often namedaux-and then the service ID instead orbrane-(e.g.,aux-scylla).address: A string with the address that other services running on this node can use to reach this service. Because this only applies to services in the same Docker network, you can use Docker DNS names (e.g., you can usebrane-drvas a hostname to refer a container with the same name).bind: A string with the socket address (and port) that the service should launch as. The port should match the one given inaddress.external_address: A string with an address that services running on other nodes can use to reach this service. Specifically, this is the address that the node will send to other nodes as a kind of calling card, i.e., an address where they can be reached. Because this is just an advertised address, this address can be used to connect through a gateway (or proxy node) that then redirects the traffic to the correct machine and port.
An example showing a public service:
...

node: !central
  # The type of service is hardcoded for every node, so no need for the tags (e.g., `!kafka`)
  api:
    name: brane-api
    address: http://brane-api:50051
    # Accepts any connection
    bind: 0.0.0.0:50051
    # In this example, we are running on node `amy` living at `amy-central-node.com`
    external_address: http://amy-central-node.com:50051

  ...
127.0.0.1as a bind address will not work, since the127.0.0.1refers to the container and not the host. Thus, using that address will make the service inaccessible for everyone.
Variable services
![]()
PrivateOrExternalService in brane_cfg/node.rs.
A variable service is one where a choice can be made between two different kinds of services. Specifically, one can choose to either host a private service, or something called an external service, which defines a service hosted on another node or machine. This is currently only used by the brane-prx service in central or worker nodes, to support optionally outsourcing the proxy service to a dedicated node.
Subsequently, there are two variants of this type of service:
-
!private: Defines a private service map that describes how to host the service. This is exactly identical to the private service other than the tag. -
!external: Defines an externally running service. It has one field only:address: A string with the address where all the other services on this node should send their traffic to.
(
 The external map variant is defined as
 ExternalServiceinbrane_cfg/node.rs.)
A few examples of variable services:
# Example that show the private variant of the variable service.

...

node: !worker
  # Note that this is just a private service
  prx: !private
    name: brane-prx
    address: brane-prx:50050
    bind: 0.0.0.0:50050

  ...
# Example that show the external variant of the variable service

...

node: !worker
  # We refer to a node living at the host `amy-proxy-node.com`
  prx: !external
    address: amy-proxy-node.com:50050

  ...
Full examples
Finally, we show a few full examples of node.yml files.
# Shows a full central node
hostnames: {}
node: !central
  paths:
    # Note all paths are full, absolute paths
    certs: /home/amy/config/certs
    packages: /home/amy/packages
    infra: /home/amy/config/infra.yml
    proxy: /home/amy/config/proxy.yml

  services:
    api:
      name: brane-api
      address: http://brane-api:50051
      # Accepts any connection
      bind: 0.0.0.0:50051
      # In this example, we are running on node `amy` living at `amy-central-node.com`
      external_address: http://amy-central-node.com:50051
    drv:
      name: brane-drv
      address: http://brane-drv:50053
      bind: 0.0.0.0:50053
      external_address: http://amy-central-node.com:50053
    # (We can also use the aliases, if we like)
    planner:
      name: brane-plr
      address: http://brane-plr:50052
      bind: 0.0.0.0:50052
    # (Shows the private variant of the proxy service)
    proxy: !private
      name: brane-prx
      address: brane-prx:50050
      bind: 0.0.0.0:50050

    aux_scylla:
      name: aux-scylla
      address: aux-scylla:9042
      bind: 0.0.0.0:9042
# Shows a full worker node, with a hostname mapping for `amy-worker-node.com`
hostnames:
  amy-worker-node.com: 192.0.2.3
node: !worker
  name: amy-worker-node
  usecases:
    central:
      api: http://amy-central-node.com:50051
  paths:
    # Note all paths are full, absolute paths
    certs: /home/amy/config/certs
    packages: /home/amy/packages
    backend: /home/amy/config/backend.yml
    policy_database: /home/amy/policies.db
    policy_deliberation_secret: /home/amy/config/policy_delib_secret.json
    policy_expert_secret: /home/amy/config/policy_expert_secret.json
    policy_audit_log: /home/amy/checker-audit.log
    proxy: /home/amy/config/proxy.yml
    data: /home/amy/data
    results: /home/amy/results
    temp_data: /tmp/data
    temp_results: /tmp/results

  services:
    reg:
      name: brane-reg-amy
      address: http://brane-reg:50051
      bind: 0.0.0.0:50051
      external_address: http://amy-worker-node.com:50051
    job:
      name: brane-job-amy
      address: http://brane-job:50052
      bind: 0.0.0.0:50052
      external_address: http://amy-worker-node.com:50052
    # (We can also use the aliases, if we like)
    checker:
      name: brane-chk-amy
      address: http://brane-chk:50053
      bind: 0.0.0.0:50053
    # (Shows the external variant of the proxy service)
    proxy: !external
      address: amy-proxy-node.com:50050
# Shows a full proxy node
hostnames: {}
node: !proxy
  paths:
    # Note all paths are full, absolute paths
    certs: /home/amy/config/certs
    proxy: /home/amy/config/proxy.yml

  services:
    # The proxy node uses a hardcoded public service
    proxy: !external
      name: brane-prx-proxy
      address: http://brane-prx:50050
      bind: 0.0.0.0:50050
      external_address: http://amy-proxy-node.com:50050
The Policy File
policies.ymlfile. A better method (involving eFLINT) is implemented through thepolicy-reasonerproject.
Brane used to read its policies from a so-called policy file (also known as policies.yml) which defines a very simplistic set of access-control policies.
Typically, there is one such policy file per domain, which instructs the "reasoner" for that domain what is should allow and what not.
In this chapter, we discuss how one might write such a policy file. In particular, we will discuss the general layout of the file, and then the two kinds of policies currently supported: user policies and container policies.
Overview
The policies.yml file is written in YAML for the time being.
It has two sections, each of them corresponding to a kind of policy (users and containers, respectively). Each section is then a simple list of rules. At runtime, the framework will consider the rules top-to-bottom, in order, to find the first rule that says something about the user/dataset pair or the container in question. A full list of available policies can be found below.
Before that, we will first describe the kinds of policies in some more detail in the following sections.
User policies
User policies concern themselves what a user may access, and then specifically, which dataset they may access. These policies thus always describe some kind of rule on a pair of a user (known by their ID) and a dataset (also known by its ID).
As a policy expert, you may assume that by the time your policy file is consulted, the framework has already verified the user's ID. As for datasets, your policies are only consulted when data is accessed on your own domain, and so you can also assume that dataset IDs used correspond to the desired dataset.
Note that which user IDs and dataset IDs to use should be done in cooperation with the system administrator of your domain. Currently, the framework doesn't provide a safe way of communicating which IDs are available to the policy file, so you will have to retrieve the up-to-date list of IDs the old-fashioned way.
Container policies
Container policies concern themselves with which container is allowed to be run at a certain domain. Right now, it would have seemed obvious that they are triplets of users, datasets and containers - but due to time constraints, they currently only feature a container hash (e.g., its ID) that says if they are allowed to be implemented or not.
Because the ID of a container is a SHA256-hash, you can safely assume that whatever container your referencing will actually reference that container with the properties you know of it. However, similarly to user policies, there is no list available in the framework itself of known container hashes; thus, this list must be obtained by asking the system's administrator or, maybe more relevant, a scientist who wants to run their container.
Policies
In this section, we describe the concrete policies and their syntax. Remember that policies are checked in-order for a matching rule, and that the framework will throw an error if no matching rule is found.
In general, there are two possible actions to be taken for a given request: allow it, in which case the framework proceeds, or deny it, in which case the framework aborts the request. For each of those action, though, there are multiple ways of matching a user/dataset pair or a container hash, which results in the different policies described below.
Syntax-wise, the policies are given as a vector of dictionaries, where each dictionary is a policy. Then, every such dictionary must always have the policy key, which denotes its type (see the two sections below). Any other key is policy-dependent.
User policies
The following policies are available for user/dataset pairs:
allow: Matches a specific user/dataset pair and allows it.user: The identifier of the user to match.data: The identifier of the dataset to match.
deny: Matches a specific user/dataset pair and denies it.user: The identifier of the user to match.data: The identifier of the dataset to match.
allow_user_all: Matches all datasets for the given user and allows them.user: The identifier of the user to match.
deny_user_all: Matches all datasets for the given user and denies them.user: The identifier of the user to match.
allow_all: Matches all user/dataset pairs and allows them.deny_all: Matches all user/dataset pairs and denies them.
Container policies
The following policies are available for containers:
allow: Matches a specific container hash and allows it.hash: The hash of the container to match.name(optional): A human-friendly name for the container (no effect on policy, but for debugging purposes).
deny: Matches a specific container hash and denies it.hash: The hash of the container to match.name(optional): A human-friendly name for the container (no effect on policy, but for debugging purposes).
allow_all: Matches all container hashes and allows them.deny_all: Matches all container hashes and denies them.
Example
The following snippet is an example policy file:
# The user policies
users:
# Allow the user 'Amy' to access the datasets 'A', 'B', but not 'C'
- policy: allow
  user: Amy
  data: A
- policy: allow
  user: Amy
  data: B
- policy: deny
  user: Amy
  data: C

# Specifically deny access to `Dan` to do anything
- policy: deny_user_all
  user: Dan

# For any other case, we deny access
- policy: deny_all


# The container policies
containers:
# We allow the `hello_world` container to be run
- policy: allow
  hash: "GViifYnz2586qk4n7fdyaJB7ykASVuptvZyOpRW3E7o="
  name: hello_world

# But not the `cat` container
- policy: deny
  hash: "W5WS23jAAtjatN6C5PQRb0JY3yktDpFHnzZBykx7fKg="
  name: cat

# Any container not matched is allowed (bad practice, but to illustrate)
- policy: allow_all
Introduction
In this chapter, we will provide a brief overview of the different packages that Brane supports.
Overview
To provide an as versatile and easy-to-use interface as possible, Brane has different ways of defining packages. Apart from just being able to execute arbitrary code, it also supports perform requests according to the OpenAPI standard and (in the future) supports publishing Common Workflow Language workflows as packages as well.
Concretely, the different types that are supported are:
- Executable Code Unit (
ecu) packages are containers containing arbitrary code that is run via thebraneletwrapper. - OpenAPI Standard (
oas) packages are packages that make API requests defined in the OpenAPI format. It is, once again, thebraneletexecutable that performs these calls.
We are working on adding other package formats, which will be added to this list in the future. One promiment technology that we would like to add is support for the Common Workflow Language, and another one is publishing Brane's DSLs (BraneScript and Bakery) as packages as well.
In the subsequent chapters, we will document the exact workings of each supported package kind. The next chapter starts with a documentation of the Executable Code Unit packages, but you can skip to others by using the sidebar to the left.
container.yml documentation
container.ymlwill be added soon.
Introduction
The whole Brane framework revolves around the workflows, which define how package functions need to be called, in what order and with what data.
Because Brane aims to be easily accessible by multiple roles (the famous separation of concerns), it provides two Domain-Specific Languages (DSLs) that can be used to write workflows: BraneScript and Bakery.
Under the hood, these languages translate to the same code, and thus have the same semantics (i.e., meaning behind the code). Their syntax, however, is different: BraneScript resembles classical scripting languages (such as Bash or Lua) and is aimed to be convienient in use by software engineers; Bakery, in contrast, is designed to be more "natural language-like", to help scientists without much programming experience to understand the code they are writing or that someone else wrote.
In this series of chapters, we will be focussing on BraneScript and its syntax. For Bakery, you should refer to its own series of chapters.
Concept & Terminology
As stated, BraneScript is designed as a workflow specification. This means that the real work of any BraneScript file is not performed within the domain of BraneScript, but rather in the domain of the package functions that BraneScript calls. It only acts as a way to "glue" all these functions together and show the result(s) to the caller of the workflow.
In these few chapters, we will refer to BraneScript files as both workflows and scripts, making the terms interchangeable for the purpose of this documentation. Anything that the workflows call is referred to as package functions or external functions, which are implemented by deploying the package container and running the appropriate function therein.
In the code snippets in these chapters, we wil use text enclosed in triangular brackets (
<example>) to define parts of the syntax that are variable. For example,Hello <world>means that there must be a tokenHello, followed by some arbitrary token that we will nameworldfor being able to reference it.
Structure
This series aims to be a comprehensive introduction to BraneScript's features, much more elaborate than given in the chapters for Scientists. It will list all of BraneScript's language features in a tutorial-like fashion, assuming minimal programming experience in languages such as Python, Lua, C or Java.
In the first chapter, we will write a simple "Hello, world!" workflow to get your feet wet in the dirt, and to practise submitting workflows. Then, chapter two
Nexts
You can start this series by reading the next chapter, which will set you on your journey. It is recommended to follow the chapters in-order if it is your first time reading about BraneScript, but you can also jump between them using the sidebar on the left.
Alternatively, if you are looking for more technical details on how the BraneScript language is specified, we recommend you to inspect the specifications of the language in the Brane: A Specification book.
Writing a full workflow
In Brane, the role of a scientist is to write workflows: high-level descriptions of some algorithm or other program that implements some goal. They are high-level by the fact that Brane will try to handle tedious stuff such as choosing the best location for each task, moving around datasets or even applying optimisations.
In this chapter, we describe the basics about writing workflow. Specifically, we will discuss how to write a workflow to run the hello_world package and print its output (first section), as well as how to run it or submit it to a remote instance (second section). Finally, we also briefly discuss the Read-Eval-Print Loop (REPL), that provides a more interactive way of running workflows (last section).
Writing a workflow
To write a workflow, all you have to do is open a plain text file with your favourite text editor. The name does not matter, but it is conventional to have it end in .bs or .bscript if you are writing in BraneScript. For this tutorial, we will use the name: hello_world.bs.
Next, it is good practise to write a header comment to explain what a file does. This gives us a good excuse to talk about BraneScript comments: everything after a double slash (//) is considered as one. So, a documentation header for this workflow might look like:
// HELLO WORLD.bs
//   by Rick Sanchez
//
// A BraneScript workflow for printing "Hello, world!" to the screen.
Next, we have to tell the Brane system which packages we want to use in our workflow. To do so, we will use the import-statement. This statement takes the identifier if the package, followed by a semicolon (;).
Note that all Brane statements end with a semicolon
;. If you forget it, you may encounter weird syntax errors; so if you don't know what the error means but it's a syntax error, you should first check for proper usage of the semicolons.
We want to import the hello_world package, so we add:
// ...

import hello_world;
This will import all of the package's functions into the global namespace. Be aware of this, since this may lead to naming conflicts. See the advanced workflows-chapter for ways of dealing with this.
In our case, this imports only one function: the hello_world() function. As you can read in the package's README, this function takes no arguments, but returns a string who's value is: Hello, world!.
inspect-subcommand of thebrane-executable:brane inspect hello_worldwhich will print something like:

Even though hello_world() is an external function, BraneScript treats it like any old function, which is done similarly like in other languages. So to call the package function, simply add:
// ...

hello_world();
to your file.
However, running the file like this will probably not work. Remember that the package function returns the string, not print it; so to show it to us, the user, we have to use the builtin println() function:
// ...

// Use this instead, where we pass the result of the 'hello_world()'-call to 'println()'
// (as you would in other languages)
println(hello_world());
See the BraneScript documentation for a full overview of all supported builtins.
We now have a workflow that should print Hello, world! when we run it, which is what we set out to do!
The full workflow file, with some additional comments:
// HELLO WORLD.bs
//   by Rick Sanchez
//
// A BraneScript workflow for printing "Hello, world!" to the screen.

// Define which packages we use, which makes its functions available ('hello_world()', in this case)
import hello_world;

// Prints the result of the 'hello_world()' call by using the 'println()' builtin
println(hello_world());
Be sure to save it somewhere where you can find it. Remember, we will refer to it as hello_world.bs.
Running a workflow
After you have written a workflow file, you can run it using the brane executable. Thus, make sure you have it installed and available in your PATH (see the installation chapter).
There are two modes of running a workflow: you can run it locally, in which all tasks are executed on your own machine and using the packages that are available locally. Alternatively, you can also run it on a remote instance, in which the tasks are executed on domains and nodes within that instance, using packages available only in that instance.
Local execution
Typically, you test your workflow locally first to make sure that it works and compiles fine without consuming instance resources.
To run it locally, you first have to make sure you have all the packages available locally. For us, this is the hello_world package. You can check whether you have it by running brane list, and then install it if you don't by downloading it from GitHub:
brane import epi-project/brane-std hello_world
For more details on this, see the previous chapter.
With the packages in place, you can then use the brane run-command to run the file we have just created:
brane run hello_world.bs
(Replace hello_world.bs with the path to the file you have created)
This will execute the workflow on your laptop. If it succeeded, you should something like:

If your workflow failed, Brane will try to offer you as much help as it can. Make sure that your Docker instance runs (use sudo systemctl start docker if you see errors relating to "Failed to connect to Docker") and that you written the workflow correctly, and try again.
Note that the execution of such a simply workflow may take slightly longer than you expect; this will take a few seconds even on fast machines. This is due to the fact that packages are implemented as containers, which have to be spun up and, if this is the first time you run a workflow, also loaded into the daemon.
Remote execution
The procedure for executing a workflow on a remote instance is very comparable to running a workflow locally.
The first step is to make sure that the instance has all the packages you need. Use a combination of brane search and brane push to achieve this (see the previous chapter for more information).
Then, to execute your workflow, you can do the same, but now specify the --remote flag to use the instance currently selected:
brane run --remote ...
Thus, to run our workflow on the remote instance we are currently loggin-in to, we would use to the following command:
# We assume your already executed 'brane instance add'
brane run --remote hello_world.bs
If your packages are in order, this should produce the same result as when executing the workflow locally.
The REPL
As an alternative to writing an entire file and running that, you can also use the Brane Read-Eval-Print Loop (REPL). This is an interactive environment that you can use to provide workflows in a segmented way, typically providing one statement at a time and seeing the result immediately.
Because our workflow is so short, we will re-do it in the REPL.
First, open it by running:
brane repl
This should welcome you with the following:

The REPL-environment works similar to a normal terminal, except that it takes BraneScript statements as input.
We can reproduce our workflow by writing its two statements separately:
// In the Brane REPL
import hello_world;
println(hello_world());
which should produce:

Which is the same result as with the separate file, instead that we've now interleaved writing and executing the workflow.
You can also use the REPL in a remote scenario, by providing the --remote option when running it, similar to brane run:
brane repl --remote
Every command executed in this REPL is executed on the specified instance.
Next
In the next chapter, we will treat datasets and intermediate results, which are an essential component to writing workflows. If you are already familiar with those, you can also check the subsequent chapter, which introduces the finer concepts of workflow writing. Alternatively, you can also checkout the full BraneScript documentation.
Basic concepts
In the previous chapter, we discussed your first "Hello, world!"-workflow. In this chapter, we will extend upon this, and go over the basic language features of BraneScript. We will talk about things like variables, if-statements and loops, parallel statements and builtin-functions.
More complex features, such as arrays, function definitions, classes or Data and IntermediateResults, are left to the next few chapters.
Variables
First things first: how do variables work in BraneScript?
They work like in most languages, where you can think of a variable as a single memory location where we can store some information. Similarly to most languages, it can be used to store a single object only; e.g., we can only store a single number, string or other value in a single variable1.
Variables are also typed, i.e., a single variable can only store values of the same type. While in some low-level languages, such as C or Rust, this is necessary to be able to compute the size of the variable, BraneScript only implements this for the purpose of being able to do static analysis: it can tell you beforehand whether the correct types are passed to the correct variables, which will help to eliminate mistakes made before you run a potentially lengthy workflow.
Finally, unlike other languages such as Python, BraneScript has an explicit notion of declaration: there is a difference between creating a new variable and updating it. This is also done to make static analysis easier, since the compiler can explicitly know which variables exist and how to analyse them.
So, how can we use this? The first step is to declare a new variable, to make BraneScript aware that it exists. The general syntax for this is:
let <ID> := <EXPR>;
where <ID> is some identifier that you want to use for your variable (existing only of alphanumeric characters and an underscore, _), and <EXPR> is some code that evaluates to a certain value. We've already seen an example of this: a function call is an expression, since it has a return value that we can pass to other functions or statements. Other expressions include literal values (e.g., true, 42, 3.14 or "Hello, there!") or logical or mathmatical operations (e.g., addition, subtraction, logical conjunction, comparison, etc). For some more examples, see below, or check the BraneScript documentation for a full overview.
Yet another example of an expression is a variable reference, which effectively reads a particular variable. To use it, simply specify the identifier of the variable you declared (ID) any time you can use an expression. For example:
// Declare one variable with a value
let foo := 21 + 21;

// We can use it here to assign the same value to `bar`!
let bar := foo;
Finally, you can also update the value of a variable using similar syntax to a declaration:
<ID> := <EXPR>;
(note the omission of the let).
This is known as an assignment, and can only be done on variables already declared. For example:
// This will print '42'...
let foo := 42;
println(foo);

// ...and this will print '84'
foo := 84;
println(foo);
Technically, variables won't be updated until the expression is evaluated (i.e., computed). This guaranteed ordering means that the following also works:
// This works because foo is first read to compute `foo * 2`, and only then updated
let foo := 42;
foo := foo * 2;
// Foo is now 84
You may already have guessed that Arrays or Classes may contain multiple variables themselves. However, arrays or classes are objects too; and while they can contain any number of nested values, we still consider them a single object themselves.
Functions
Something that you've already seen used in the previous chapter and the previous section, is the use of function calls.
This concept is used in almost any language, and essentially represents a temporary jump to some other part of code that is executed, and then the program continues from the function call onwards. Crucially, we typically allow these snippets to take in some values - arguments - and hand us back a value when they are done - a return value.
BraneScript uses a syntax that is very widely used in languages like C, Python, Rust, Lua, C#, Java, ... It is defined as:
<ID>( <ARG1>, <ARG2>, ... )
The <ID> is the identifier of the function (i.e., its name), and in between the parenthesis (()) there are zero or more arguments to pass to the function, separated by commas.
The return value of the function is returned "invisibly", in the sense that it is returned as a value in an expression. To illustrate this, consider the following function zero that simply returns the integer 0:
let zero := zero();
println(zero);   // Should print '0'
(It should be obvious now that println was a regular function call all along!)
To use expression language, we can say that a function will always evaluate to its return value. To this end, there is a strict ordering implied: first, BraneScript will evaluate all of the function's arguments (in-order), then the function is called and executed, after which the remainder of the expression continues using the function's return value.
This makes it possible for us to write the following, which uses the zero function from the previous example and some add-function that takes two integers as its arguments and returns their sum:
let fourty_two := add(add(add(2, add(zero(), 20)), zero()), 20);
println(fourty_two);   // Should print '42'
Note that BraneScript uses the same syntax for calling imported functions (see the previous chapter with the hello_world()-function), builtin functions (think println(); see below) and defined functions (check the relevant chapter).
To be complete, you can import all of the functions within a package using the import-statement:
import <id>;
You've already seen examples of this in the previous chapter.
Control flow
Another very important and common feature of a programming language is that it typically has syntax for defining the control flow of a language. In BraneScript, this is even more important, since effectively that is what a workflow is: defining some control flow for a set of function calls.
To that end, BraneScript supports different kind of statements that can allow your workflow to branch or loop, or define things such as where functions are executed.
In the following subsections, we will go through each of the control-flow statements currently supported.
If-statements
Arguably one of the most important statements, an if-statement allows your code to take one of two branches based on some condition. Most languages feature an if-statement, and most feature them in comparable syntax.
For BraneScript, this syntax is:
if (<EXPR>) {
    <STATEMENTS>
}
This means that, if the <EXPR> evaluates to a true-boolean value, the code inside the block (i.e., the curly brackets {}) is executed; but if it evaluates to false, then it isn't.
An example of an if-statement is:
// Let's assume this has an arbitrary value
let some_value := 42;

if (some_value == 42) {
    println("some_value was 42!");
}
Because the expression value == 42 is computed at runtime, this allows the program to become flexible and respond differently to different values stored in variables.
The if-statement also comes in another form:
if (<EXPR>) {
    <STATEMENTS>
} else {
    <OTHER-STATEMENTS>
}
This is known as an if-else-statement, and essentially has the same definition except that, if the condition now evaluates to false, the second block of statements is run instead of nothing. To illustrate: these two blocks of code are equivalent:
let some_value := 42;
if (some_value == 42) {
    println("some_value was 42!");
} else {
    println("some_value was not 42 :(");
}
let some_value := 42;
if (some_value == 42) {
    println("some_value was 42!");
}
if (some_value != 42) {
    println("some_value was not 42 :(");
}
int some_value = 42;
if (some_value == 42) {
    printf("some_value was 42!");
} else if (some_value == 43) {
    printf("some_value was 43!");
} else if (some_value == 44) {
    printf("some_value was 44!");
} else {
    printf("some_value had some other value :(");
}
BraneScript, however, has no such syntax (yet). Instead, you should write the following to emulate the same behaviour:
let some_value := 42;
if (some_value == 42) {
    println("some_value was 42!");
} else {
    if (some_value == 43) {
        println("some_value was 43!");
    } else {
        if (some_value == 44) {
            println("some_value was 44!");
        } else {
            println("some_value had some other value :(");
        }
    }
}
Tedious, but produces equivalent results.
For-loop
Another type of control-flow statement is a so-called for-loop. These repeat a piece of code multiple times, based on some specific kind of condition being true.
Let's start with the syntax:
for (<STATEMENT>; <EXPR>; <STATEMENT>) {
    <STATEMENTS>
}
BraneScript for-loops are very similar to C for-loops, in that they have three parts (respectively):
- An initializer, which is a statement that is run once before any iteration;
- A condition, which is ran at the start of every iteration. The iteration continues if it evaluates to
true, or else the loop quits; - and an increment, which is a statement that is run at the end of every loop.
Typically, you use the initializer to initialize some variable, the condition to check if the variable has exceeded some bounds and the increment to increment the variable at the end of every iteration. For example:
for (let i := 0; i < 10; i := i + 1) {
    println("Hello there!");
}
This will print the phrase Hello there! exactly 10 times.
While-loop
While loops are generalizations of for-loops, which repeat a piece of code multiple times as long as some condition holds true. Essentially, they only define the condition-part of a for-loop; the initializer and increment are left open to be implemented as normal statements.
The syntax for a while-loop is as follows:
while (<EXPR>) {
    <STATEMENTS>
}
The statements in the body of the while-loop are thus executed as long as the expression evaluates to true. Just as with the for-loop, this check happens at the start of every iteration.
For example, we can emulate the same for-loop as above by writing the following:
let i := 0;
while (i < 10) {
    println("Hello there!");
    i := i + 1;
}
More interestingly, we often represent a while-loop to do work that requires an unknown amount of iterations. A classic example would be to iterate while an error is larger than some factor:
let err := 100.0;
while (err > 1.0) {
    train_some_network();
    err := compute_error();
}
(A real example would probably require arguments in the functions, but they are left out here for simplicity).
Finally, another common pattern, which is an infinite loop, can also most easily be written with while-loops:
print("The");
while (true) {
    print(" end is never the");
}
Note, however, that BraneScript currently has no support for a break-statement (like you may find in other languages). Instead, use a simple boolean variable to iterate until you like to stop, or use a return-statement (see the next chapter).
Parallel statements
A feature that is a bit more unique to BraneScript is a parallel-statement. Like if-statements, they have multiple branches, but instead of taking only one of them, all of them are taken - in parallel.
The syntax for a parallel statement is:
parallel [{
    <STATEMENTS>
}, {
    <MORE-STATEMENTS>
}, ...]
(Think of it as a list ([]) of one or more code blocks ({}))
Unlike the if-statement, a parallel-statement can have any number of branches. For example:
parallel [{
    println("This is printed...");
}, {
    println("...while this is printed...");
}, {
    println("...at the same time this is printed!");
}]
There is more to say about parallel branches, but we keep this for the chapter on advanced workflows since it mixes with other BraneScript features. For now, assume that the branches run in parallel are run in arbitrary order, and (conceptually) at the same time. Once every branch has completed, the workflow continues (i.e., the "end" of the parallel statement acts as a joining point).
Builtin functions
Finally, it is very useful to know the builtin functions in BraneScript. These are them:
print(<string>): Prints the given string (or other value) to the terminal (stdout, to be precise). Does not add a newline at the end of the string.println(<string>): Prints the given string (or other value) to the terminal (stdout, to be precise). Does add a newline at the end of the string.len(<array>): Returns the length of the given array, as an integer.commit_result(<string>, <result>): A function that promotes an intermediate result to a dataset. Don't worry if this doesn't make sense yet - for that, examine the chapter on data.
You've already seen println being used in this and the previous chapter, and that's also the builtin you will likely be using the most.
Examples
To help grasping the presented concepts, we present the following workflow that uses a little bit of all of them:
let hello := "Hello, world!";
println(hello);

hello := "Hello there!";
println(hello);

if (hello == "Hello, world!") {
    println("Goodbye, world!");
} else {
    println("Goodbye there!");
}

println("I love the world so much, I'm going to say hi...");
for (let i := 0; i < 5; i := i + 1) {
    println(i);
}
println("...times!");

println("In fact, I will say 'hi' until...");
let i := 0;
let say_hi := true;
while (say_hi) {
    i := i + 1;
    if (i == 3) { say_hi := false; }
    print("say_hi is ");
    print(say_hi);
    println("!");
}

parallel [{
    println("HELLO WORLD!");
}, {
    println("HELLO WORLD!");
}, {
    println("HELLO WORLD!");
}];
It may help to first try and guess what the workflow will print, and only then execute it to see if your guess was right.
Next
If you have the idea you understand these basic constructs a little, congratulations! This should allow you to write basic workflows.
In the next chapter, we examine how to define functions and classes and how to use the latter. Then, in the chapter after that, we examine BraneScript's builtin Data-class, which is integral to writing useful workflows. Finally, in the last chapter of the BraneScript-part, we discuss some of the finer details of BraneScript as a language.
Separate from these introductory chapters, there is also the complete and more formal overview of the language in the BraneScript documentation. Those chapters should cover all of its details, and function as useful reference material once you've grasped the basics.
Functions & Composite Types
In the previous chapter, we discussed the basic functionality and constructs of the BraneScript language: variables, control flow constructructs (if, for, while, parallel) and function calls.
This chapter will extend on that, and explains how to define functions (to match with the function calls). Moreover, we will also discuss classes and, while at it, arrays.
Function definitions
To start, we will examine function definitions.
As already discussed in the previous chapter, functions are essentially snippets of code that can be executed from somewhere "in between" other code. We've already discussed how to call them, i.e., run their code from somewhere else; in this section we discuss how to define them.
A definition uses the following syntax:
func <ID> ( <ARG1>, <ARG2>, ... ) {
    <STATEMENTS>
}
Just as with a call, the <ID> is the name of the new function, and in between the parenthesis (()) are zero or more arguments that this function can accept. They are given as identifiers, each of those specifying the name of that specific argument. The <STATEMENTS>, then, are the statements that are executed when this function is called.
The simplest function is one that neither takes any arguments, nor returns any value. An example of such a function is:
// Define the function first
func print_hello_world() {
    println("Hello, world!");
}

// Now run it
print_hello_world();
This should print the string Hello, world! to the terminal.
In practise, however, there will be very few functions that neither take nor produce any values. So let's consider a function that takes some arguments:
func print_text(text) {
    println(text);
}
The text is the argument that we want to pass to the function, and println(text) then uses that argument to pass as input to the println function. It may seem like arguments can be used very similar to variables, and that would be exactly write - because they are. They act and are local variables who are initialized with the values passed to the function.
Another example that is a bit more complex:
func print_greeting_place(greeting, place) {
    print(greeting);
    print(", ");
    print(place);
    println("!");
}

// To do the same as `print_hello_world()`, we can run:
print_greeting_place("Hello", "world");

// But we can also do other stuff now
print_greeting_place("Sup", "planet");
The only thing left, then, is to define how a function returns a value.
To do so, we use the return-statement. It has the following syntax:
return <EXPR>;
where <EXPR> is the expression that creates the value to return.
An example of how this works is by implementing the zero()- and add()-functions from the previous chapter:
func zero() {
    return 0;
}

func add(lhs, rhs) {
    return lhs + rhs;
}
When called, this functions will evaluate to 0 or the sum of its arguments, respectively.
In addition to just returning values, a return acts as a 'quit'-command for a function; whenever it is called, the function is exited immediately, and the program resumes execution from the function call onwards - even if there are subsequent statements in the function body.
For example, consider the following function:
func greet(person) {
    // Filter out rude names
    if (person == "stinky") {
        println("That is rude, I won't print that.");
        return;
    }

    // Otherwise, we can print
    print("Hello, ");
    print(person);
    println("!");
}
(Note that the expression can be omitted from the return-statement if the function does not return a value, as in this example. But it can also be used with expression.)
Arrays
Next, we will talk about arrays before we will talk about classes.
Most languages that have a concept of variables, also have a concept of arrays. These are essentially (ordered) sequences of values, collected into a single object. You can thus think of them as a single variable that contains multiple values, instead of one.
Note, however, that arrays can only accept values of the same type. For example, they can contain multiple integers, or multiple strings - but not a mix of those. This essentially makes them homogeneous - every element has the same layout.
There are multiple syntaxes for working with arrays. The first is the array literal:
[ <EXPR1>, <EXPR2>, ... ]
Here, there are zero or more expressions, where every <EXPRX> is some expression who's evaluated value we will store in the array.
For example, this will generate an array with the values 1, -5 and 0:
let value := -5;
let array := [ 1, value, zero() ];
It is also possible to create an array of arrays:
let array := [ [ 0, 1, 2 ], [ 3, 4, 5 ], [ 6, 7, 8 ] ];
Then, to read a specific element in an array, or to write to the element, we can index it. This is done using the following syntax:
<ARRAY-EXPR>[ <INDEX-EXPR> ]
The <ARRAY-EXPR> is something that evaluates to an array (e.g., an array literal, a variable that contains an array, ...), and the <INDEX-EXPR> is something that evaluates to an integral number. Note that array indices in BraneScript are zero-indexed, so the first elements is addressed by 0, the second by 1 and so on.
The following examples show some array indexing:
let array1 := [ 1, 2, 3 ];
println(array1[0]);

let index1 := 2;
println(array1[index1])

println([ 4, 5, 6 ][1]);
println(generate_array_with_zeroes()[0]);
println(array1[zero()]);
This will print 1, 3, 5, 0 and 1, respectively.
We use the same syntax to write to an array, except that we then use the array in the variable position in an assignment:
let array2 := [ 7, 8, 9 ];
array2[0] := 42;
println(array2);
This will print [ 42, 8, 9 ].
Classes
It is probably easier to understand classes after you understand arrays, so be sure to check out their section first.
If arrays provide some homogeneous collection of values, then classes provide a heterogeneous collection. Specifically, we can think of classes as a collection of values but values who can be of different types. Usually, because of this inherent difference between the values, we don't index classes by positions (like arrays), but instead we assign a name to each value and index by that. Some languages allow this quite literally (e.g., JavaScript), whereas other choose a different kind of syntax called projection (e.g., C or Python). BraneScript uses the latter syntax as well.
Because of this heterogeneity, BraneScript requires you to specifically define classes, so that it knows beforehand which values are allowed in a specific class and how to name them.
Technically, however, arrays do this as well, since it usually makes no sense to assign an array of strings to an array of integers. However, because of their uniform element type, array types are more lenient, whereas classes are almost always completely disjoint from each other.
Another key difference between arrays and classes (at least, in BraneScript) is that a class can associate functions with it, usually called methods. These methods, then, work on an explicit instance of that class (i.e., a particular set of values) in addition to their normal arguments. This allows for Object-Oriented Programming (OOP) design patterns. For more information on OOP in general, see here.
Definition & instantiation
We will first discuss the syntax and usage of classes as just data containers. To define a class, use the following syntax:
class <ID> {
    <FIELD-ID-1>: <FIELD-TYPE-1>;
    <FIELD-ID-2>: <FIELD-TYPE-2>;
    ...
}
Here, <ID> is the name of the class (conventially written in upper camel case). Then follow zero or more field definitions (an element within a class is referred to as a field), which consists of some identifier (<FIELD-ID>) as name and the type that determines what kind of values are allowed for that field (<FIELD-TYPE>).
To illustrate, consider the following class:
class Jedi {
    name: string;
    lightsaber_colour: string;
    is_master: bool;
}
This class will contain three fields, or string, string and bool-type respectively.
Note, however, that class definitions ask like "blueprints" rather than a usable value. To do so, we instantiate a class, which is the act of assigning values to the fields to create an object that we can use. In BraneScript, we use the following syntax for that:
new <ID> {
    <FIELD-ID-1> := <EXPR1>,
    <FIELD-ID-2> := <EXPR2>,
    ...
}
(Note the usage of comma's (,) instead of semicolons (;) at the end of each line)
This tells the backend to create a new object from the definition with the name <ID>, and then populate the fields with the given names (FIELD-ID) with the value that the given expression evaluates to (EXPR).
Note that this is an expression itself, which will thus evaluate to an instance of the referred class. Furthermore, because the fields are named, you don't have to use the same order in assigning the value as used in the definitions of the fields.
For example, we can instantiate our Jedi class as follows:
let anakin := new Jedi {
    name := "Anakin Skywalker",
    lightsaber_colour := "blue",
    is_master := false,
};
Similary, we can create another Jedi with different properties:
// Note the different order - still works!
let obi_wan := new Jedi {
    lightsaber_colour := "blue",
    name := "Obi-Wan Kenobi",
    is_master := true,
};
As long as they refer to the same class, they have the same type, and can thus be used interchangeably.
Projection
You can now create classes - great! So now it's time to learn how to use them.
The most basic operation on a struct is accessing one of its fields - and the operation for doing so is called projection. The sytanx for it is as follows:
<CLASS-EXPR>.<FIELD-ID>
Here, <CLASS-EXPR> is some expression that evaluates to a class, and <FIELD-ID> is the name of the field that should be accessed.
For our Jedi class, we could do something like this:
// A function that prints information about a given jedi
func print_jedi(jedi) {
    print(jedi.name);
    print(" swishes his ");
    print(jedi.lightsaber_colour);
    print(" lightsaber ");
    if (jedi.is_master) {
        println("masterfully!");
    } else {
        println("amateurishly!");
    }
}

// Call it
print_jedi(anakin);
print_jedi(obi_wan);

// Setting values works just like with array indices
anakin.lightsaber_colour = "green";
print_jedi(anakin);
Datasets in workflows
Advanced workflows
In this chapter, we will discuss some loosely connected but very useful concepts for when your are writing more extensive and advanced workflows.
Arrays
Another more complex form of an expression is an array. This is simply a(n ordered) collections of values, indexable by an integral number. They are very similar to arrays used in other languages.
To create an array, use the following syntax:
[ <VALUE>, <ANOTHER-VALUE>, ... ]
Note that arrays are homogeneous in the sense that all elements must have the same type. For example, this will throw errors:
let uh_oh := [ 42, "fourty two", 42.0 ];
Instead, assign it with values of the same type:
let ok := [ 83, 112, 97, 109 ];
To index an array, use the following syntax:
<ARRAY-EXPR> [ <INDEX-EXPR> ]
This may be a bit confusing, but the first expression is an expression that evaluates to an array to index (i.e., a literal array, a variable or a function call), and the second expression is an expression that evaluates to a number that is used as index. Some examples:
let array1 := [ 1, 2, 3 ];
// Arrays are zero-indexed, so this refers to the first element
println(array1[0]);

let index1 := 2;
// And this to the last element
println(array1[index1])

// Some other examples using weirder expressions
println([ 4, 5, 6 ][1]);
println(generate_array_with_zeroes()[0]);
println(array1[zero()]);
This will print 1, 3, 5, 0 and 1, respectively.
Array indexing can be used to assign a value as well as read it:
let array1 := [ "a", "b", "c" ];
array1[0] := "z";
println(array1);
// Will print '[ z, b, c ]'
Finally, when you have an array that you got from some function or other source that you don't know the size of, you can retrieve it using the builtin len-function:
println(len([ 0, 0, 0 ]));
// Will print 3
This is very useful when iterating over an array with a for-loop (see below).
Returning
A different kind of control flow statement is the return-statement. This is used to essentially halt the current control flow, and go to whatever was the calling context. In other languages, this is often used in functions, but in BraneScript its used a bit more general.
The syntax is:
return;
Writing this statement can be thought as a 'stop' or 'exit' command, and any statement following it (if not in a branch) can be ignored.
There are two possible ways to use a return statement:
- When used in a function, the function is exited immediately and the program resumes execution from the function call onwards (see the next chapter).
- When used in another context, the function exits the workflow entirely. This can be used to early-quit the workflow if desired.
For example, this workflow:
println("Hello, ");
return;
println("world!");
will only print Hello, , not world!, because of the early quit in between the statements.
A really useful alternative syntax of the return-statement allows it to carry a value to the calling scope:
return <EXPR>;
This is used to return a value from a function, or to return a value from a workflow.
For example, one can run this workflow in the Brane CLI:
return "A special value";

While this doesn't seem a lot different than just printing, this actually matters in a few use-cases such as automatically downloading datasets or creating a workflow package.
Advanced parallelism
Note that there are a few peculiarities about parallel statements:
- The code inside the blocks is run in parallel, which means that the statement itself will only return once all of the branches do. To illustrate:
parallel [{ println("The order of this print..."); }, { println("...and this print may vary"); }]; println("But this print is only run after the other two finished"); - Instead of being able to refer to variables like normal, every branch receives its own copy of those variables. In practise, this means that any changes they make to variables are only local to that branch. For example:
let value := 42; parallel [{ println(value); // Will print 42 }, { value := 84; println(value); // Will print 84 }]; println(value); // Will still print 42! - The order of execution of the branches is arbitrary (as hinted to above), as it depends on the scheduling of the runtime itself and of the OS' scheduling of the VM threads.
- In addition, although they are said to run in parallel, in practise, the only guarantee is that each branch is run concurrently (but still may be run in parallel, depending on the setup). To understand the precise difference, check https://freecontent.manning.com/concurrency-vs-parallelism/.
- Each parallel branch forms their own "workflow": or, to be more precise, when your return in a parallel branch, it actually returns the branch - not the workflow. For example:
will actually printparallel [{ println("1"); return; println("2"); }]; println("3");1and3, in that order. - The only way to return from a parallel branch is to use the declaration syntax of the parallel statement. It looks like the parallel statement is assigned to a variable declaration:
If this syntax is used, then every branch must return a value of the same type (using a return-statement). For example:let <ID> := parallel[{ <STATEMENTS> }, { <MORE-STATEMENTS> }, ...];
Will actually print an array with the returned strings.let jedis := parallel [{ return "Obi-Wan Kenobi"; }, { return "Anakin Skywalker"; }, { return "Master Yoda"; }]; println(jedis); Note that the undefined order of execution, the order of the array is also undefined; it is first-come first-serve, so it typically only makes sense to process these array using some loop (e.g., a for-loop). - Finally, as a variation on returning an array, multiple merge strategies exist to do different things with the result. For example, one such strategy is the
sum-strategy, that simply adds the results returned by the parallel-statement. The syntax to define it is:
To merge usingparallel [ <STRATEGY> ] [{ <STATEMENTS> }, ...]sum:
which will printlet res := parallel [all] [{ return 42; }, { return 42; }]; println(res);84. For a complete overview of all merge strategies, check the BraneScript documentation.
Introduction
Documentation for Bakery will be added soon.