Your first package
In this chapter, we will guide you through creating the simplest and most basic package available: the hello world package.
This tutorial assumes that you have experience with programming. In particular, it's useful to known about standard streams and environment variables.
The code used in this tutorial can be found in
examples/doc/hello-worldof the repository.
1. Writing the code
Because Brane will package your code as an Ubuntu container, you may choose virtually any language you like to write your code in.
For the purpose of this tutorial (because the code is very simple), we will write in GNU Bash, which is a very commonly used Unix shell.
To begin, create a new directory (which we will call hello-world), and create a file hello_world.sh. All it does it printing: "Hello, world!", and so we only have to use an echo-statement:
#!/bin/bash
echo 'Hello, world!'
Don't forget the shebang at the top of the file; this special comment,
#!/bin/bash, tells the terminal how it should run this script (using the Bash interpreter, in this case). If you omit it, it will try to run your script as a normal Linux executable - which will not work, as this is not binary code.
However, if we were to build this as a package and launch it in Brane as it is, we wouldn't see anything. That's because Brane doesn't pass the stdout directly to the user; instead, it reads it and parses it as YAML.
Specifically, Brane will expect a YAML file as output that has a certain key/value mapping, where it will only return the result of a specific key. The name of this key is arbitrary; for this tutorial, we will call it output.
Thus, change your script to:
#!/bin/bash
echo 'output: "Hello, world!"'
which just writes the YAML equivalent of a key output with a value Hello, world!.
For now, this is all the code that we will package in a container, and so you can save the script and move to the next section.
2. Creating a container.yml
Every Brane (code) package exists of two components: the code to run and a file describing how to interface with the code. For us, the first part is the hello_world.sh script, and the second is a file conventionally called container.yml.
For this tutorial, we will only focus on the general file structure of the container.yml and how to read package output. The next tutorial will focus on how to partition a package into multiple functions and provide them with input.
The container.yml file describes a couple of things about your package:
- Metadata (name, version, kind, etc).
- Files and dependencies that should be added to the container
- The functions that your package implements and how they can be called.
We will go through these step-by-step.
Create a file container.yml in the hello-world directory, and populate it with the following to start:
# The package metadata
name: hello_world
version: 1.0.0
kind: ecu
The first line (name) specifies the package name, and the second line (version) specifies the package version. Together, the provide a unique identifier for each package. This means that we can have multiple versions of the same packages around, which the framework will treat as different packages.
The third line (kind) is the most important one, because this specifies that this package contains arbitrary code (Executable Code Unit; see the packages series of chapters).
Next, we will specify the dependencies of this package. Because Bash is installed in the Ubuntu image by default, we only have to provide the files that should be copied over to the container, and then which file the container should run. Do this by adding the following to your file:
...

# Specify the files to copy over (relative to the container.yml file)
files:
- hello_world.sh

# Specify which file to run
entrypoint:
  # 'task' means the script should be run synchronously (i.e., blocking)
  kind: task
  exec: hello_world.sh
As you can see, Brane supports only one entry point, even though a package may contain multiple functions. As you will see in the next tutorial, Brane will tell your entrypoint which function to run by specifying certain command-line arguments or environment variables. However, because our script contains only one function, we do not worry about this; every time it is called, it will only ever have to return the Hello, world! message.
However, we still have to define this function. To do so, add the following lines to your container.yml:
...

actions:
  "hello_world":
    command:
    input:
    output:
    - type: string
      name: output
This defines a function with the identifier hello_world, that requires no input (input: is empty) and also doesn't need to pass any command-line arguments to the script (command: is empty). What is does define, however, is that it should return the value of the output-key in the function's output. We define that value to be of type string, and the name of the key corresponds to the one we set in the hello_world.sh Bash script.
With that defined, your container.yml file should now look like this:
# Container.yml for the hello_world package
name: hello_world
version: 1.0.0
kind: ecu

files:
  - hello_world.sh

entrypoint:
  kind: task
  exec: hello_world.sh

actions:
  'hello_world':
    command:
    input:
    output:
    - name: output
      type: string
We are now ready to build the package.
3. Building the package
To build a package, we will finally use the Brane CLI. We will assume that you have named it brane, and that it is reachable under the PATH of your machine.
To build the package, simply run the following from within the hello-world directory:
brane build ./container.yml
While the command above seems simple, there are a couple of semantics to think about:
- All relative paths in the file are relative to the
container.ymlfile; use the--workdiroption to change the working directory. - Brane will automatically try to deduce the kind of the package based on the name of the file you specify it.
container.ymlwill default to anecupackage (see the packages series of chapters). To change this, or if Brane could not deduce the package kind, use the--kindoption to manually specify it. - The CLI will automatically download the
braneletexecutable that will live in the container from the repository. However, if you have a non-released version of the CLI in any way, you should probably build your own (download the repository as described here) and pass it to the build command with the--initoption.
If everything succeeds, you should see something along the lines of:

Your package is now available in the local repository that only exists on your laptop. To verify it, you can run:
brane list
which should show you:

4. Testing your package
Because publishing your package to a Brane instance immediately exposes it for others to use, it is often better to first test your package locally to catch any errors or bugs.
To do so, the Brane CLI provides a build-in test capability, which can run any function you defined in the package container with some (properly-typed) input and test its computation.
To run it for the hello_world package, run the following command:
brane test hello_world
You will then be greeted by something along the lines of:

This TUI (Terminal UI) will help you to select a function, give input to it (though now not relevant) and show its output.
If everything went alright, you should see the Hello, world! message if you hit 'enter':

This confirms that your package is working and Brane can interact with it! If it doesn't, you'll see an error that hopefully allows you to debug your package. You can check the troubleshooting chapter with some general tips on how to debug any such errors.
If everything checks out, you are now ready to push your package to a Brane instance.
5. Publishing your package
For this step, you will need to have a running Brane instance. If you do not have one where you can test this tutorial, you can download and install one yourself by following the steps listed in the chapters for system administrators.
We will assume that you have a Brane instance available at 127.0.0.1 (localhost). If you will be using a remote instance, replace all of the occurrences of the localhost IP address with the address of your instance.
The first step, before you can publish to a cluster, is to login to one. Run the following command for that:
brane login http://127.0.0.1 --username <user>
where you should replace <user> with a name of your choosing. This is the name that will be used to 'sign' all your packages (i.e., list you as owner).
Next, you may try to publish your package by pushing it to the instance you just logged-in to:
bash push hello_world
This command will automatically push the latest version of your package to the remote instance. If you want to be explicit about which version to push, you may add it to the end of the command. For this tutorial, this command will give the same result as the one above:
brane push hello_world 1.0.0
Your package is now available in the remote instance. You can verify this by running:
brane search
This commands does exactly the same as the brane list command, except that it doesn't inspect your local repository but instead the remote one you are logged-in to. Thus, it should show you something along the lines of:

6. Running your package
Finally, we can properly run the function that you have just created!
To do so, we will connect to the remote instance using the REPL (Read, Eval, Print-Loop) of the Brane CLI tool. This loop will take BraneScript statements line-by-line, and run them on the remote instance. Effectively, this will be like "interactively" running a workflow on the remote instance.
To start the REPL, run:
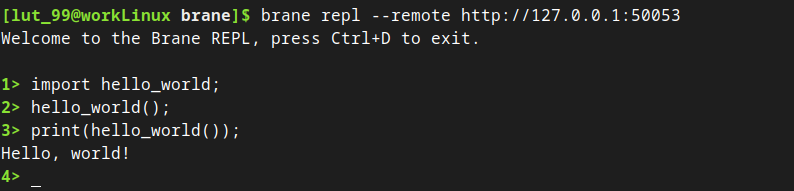
brane repl --remote http://127.0.0.1:50053
--remoteoption from the command, you will run a local REPL instead. This can be used to test workflows and run package locally more thoroughly, and should work the same (except that you don't actually push anything to a Brane instance).
If the REPL launched and connected successfully, you will see:

Any command you write will be executed as BraneScript. For a more in-depth documentation of how BraneScript works, you can refer to its documentation chapters.
For now, we will restrict ourselves to testing our package.
First, we will bring the function that we have defined in our package into scope, by importing the package:
import hello_world;
(Note the delimiter, ;. BraneScript requires all stataments to be terminated by it.)
If the instance was able to find the package, then the command will return without printing anything. Otherwise, it might give you an error saying the package is unknown. If so, try re-pushing your package and making sure you are logged-in to the correct instance.
Next, you can call the function to run your package on the instance:
hello_world();
After running that command, you should see:

Wait, we're not seeing anything?! Did something go wrong?!
No, it didn't! Remember, Brane never simply shows the user the stdout of the package. Instead, it uses the value of the parsed YAML field (in our case, output) as the return value of the function that we defined. Thus, if we wrap the hello_world()-call in a println-statement (a builtin in BraneScript), you will finally see:
Congratulations! You have now written, built, tested, published and then executed your first Brane package.
// TODO: Replace pic above here with one that uses println
Next
In the next chapter, we will consider a slightly more complicated case, where we will talk about passing inputs to functions and separating a package to have multiple functions. To do so, you will implement a simple Base64 encoding/decoding package.
Alternatively, you can also look at the Package documentation to find out the details of the different package types, or dive into BraneScript by reading its documentation.