Package inputs & multiple functions
In the previous chapter, you created your first package, and learned how to build and run a function that take no inputs.
However, this makes for very boring workflows. Thus, in this chapter, we will extend upon this by creating a container with multiple functions, and where we can pass inputs to those functions. Concretely, we will describe how to implement a base64 package, which will contain a function to encode a string and decode a string to and from Base64, respectively.
The code used in this tutorial can be found in
examples/doc/base64of the repository.
1. Writing code
To implement the package, we will write a simple Python script that contains the two functions.
First, create the directory for this package. We will call it base64. Then, create a Python file code.py with the skeletons for the two functions:
#!/usr/bin/env python3


# Imports
# TODO


# The functions
def encode(s: str) -> str:
    """
        Encodes a given string as Base64, and returns the result as a string
        again.
    """

    # TODO


def decode(b: str) -> str:
    """
        Decodes the given Base64 string back to plain text.
    """

    # TODO


# The entrypoint of the script
if __name__ == "__main__":
    # TODO
(Don't forget the shebang at the top of the file!)
strs in the function headers. If you're unfamiliar with it, this annotes the types of the arguments. If you're interested, you can read more about it here.
The functions themselves are pretty straightforward to implement if we employ the help of the base64 module, which is part of the Python standard library. Thus, import it first:
# Imports
import base64

...
The implementation of encode():
...

def encode(s: str) -> str:
    """
        Encodes a given string as Base64, and returns the result as a string
        again.
    """

    # First, get the raw bytes of the string (to have correct padding and such)
    b = s.encode("utf-8")

    # We simply encode using the b64encode function
    b = base64.b64encode(s)

    # We return the value, but not after interpreting the raw bytes returned by the function as a string
    return b.decode("utf-8")

...
The implementation of decode() is very similar:
...

def decode(b: str) -> str:
    """
        Decodes the given Base64 string back to plain text.
    """

    # Remove any newlines that may be present from line splitting first, as these are not part of the Base64 character set
    b = b.replace("\n", "")

    # Decode using the base64 module again
    s = base64.b64decode(b)

    # Finally, we return the value, once again casting it
    return s.decode("utf-8")

...
Up to this point, we are just writing a Python package; Brane is not yet involved.
But that will change now. In the entrypoint of our package, we have to do two things: we have to let Brane select which of the functions to call, and we have to be able to process the input that Brane presents us with.
The first is done by Brane specifying a command-line argument (see below) that specifies the function to call. Thus, we will write a piece of code that reads the first argument passed to the script, and then uses that to select the function.
...

# The entrypoint of the script
if __name__ == "__main__":
    # Make sure that at least one argument is given, that is either 'encode' or 'decode'
    if len(sys.argv) != 2 or (sys.argv[1] != "encode" and sys.argv[1] != "decode"):
        print(f"Usage: {sys.argv[0]} encode|decode")
        exit(1)

    # If it checks out, call the appropriate function
    command = sys.argv[0]
    if command == "encode":
        result = encode(<TODO>)
    else:
        result = decode(<TODO>)

    # TODO
Don't forget to import the sys module:
# Imports
import base64
import sys

...
However, to call our functions, we will first have to know the input that the caller of the function wants to be encoded or decoded.
Brane does this by passing the arguments of the function call to the package as environment variables. Specifically, it takes the value in BraneScript, serializes it to JSON and then sets the resulting string in the matching environment variable. The names of these variables are derived from the container.yml file (see below), but let's for now just assume that it's called: INPUT.
Thus, to give our functions their input, we can just pass the value of the INPUT environment variable to the json package, and pass the resulting string to our functions:
...

if __name__ == "__main__":
    ...

    # If it checks out, call the appropriate function
    command = sys.argv[0]
    if command == "encode":
        # Parse the input as JSON, then pass that to the `encode` function
        arg = json.loads(os.environ["INPUT"])
        result = encode(arg)
    else:
        # Parse the input as JSON, then pass that to the `decode` function
        arg = json.loads(os.environ["INPUT"])
        result = decode(arg)

    # TODO
Again, don't forget to add our new dependencies as imports:
# Imports
import base64
import json    # new
import os      # new
import sys

...
Now, finally, we have to give the result back to Brane like we did before.
We will do so in a slightly complicated manner, using the yaml package of Python. This is both to show that Brane just expects YAML, which might make it easier to return arbitrary output, and it gives us an opportunity to talk about package dependencies in a later section.
To return the values, we will return the value as a YAML key/value pair with the key name called output:
...
if __name__ == "__main__":
    ...

    # Print the result with the YAML package
    print(yaml.dump({ "output": result }))

    # Done!
Finally, add the yaml-module dependency:
# Imports
import base64
import json
import os
import sys
import yaml

...
And that gives us the final base64/code.py Python file that implements the base64-package:
#!/usr/bin/env python3


# Imports
import base64
import json
import os
import sys
import yaml


# The functions
def encode(s: str) -> str:
    """
        Encodes a given string as Base64, and returns the result as a string
        again.
    """

    # First, get the raw bytes of the string (to have correct padding and such)
    b = s.encode("utf-8")

    # We simply encode using the b64encode function
    b = base64.b64encode(b)

    # We return the value, but not after interpreting the raw bytes returned by the function as a string
    return b.decode("utf-8")


def decode(b: str) -> str:
    """
        Decodes the given Base64 string back to plain text.
    """

    # Remove any newlines that may be present from line splitting first, as these are not part of the Base64 character set
    b = b.replace("\n", "")

    # Decode using the base64 module again
    s = base64.b64decode(b)

    # Finally, we return the value, once again casting it
    return s.decode("utf-8")


# The entrypoint of the script
if __name__ == "__main__":
    # Make sure that at least one argument is given, that is either 'encode' or 'decode'
    if len(sys.argv) != 2 or (sys.argv[1] != "encode" and sys.argv[1] != "decode"):
        print(f"Usage: {sys.argv[0]} encode|decode")
        exit(1)

    # If it checks out, call the appropriate function
    command = sys.argv[1]
    if command == "encode":
        # Parse the input as JSON, then pass that to the `encode` function
        arg = json.loads(os.environ["INPUT"])
        result = encode(arg)
    else:
        # Parse the input as JSON, then pass that to the `encode` function
        arg = json.loads(os.environ["INPUT"])
        result = decode(arg)

    # Print the result with the YAML package
    print(yaml.dump({ "output": result }))

    # Done!
2. Creating a container.yml
With the code complete, we will once again create a container.yml.
Again, write the package metadata first, together with the files that contain the code and the entrypoint:
name: base64
version: 1.0.0
kind: ecu

files:
  - code.py

entrypoint:
  kind: task
  exec: code.py
(see the previous chapter for a more in-depth explanation on these)
Next, we can specify additional dependencies for the package. Not only do we require Python to run our script, we also require the yaml package in Python. To do so, we will add an extra section, which will tell Brane to install both of these in the package container:
...

dependencies:
  - python3
  - python3-yaml
The dependencies are just apt packages for Ubuntu 20.04. If you require another OS or system, you should check the in-depth container.yml documentation.
Next, we once again write the section that describes the functions. However, this time, we have two functions (encode and decode), and so we will create two entries:
...

actions:
  encode:
    command:
      # TODO
    input:
      # TODO
    output:
      # TODO

  decode:
    command:
      # TODO
    input:
      # TODO
    output:
      # TODO
First, we will fill in the command-field.
If you think back to the previous section, we said that Brane would tell us which function to run based on the argument given to the script. We can fullfill this assumption by using the command-field of each function:
...

actions:
  encode:
    command:
      # This is just a list of arguments we pass to the function
      args:
      - encode
    input:
      # TODO
    output:
      # TODO

  decode:
    command:
      # Note that we give another argument here, selecting the other function
      args:
      - decode
    input:
      # TODO
    output:++
      # TODO
This (correctly) implies that there are other ways of selecting functions in a package. See the container.yml documentation for more information.
With the function selected, we will next specify the input arguments to each function. For both functions, this is a simple string that we would like to encode.
Now, remember that Brane will pass the input arguments as environment variables. Because environment variables are (by convention) spelled with CAPS, Brane will translate the name you give to an input argument to an appropriate environment variable name - which is the same but all alphabetical characters converted to UPPERCASE.
Thus, for each function, we define an input argument input (which translates to the INPUT in the code.py file) that is of type string:
...

actions:
  encode:
    command:
      args:
      - encode
    input:
    # This specifies one input of type string, in similar syntax to how we specified outputs.
    - name: input
      type: string
    output:
      # TODO

  decode:
    command:
      args:
      - decode
    input:
    # This specifies one input of type string, in similar syntax to how we specified outputs.
    - name: input
      type: string
    output:
      # TODO
Finally, we will define an output (called output again) in much the same way as in the Your first package tutorial:
...

actions:
  encode:
    command:
      args:
      - encode
    input:
    - name: input
      type: string
    output:
    # See the previous section
    - name: output
      type: string

  decode:
    command:
      args:
      - decode
    input:
    - name: input
      type: string
    output:
    # See the previous section
    - name: output
      type: string
The complete container.yml may be found in the project repository (examples/doc/base64/container.yml).
3. Building & Publishing the package
If you've done everything right, this will be exactly the same as with the previous tutorial.
First, we will build the package:
brane build ./container.yml
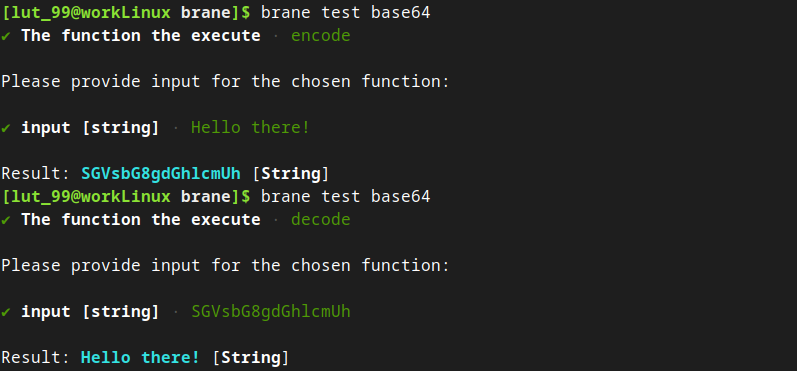
Once that's ready, test your package by running brane test:
brane test base64
If you test your encode function and then your decode function, you should get something along the lines of:
Once you've verified everything works, we will push it to the remote repository:
brane push base64
brane login. Refer to the previous tutorial for more details.
And then, like before, we can use the REPL to interact with our package:
brane repl --remote http://<IP>:50053
For example, you can now do the following:
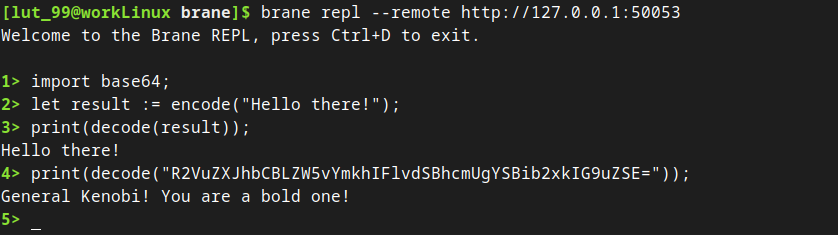
// TODO: Replace pic above here with one that uses println
You can refer to the chapters on writing workflows or the documentation of BraneScript for more explanation on the syntax used here.
Next
You should now be able to build most functions, congratulations!
In the next chapter, we will consider a last-but-not-least aspect of building packages: datasets and intermediate results. If you plan to do any serious data processing with Brane, we highly recommend you to check that chapter out.
Otherwise, check the in-depth documentation on the package system. It will talk about the different types of packages, how they are implemented and the complete overview of the interface with code and the container.yml file.
You can also continue with the chapters for [scientists] to know more about how to write workflows, or check the documentation of BraneScript and Bakery.