Part 2: A workflow for Disaster Tweets
In this document, we detail the steps that can be taken during the second part of the tutorial. In this part, participants will write a larger workflow file for an already existing package and submit it to a running EPI Framework instance. The package implements a data pipeline for doing Natural Language Processing (NLP) on the Disaster Tweets dataset, created for the matching Kaggle challenge.
Background
In the first part of the tutorial, you've created your own Hello, world!-package. In this tutorial, we will assume a more complex package has already been created, and you will take on the role as a Domain-Specific Scientist who wants to use it in the framework.
The pipeline implements a classifier that aims to predict is a tweet is indicating a natural disaster is happening, or not. To do so, a naive bayes classifier has been implemented that takes preprocessed tweets as input, and outputs a 1 if it references a disaster, or a 0 if it does not. In addition, various visualisations have been implemented that can be used to analyse the model and the dataset.
The package has been implemented by Andrea Marino and Jingye Wang for the course Web Services and Cloud-Based Systems. Their original code can be found here, but we will be working with a version compatible with the most recent version of the framework which can be found here.
Objective
As already mentioned, this part focusses on implementing a workflow that can do classification on the disaster tweets dataset. To do so, the dataset has to be downloaded and the two packages have to be built. Then, a workflow should be written that does the following:
- Clean the training and test datasets (
clean()) - Tokenize the training and test datasets (
tokenize()) - Remove stopwords from the tweets in both datasets (
remove_stopwords()) - Vectorize the datasets (
create_vectors()) - Train the model (
train_model())
All of these functions can be found in the compute package.
Then, optionally, any number of visualizations can be implemented as well to obtain results from the dataset and the model. Conveniently, you can generate all of them in a convenient HTML file by calling the visualization_action() function from the visualization package, but you can also generate the plots separately.
Tip: If you use
brane inspect <package>, you can see the tasks defined in a package together with which input and output the tasks define. For example: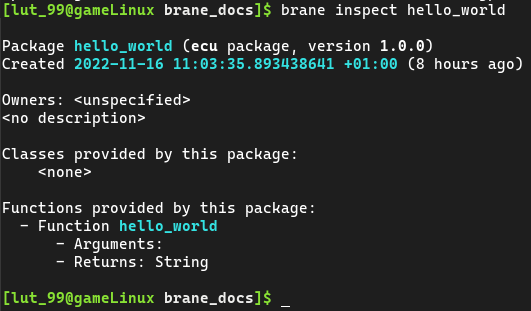
Installation
Before you can begin writing your workflow, you should first built the packages and download the required datasets. We will treat both of these separately in this section.
We assume that you have already completed part 1. If not, install the brane executable and install Docker as specified in the previous document before you continue.
Building packages
Because the package is in a GitHub repository, this step is actually fairly easy by using the brane import command.
Open a terminal that has access to the brane-command, and then run:
brane import epi-project/brane-disaster-tweets-example -c packages/compute/container.yml
brane import epi-project/brane-disaster-tweets-example -c packages/visualization/container.yml
This will allow you to build a package's source from a repository of the user epi-project and that goes by the name of brane-disaster-tweets-example. An eagle-eyed person may notice that this is exactly the URL of a repository, except that https://github.com/ is omitted. The second part of the command, -c ..., specifies which container.yml to use in that repository. We need to specify this because the repository defines two different packages, but this does allow us to build both of them.
After the command completes, you can verify that you have them installed by running brane list again.
Obtaining data
In the EPI Framework, datasets are considered assets, much like packages. That means that similarly, we will have to get the data file(s), defined some metadata, and then use the brane tool to build the assets and make them available for local execution.
To save some time, we have already pre-packaged the training dataset here, and the test dataset here. These are both ZIP-archives containing a directory with a metadata file (data.yml) and another directory with the data in it (data/dataset.csv). Once downloaded, you should unpack them, and then open a terminal.
Navigate to the folder of the training dataset first, and then run this command:
brane data build ./data.yml
Once it completes, navigate to the directory of the second dataset and repeat the command. You can then use brane data list to assert they have been added successfully.
The data.yml file itself is relatively straightforward, and so we encourage you to take a look at it yourself. Similarly, also take a look at the dataset itself to see what the pipeline will be working on.
data.yml, but instead just links it. This is usually fine, but if you intend to delete the downloaded files immediately afterwards, use the--no-linksflag to copy the dataset instead.
Writing the workflow - Compute
Once you have prepared your local machine for the package and the data, it is time to write a proper workflow!
To do so, open a new file (called, for example, workflow.bs) in which we will write the workflow. Then, let's start by including the packages we need:
import compute;
import visualization;
The first package implements everything up to training the classifier, and the visualization package implements functions that generate graphs to inspect the dataset and the model, so we'll need both of them to see anything useful.
Next up, we'll do something new:
// ... imports

// We refer to the datasets we want to use
let train := new Data{ name := "nlp_train" };
let test  := new Data{ name := "nlp_test" };
The first step is to decide which data we want to use in this pipeline. This is done by creating an instance of the builtin Data class, which we can give a name to refer to a dataset in the instance. If you check brane data list, you'll see that nlp_train is the identifier of the training set, and nlp_test is the identifier of the test set.
Note, however, that this is merely a data reference. The variable does not represent the data itself, and cannot be inspected from within BraneScript (you may not that the Data class has no functions, for example). Instead, its only job is so that the framework knows which dataset to attach to which task at which moment. You can verify that the framework attaches it by inspecting the package code and observing that it will pass the task a path where it can find the dataset in question.
Next, we will do the first step: cleanup the dataset.
// ... datasets

// Preprocess the datasets
let train_clean := clean(train);
let test_clean  := clean(test);
You can see that this is the same function that takes different datasets as input, and then returns a new dataset that contains the same data, but cleaned. Note, however, that this dataset won't be externally reachable; instead, we call it an intermediate result, which is a dataset which will be deleted after the workflow completes.
Let's continue, and tokenize and then remove stopwords from the two datasets:
// ... cleaning

let train_final := tokenize(train_clean);
let test_final  := tokenize(test_clean);
train_final := remove_stopwords(train_final);
test_final  := remove_stopwords(test_final);
As you can see, we don't need a new variable for every new result; we can just override old ones if we don't need them anymore.
Now that we have preprocessed datasets, we will vectorize them so that it becomes quicker for a subsequent call to load them. However, by design of the package, these datasets are vectorized together; so we have to give them both as input, and only get a single result containing both output files:
// ... preprocessing

let vectors := create_vectors(train_final, test_final);
And with that, we have a fully preprocessed dataset. That means we can now train the classifier, which is done conveniently by calling a single function:
// ... vectorization

let model := train_model(train, vectors);
commit_result("nlp_model", model);
The second line is the most interesting here, because we are using the builtin commit_result-function to "promote" the result of the function to a publicly available dataset. Specifically, we tell the framework to make the intermediate result in the model-variable public under the identifier nlp_model. By doing this, we can later write a workflow that simply references that model in the first place, and pickup where we left off.
You might notice that the model is returned as a dataset as well. While the function could have returned a class or array in BraneScript to represent it, this has two disadvantages:
- Most Python libraries write models to files anyway, so converting them to BraneScript values needs additional work; and
- By making something a dataset, it becomes subject to policy. This means that participating domains will be able to say something about where the result may go. For this reason, in practice, a package will likely not be approved by a hospital if it does not return important values like these as a dataset so that they can stay in control of it.
This is useful to remember if you ever find yourself writing BraneScript packages again.
And with that, we have a workflow that can train a binary classifier on the Disaster Tweets dataset! However, we are not doing anything with the classifier yet; that will be done in the next section.
Writing a workflow - Visualization
The next step is to add inference to the network, and to generate some plots that can show it works. To do so, we will add a few extra function calls at the bottom of your workflow.bs file.
imports on top of your file.
Scroll past the training, and write the following:
// ... training

// Create a "submission", i.e., classify the test set
let submission := create_submission(test, vectors, model);
This line will use the existing test set, its vectors (the training-vectors are unused) and the trained model to create a so-called submission. This is just a small dataset that matches tweet identifiers to the prediction the model made (1 if it classified it as a disaster tweet, or 0 otherwise). The terminology stems from the package being written for a Kaggle challenge, where this classification has to be submitted to achieve a particular score.
We can then use this submission to generate the visualizations. The easiest way is to call the visualization_action() function from the visualization package:
// ... submission

// Create the plots, bundled in an HTML file
let plot := visualization_action(
    train,
    test,
    submission
);
return commit_result("nlp_plot", plot);
Here, we call the function (which takes both datasets and the classification), and commit its resulting plot. Note, however, that we return this dataset from the workflow. This means that, upon completion, the client will automatically attempt to download this dataset from the remote instance. Only one result can be returned at a time, and if you ever need to download more, simply submit a new workflow with only the return statement.
visualizationpackage exposes its individual plot generation logic as separate functions. It might be a fun exercise to try and add these yourself, by usingbrane inspectand the package's code itself.
And that's it! You can now save and close your workflow file(s), and then move on to the next step: executing it.
Local execution
We can execute the workflow locally first to see if it all works properly. To do so, open up a terminal, and then run the following:
brane run <PATH_TO_WORKFLOW>
If your workflow works, you should see it blocking which indicates it is working. Eventually, the workflow should return and show you where it stored the final result of the workflow. If not, then it will likely show you an error of what went wrong, which may be anything from passing the wrong arguments to forgetting a semicolon (the latter tends to generate "end-of-file" errors, as do missing parenthesis errors).
println()calls in your workflow! It takes a single argument, which will always be serialized to a string before printing it to stdout. By mixingprint()(print without newline) andprintln(), you can even write formatted strings.
After having added some additional println() statements, you might see something like the following:
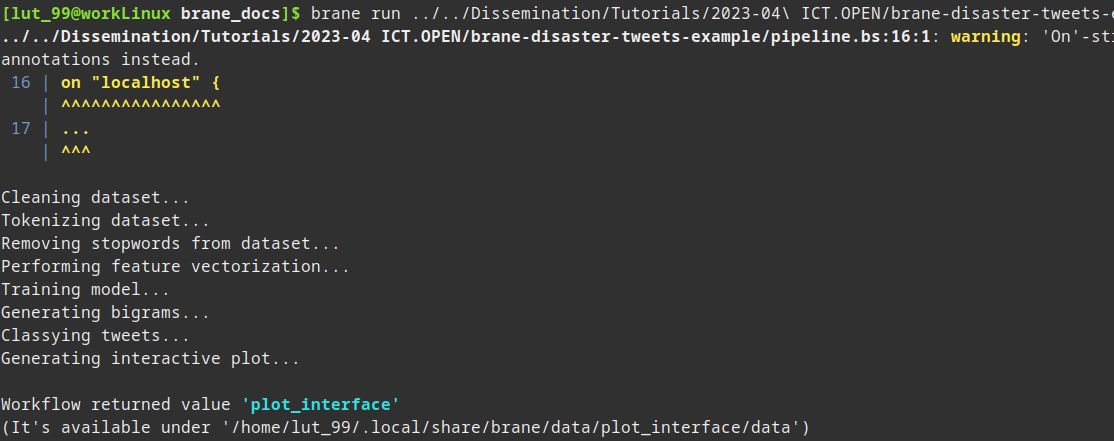
(You can ignore the warning message)
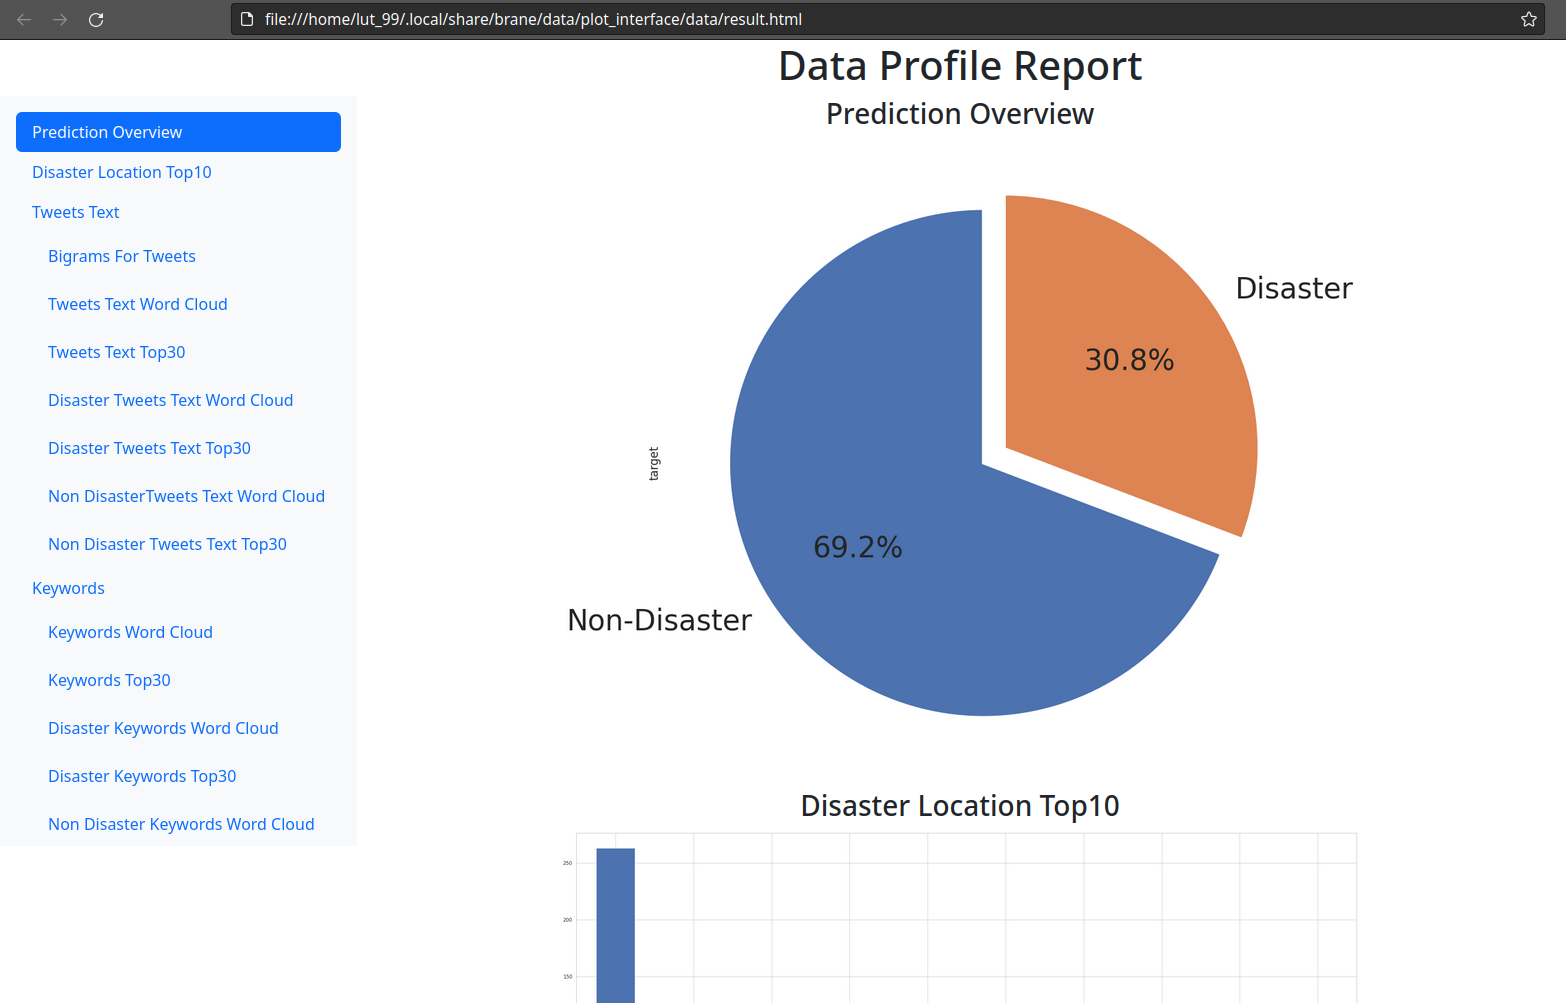
You can then inspect the index file by navigating to the suggested folder, and then opening index.html. If you have a browser like Firefox installed, you can also run:
firefox "<PATH>/index.html"
to open it immediately, where you can replace <PATH> with the path returned by BRANE.
You will then see a nice web page containing the plots generated about the model and the dataset. It should look something like:
Remote execution
More interesting than running the code locally, though, would be to run it remotely on a running BRANE instance.
For the purpose of the tutorial, we have setup an instance with two worker nodes: one resides at the University of Amsterdam (at the OpenLab cluster), and the other resides at SURF's ResearchCloud environment.
Updating the workflow
We can run the workflow on either of these locations. To do so, you have to do a small edit to your workflow, because the planner of the framework is a little too simplistic in its current form. Open your workflow.bs file again, and wrap the code in the following:
on "uva" {
    // ... your code
}
(You can leave the import statements outside of it, if you like)
This on-struct tells the framework that any task executed within must be run on the given location. Because there are two locations, you can use two different identifiers: uva, for the University of Amsterdam server, or surf for the SURF server.
The reason that you have to manually specify this is because both sites have access to the required dataset. This means that the framework has to equally possible locations, and to avoid complications with policy, the framework just gives up and requires the programmer to manually make the decision where to run it. In the future, this should obviously be resolved by the framework itself.
You can now close your file again, after having saved it.
Adding the instance to your client
Then, go back to your terminal so that we can register this instance with your client.
You can register an instance to your client by running the following command:
brane instance add brane01.lab.uvalight.net --name tutorial --use
This will register an instance who's central node is running at brane01.lab.uvalight.net. The ports are all default, so there is no need to specify them. The tutorial-part is just a name so you can recognize it later, so you can replace it with something else if you want.
If the command runs successfully, you should see something like:

You can then query the status of the instance by running:
brane instance list --show-status

We now know the instance has been added successfully!
Adding certificates
Before we can run the workflow in the remote environment, we have to add a certificate to our client so that the remote domains know who they might be sharing data with. In typical situations, this requires contacting the domain's administrator and asking them for a certificate. However, because this is a tutorial, you will all be working as the same user.
Note that you will need new certificates for every domain, since you may not be involved with every domain. Thus, you can download the certificates for the University of Amsterdam here, and the certificates for the SURF server here.
Obviously, posting your private client key on a publicly available website is about the worst thing you can do, security-wise. Luckily for us, this tutorial is about the BRANE framework and not security best practises - but just be aware this isn't one.
Download both of these files, and extract the archives. Then, for each of the two directories with certificates, run the following command to add them to the client:
# For the University of Amsterdam
brane certs add ./ca.pem ./client-id.pem --domain uva
# For SURF
brane certs add ./ca.pem ./client-id.pem --domain surf
Unfortunately, there is a problem with certificate generation that does not properly annotate the domains in the certificates which causes the warnings to appear. However, this is not an issue, since the certificates are still signed with the private keys of the domains, and thus still provide reliable authentication.
After they are added, you can verify they exist with:
brane certs list

You are now ready to run your workflow online!
The final step
With an instance and certificates setup, and the proper instance selected, you can then run your workflow on the target instance. Normally, you would have to push your package to the instance (brane push <package name>) and make sure that the required datasets are available (this can only be done by the domain's administrators). However, for the tutorial, both of these steps have already been done a-priori.
Thus, all is left for you to execute your workflow remotely. Do so by running:
brane run <PATH_TO_WORKFLOW> --remote
You might note this is exactly the same command as to run it locally, save for the additional --remote flag. Subsequently, your output should also be roughly the same:
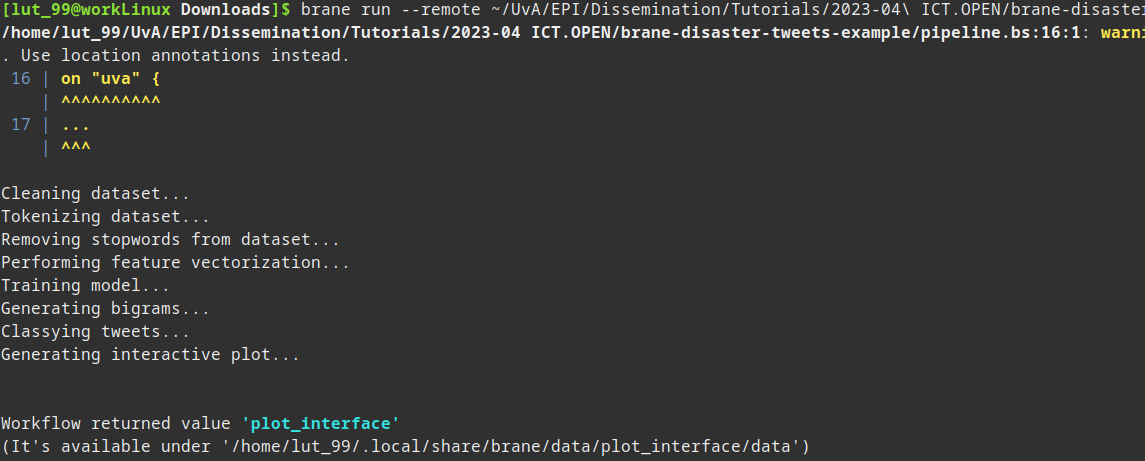
In the final step, the part with Workflow returned value..., the dataset is downloaded to your local machine. This means it is available in a similar manner as for local datasets, except it has now been executed remotely.
--debugflag, you might see that the final result is actually downloaded from a different location than where you executed the workflow. This is because the resulting dataset is available on both sites (under the same identifier), and because the on-struct only affects tasks, not the builtincommit_result-function. Whether this has to be changed in the future remains to be seen, but just repeat the execution of your workflow a few times to also see the download from the other location.
Conclusion
Congratulations! You have now written a more complex workflow for a more complex package, and successfully ran it online. Hopefully, you find the framework (relatively) easy to work with, and enjoyed the experience of getting to know it!
If you still have time left, take the opportunity to play around and ask questions. You can select various topics in the sidebar to the left of this wiki page to find more explanations about the framework. Especially the topics on BraneScript might be interesting, to learn about more possibilities that can be done with the workflow language.
Note, however, that the wiki is still incomplete and unpolished, like the framework itself. If you want to know anything, however, feel free to ask it to the tutorial hosts!